how to fix wifi on laptop when it says limited

Title: How To Fix Limited WiFi Connection On Windows 1087 Fix Limited WiFi Connection Error
Channel: MK TECH
How To Fix Limited WiFi Connection On Windows 1087 Fix Limited WiFi Connection Error by MK TECH
WiFi Says Limited? This ONE Trick Fixes It INSTANTLY!
Struggling with "Limited" WiFi? This Secret Weapon Will Change Everything!
Have you ever felt the digital world grind to a halt? That infuriating “Limited” message taunting you from your WiFi icon. It stops your streaming, kills your gameplay and frustrates even the most patient of us. But, don't despair! There's a game-changing secret that often goes unnoticed. Prepare to banish that pesky "Limited" status. Let's get your WiFi back in fighting form.
Understanding the WiFi Wasteland: Why "Limited" Happens
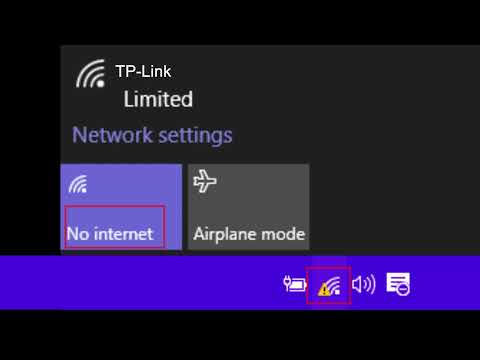
First, let's dissect this digital drama. What exactly does "Limited" mean? Essentially, your device can’t fully connect to the internet. It sees the WiFi network, however, it cannot communicate with it properly. This is a common problem, and therefore, there's a solution! This could be down to a multitude of reasons. But thankfully, the fix is usually quite simple. So, ditch the tech frustration.
The Magic Bullet: Rebooting Your Router (Yes, Really!)
Often, the solution is simpler than you think. It's the oldest trick in the book, and it often works wonders. We're talking about the good old router reboot. It's like giving your WiFi a digital reset button. Moreover, it clears up any temporary glitches or conflicts.
Here’s the deal: Locate your router. Unplug it from the power source. Wait for a full 30 seconds. Then, plug it back in. Let the router fully power up. Give it a couple of minutes to get back online. Now, check your WiFi connection. In many cases, the "Limited" message will disappear. You should be back in business!
Beyond the Reboot: Digging a Little Deeper
Sometimes, rebooting isn't enough. That "Limited" message might stubbornly linger. Don’t worry; we've got further tactics. There are other potential culprits that we need to address. Consider these additional troubleshooting steps.
Checking Your Device's IP Address
Your device needs a unique IP address to connect. So, confirm your device has obtained one. Sometimes, the IP address assigned by your router might be incorrect. Therefore, check your device’s network settings. Your device should automatically connect to your router. If this isn't working, it's time for some tweaking.
Renewing Your IP Address (The Easy Fix)
Renewing your IP address is often the key. This forces your device to request a new address. This action will clear up any conflict. Here’s how to do it on most devices:
- Windows: Search for "cmd" and open the Command Prompt. Type "ipconfig /release" and press Enter. Then, type "ipconfig /renew" and press Enter.
- Mac: Open System Preferences, go to Network, select your WiFi connection, and click "Advanced." Click the "TCP/IP" tab and click "Renew DHCP Lease."
- Smartphones/Tablets: Usually, toggling the WiFi off and then on again will refresh the IP. You may need to "Forget" the network and reconnect.
Investigating Your Router's Settings
Sometimes, the issue lies within your router's settings. Hence, let's check them out. Open your router's configuration page. You can usually access this by typing your router’s IP address in your browser. (Check your router’s manual for this). Make sure DHCP is enabled. This is the protocol that assigns IP addresses. Also, make sure the router isn't blocking your device.
The Wireless Interference Factor: Clearing the Airwaves
WiFi signals travel through the air. Sadly, other devices can cause interference. Consider these interfering obstacles: Bluetooth devices, microwaves, and even other WiFi networks. Thus, try to minimize interference. Ensure your router is in an open space. Reduce the number of devices connected and check your router’s channel settings.
The Nuclear Option (If All Else Fails)
Still stuck? It's time to bring out the big guns. Consider a factory reset of your router. This erases all custom settings. You'll need to reconfigure your WiFi. But it can often resolve persistent issues. Be very sure this is what you need. Have your router's default username and password ready.
Preventive Measures: Keeping Your WiFi Healthy
Prevention is better than cure. Therefore, here are some tips to keep your WiFi in tip-top shape. Regularly update your router's firmware. This often contains bug fixes and security patches. Position your router in a central, elevated location. Avoid placing it near walls or metal objects. This allows the signal to disperse. Keep your security up to date. Regularly change your WiFi password.
Celebrating Your Victory: Back Online and Ready to Roll!
So, there you have it. You now possess the knowledge to conquer the "Limited" WiFi monster. You’re empowered to take back control of your digital life. Implement these tricks. You'll be streaming, gaming, and browsing with ease. Now, go forth and enjoy a seamless internet experience. Happy surfing!
Unlock Your Toshiba's WiFi NOW! (Windows 8 Secret Trick)Alright, let's dive into the frustrating world of Wi-Fi woes! Because, let's be honest, there's nothing more infuriating than your internet connection deciding to take a vacation just when you need it most. So, you stare at your screen, that dreaded "Limited" message glaring back at you. It's like your computer is gasping for air, clinging to the last vestiges of a signal. But fear not, my friends! We've all been there, and we've found the trick. And spoiler alert: it's probably simpler than you think.
WiFi Says Limited? This ONE Trick Fixes It INSTANTLY!
We're talking about a solution so effective, so quick, that it'll make you do a little happy dance (or at least silently breathe a sigh of relief). Ready to banish the "Limited" connection forever? Let's get started!
1. The Dreaded "Limited" Connection: A Familiar Foe
Ah, the "Limited" connection. It's the digital equivalent of a flat tire on the information superhighway. You think you're going places, but you're actually stuck, spinning your wheels. This message often pops up when your computer can't properly communicate with your router, like a bad translator struggling to get the message across. It’s a signal that something isn’t clicking, a glitch in the matrix of your digital life. More often than not, especially in the modern age, this issue is tied to Dynamic Host Configuration Protocol (DHCP) and its inability to find an IP address.
2. Why Does This Digital Headache Even Happen?
So, what causes this internet hiccup? The reasons are as varied as the channels on your streaming service. Here are a few common culprits:
- IP Address Conflicts: Your devices might be "fighting" over the same IP address, like siblings squabbling over the last slice of pizza.
- Router Glitches: Your router, the unsung hero of your home network, might be temporarily frozen, needing a little reset.
- Driver Issues: Outdated or corrupted network adapter drivers on your computer can prevent it from properly communicating with the router.
- Interference: Other devices, like microwaves or cordless phones, can sometimes interfere with your Wi-Fi signal, disrupting the flow of data.
- Misconfigured Settings: A setting might be a bit off on your device, or the router, leading to the restricted connection issue.
3. The ONE Trick: Restarting Your Network Adapter – The Key!
Drumroll, please… the secret weapon, the one trick that often works wonders is: restarting your network adapter. This is akin to giving your computer's network connection a fresh start, like rebooting your brain after a long day. It forces your computer to re-establish the connection with your router, often resolving the underlying issue.
4. Step-by-Step: How to Restart Your Network Adapter (Windows)
For Windows users, here's how you do it:
- Open Device Manager: Press the Windows key, type "Device Manager," and hit Enter.
- Expand Network Adapters: Click on the arrow next to "Network adapters" to expand the list.
- Find Your Adapter: Locate your Wi-Fi adapter (it usually has "Wireless" or "Wi-Fi" in its name).
- Disable: Right-click on your Wi-Fi adapter and select "Disable device." Wait a few seconds.
- Enable: Right-click on the same adapter again and select "Enable device."
- Check Your Connection: Your computer will now try to reconnect to the network. Check if the "Limited" message is gone. If that connection is good, you may be back on the internet freeway in no time.
5. Step-by-Step: How to Restart Your Network Adapter (Mac)
Mac users, it's your turn. Here’s how to approach restarting your network adapter:
- Open System Preferences: Click on the Apple icon in the top-left corner of your screen and select "System Preferences." (Or it might be called "System Settings" depending on your version of macOS)
- Go to Network: Click on "Network."
- Select Your Wi-Fi: In the list on the left, select your Wi-Fi connection.
- Turn Wi-Fi Off: At that point, click "Turn Wi-Fi Off." Wait briefly.
- Turn Wi-Fi On: Then, click "Turn Wi-Fi On."
- Reconnect: Your Mac will automatically try to reconnect to your Wi-Fi network. Again, you can check to see if the connection is restored.
6. The Power of a Simple Reboot
This single trick gives your network adapter a fresh start, resolving many of the issues that cause the "Limited" message to appear. Think of it like hitting the reset button on your computer, giving it a kick so it can start anew.
7. When Restarting Isn't Enough: Further Troubleshooting
If restarting your network adapter doesn't do the trick, don't despair! It's time to dig a little deeper.
- Restart Your Router: Sometimes, the issue lies with the router itself. Unplug it, wait 30 seconds, and plug it back in.
- Check Your Router's Settings: Make sure your router is broadcasting the Wi-Fi signal properly.
- Update Your Drivers: Ensure your network adapter drivers are up-to-date. You can usually do this through Device Manager (Windows) or by checking for updates on your Mac.
- Run the Network Troubleshooter: Both Windows and macOS have built-in troubleshooters. Try running them; they might identify and fix the problem.
8. Unveiling the Hidden World of IP Addresses
Now, let's get a little nerdy. (Just a little, I promise!) The "Limited" connection often stems from problems with obtaining an IP address. Your IP address is like your home address on the internet. Without it, your computer can't find its way to the internet.
9. DHCP vs. Static IP: Understanding the Basics
Your router usually assigns IP addresses automatically (using DHCP, or Dynamic Host Configuration Protocol). Sometimes, however, you might need to manually assign a static IP address. This can fix issues if the DHCP server is malfunctioning. But be cautious; this can sometimes lead to further complications if not done correctly.
10. Interference: The Invisible Enemy
Remember those annoying interference sources? Microwaves, cordless phones, and even other Wi-Fi networks can all contribute to your woes. Try moving your router to a different location or changing the Wi-Fi channel it's using.
11. Security Considerations: Is Your Network Secure?
Keeping your Wi-Fi network secure is crucial. Use a strong password and enable WPA2 or WPA3 encryption to protect your data from prying eyes.
12. The Importance of a Strong Wi-Fi Signal
A weak Wi-Fi signal can also lead to a "Limited" connection. Ensure your router is placed in a central location and that there are no physical obstructions (like walls) blocking the signal.
13. Speed Tests: Measuring Your Internet Performance
Once you've fixed the "Limited" connection, run a speed test to check your internet performance. This will let you see if you're getting the speeds you're paying for.
14. When All Else Fails: Calling for Reinforcements
If you've tried everything and still can't get rid of that pesky "Limited" message, it's time to call in the professionals:
- Your Internet Service Provider (ISP): They can check for issues on their end.
- A Tech-Savvy Friend: A helping hand from someone who understands networks can work wonders.
15. The Ultimate Victory: Back to Smooth Sailing!
Once you conquer this problem, rejoice! You are back on the digital highway and can connect to the world. Now, enjoy the ride!
Closing Segment
So, there you have it! The one trick that often saves the day when your Wi-Fi decides to be uncooperative. Remember, restarting your network adapter is usually the first step, a simple yet powerful tool. But don't be afraid to dig deeper if the problem persists. With a little troubleshooting, you can banish the "Limited" connection and get back to enjoying your online experience. We hope this guide has been helpful and that you're now internet-ready. Now go forth and conquer!
Frequently Asked Questions (FAQs)
Why am I getting the "Limited" connection message?
- The "Limited" connection can be caused by several issues, including IP address conflicts, router glitches, outdated drivers, and interference.
What's the easiest way to fix a "Limited" connection?
- The easiest way is often to restart your network adapter. In Windows, you do this through Device Manager. On a Mac, you can disconnect and reconnect your Wi-Fi.
What if restarting my network adapter doesn't work?
- Try restarting your router, updating your network adapter drivers, and running the network troubleshooter.
**How can I
how to fix limited wifi connection on windows 8-how to fix limited wifi connection on windows 8.1

By Theta Box how to fix limited wifi connection on windows 8-how to fix limited wifi connection on windows 8.1 by Theta Box
How to fix Limited WIFI connection on windows on Windows 1087 Limited WIFI Connection Fix
By Tutorial 4You How to fix Limited WIFI connection on windows on Windows 1087 Limited WIFI Connection Fix by Tutorial 4You
How to fix limited access wifi windows 7

By IT Magics How to fix limited access wifi windows 7 by IT Magics

Title: cara jitu mengatasi koneksi wifi limited pada laptop
Channel: dhidick
cara jitu mengatasi koneksi wifi limited pada laptop by dhidick
Wifi On Laptop
WiFi Says Limited? Conquer Connectivity Constraints with This Instantaneous Solution!
The digital world hinges on seamless connectivity. A robust WiFi signal is no longer a luxury; it's an absolute necessity. When your device announces the dreaded "Limited" status, a cascade of frustration often ensues, severing your vital links to work, communication, and entertainment. We've all been there. But what if we told you that resolving this often-encountered problem isn't a complex ordeal? We're unveiling a potent, remarkably simple technique capable of banishing "Limited" WiFi limitations and restoring your digital freedom, instantly.
Understanding the Elusive "Limited" Connection
Before we delve into the solution, let's briefly unravel the meaning behind this frustrating message. The "Limited" status isn't simply a synonym for "no internet." Instead, it signifies a communication breakdown between your device and the network, signaling an inability to fully connect and access online resources. It indicates that your device can "see" the WiFi network, establishing a preliminary connection. However, it's subsequently unable to obtain a valid IP address, a crucial element enabling data transfer. This is the core of the problem. A limited connection demonstrates that something is obstructing the handshake between your device and the router.
The Immediate Fix: A Powerful IP Address Renewal
The most direct and consistently effective remedy resides in forcibly renewing your device's IP address. Your IP address is equivalent to your home address on the internet. It identifies your device within your local network and as it goes out to the internet. When this address falters, you face connection limitations. The beauty of this solution lies in its simplicity and speed. It's a process that can be performed on any device, regardless of its operating system.
For Windows Users: The Command Prompt Route
Windows users can harness the power of the Command Prompt to effortlessly renew their IP address. Here’s a step-by-step approach:
Open Command Prompt: Click the Start button, type "cmd" in the search bar, and press Enter. Alternatively, you can right-click the Start button for a shortcut.
Release the Existing IP: Type
ipconfig /releaseand press Enter. This command forcefully releases your current IP address, effectively severing the connection. A series of lines will appear, confirming the release.Renew the IP Address: Type
ipconfig /renewand press Enter. This action requests a new IP address from your router. The system will reestablish the connection, assigning a fresh IP address. Once this step is completed, you should be reconnected and functional.Flush DNS Resolver Cache: Though this step may not always be needed, it's a good practice. Type
ipconfig /flushdnsand press Enter. This clears the DNS cache, helping to resolve any lingering connection issues.Test Your Connection: Open your web browser and attempt to access a website. Your internet service should be fully restored.
For macOS Users: The Network Preference Panel Approach
Apple's macOS provides a streamlined method through its Network preference panel:
Access System Preferences: Click the Apple icon in the top-left corner of your screen, and select "System Preferences."
Navigate to Network: Select the "Network" icon.
Choose your WiFi connection: Select your WiFi connection in the left panel.
Advanced Settings: Click the "Advanced" button at the bottom-right of the window.
Renew DHCP Lease: Click on the "TCP/IP" tab. Click "Renew DHCP Lease." This action ensures your device obtains a fresh IP address.
Apply Changes: Click "OK" and then "Apply" to save your settings. Your connection should then be reestablished.
Test your Connection: Open your web browser and attempt to access a website.
For Android and iOS Devices: A Simplified Restart
Android and iOS devices offer an equally straightforward approach:
Toggle WiFi Off: Navigate to your device's settings (usually by swiping down from the top of the screen on Android or swiping up from the bottom on iOS) and turn off WiFi.
Wait Briefly: Allow approximately 10-15 seconds to pass.
Toggle WiFi On: Turn WiFi back on. The device will attempt to reconnect to the network, typically obtaining a new IP address.
Test Your Connection: Open your web browser and attempt to access a website.
Beyond the Immediate Fix: Troubleshooting Deeper Issues
While renewing your IP address presents a quick fix, it's critical to acknowledge that the “Limited” status can stem from more complicated issues. If the preceding solution proves ineffective, consider these additional troubleshooting steps.
Router Reboot: A First Line of Defense
Often, the issue resides not within your device but with the router itself. Rebooting the router is a simple yet potent step that can clear temporary glitches or errors. To achieve this:
Unplug the Router: Disconnect your router from its power source.
Wait: Allow approximately 30-60 seconds for the router to fully discharge.
Plug in the Router: Reconnect the router to the power source.
Allow Booting: Allow the router to fully boot up, which may take a few minutes.
Reconnect and Test: Reconnect your device to the WiFi and test your connection.
Check for Interference: Environmental Factors
WiFi signals are vulnerable to interference from other electronic devices. Microwaves, cordless phones, and even certain types of building materials can obstruct your signal. To combat interference:
Relocate the Router: Place your router in a central location, away from walls and obstructions.
Change the Channel: Most routers allow you to select a different WiFi channel. Some channels may experience less interference than others. In your router's settings, look for the wireless settings and find the "channel" option. Experiment with different channels.
Reduce Proximity to Other Devices: Keep your router away from appliances that emit radio waves.
Confirm the Correct WiFi Password
An incorrect WiFi password is a common source of connection problems. Double-check that you’re entering the correct password for your WiFi network on your device, making certain to avoid common input errors such as typos.
Consider Router Firmware Updates
Outdated router firmware can lead to instability and connection issues. Check your router manufacturer's website for firmware updates and install them.
Investigate IP Conflicts
Rarely, two or more devices on your network may have the same IP address, leading to conflicts. These instances are usually found in setups where static IP addresses are configured manually. To address this, access your router's settings and check for, and resolve, any IP address conflicts.
When to Seek External Assistance
If you've exhausted all the above troubleshooting steps without success, it may be time to seek professional help. Contact your internet service provider (ISP) to investigate potential network issues, or consult a qualified IT technician to explore the possibility of hardware malfunctions.
Concluding Thoughts: Connectivity as a Cornerstone
A consistent, reliable WiFi connection is inseparable from the modern digital experience. The "WiFi says Limited" message is not necessarily a herald of doom. Instead, it's often a temporary setback easily overcome. The command-line IP renewal, coupled with other described steps, is your effective remedy. Implementing these straightforward solutions empowers you to reclaim your digital freedom and secure your continuous access to the online world. Don't let a "Limited" connection limit your productivity, communication, or entertainment. Restore your digital connection, instantly, and embrace the boundless possibilities of the internet.
