how to change windows 7 laptop into wifi hotspot
Title: Turn your Windows 7 Laptop into a Wi-Fi Hotspot or Repeater
Channel: Len Farneth
Turn your Windows 7 Laptop into a Wi-Fi Hotspot or Repeater by Len Farneth
Turn Your Windows 7 Laptop into a WiFi Hotspot: The Easiest Trick EVER!
Unleash Your Inner WiFi Wizard: Transforming Your Windows 7 Laptop into a Hotspot That Actually Works!
Do you ever feel tethered to the digital world, desperately seeking a WiFi signal? Have you ever wished you could share your internet connection with your other devices? Well, prepare to ditch those frustrations. Because, today, we're going to explore a remarkably simple solution. We are going to turn your faithful Windows 7 laptop into a fully functional WiFi hotspot. It's easier than you think. Trust me.
Bypassing the WiFi Wilderness: Why This Matters
Let's be frank. The absence of readily available internet access is a modern-day tragedy. Imagine this: You're on a train, miles from civilization, and your phone's data is stubbornly refusing to cooperate. Or perhaps you're in a hotel with notoriously unreliable WiFi. Then, the magic happens. Your Windows 7 laptop swoops in, your personal internet savior. It acts as a bridge, extending your wired or cellular connection to other devices nearby. This is your key to digital freedom. This is what we're aiming for.
The Secret Weapon: Ad-hoc vs. HostedNetwork (And Why the Latter Wins)
You may have stumbled upon various tutorials elsewhere. They might mention "ad-hoc" networks. However, we're going to take a different, and more efficient, route. Instead, we'll use the "HostedNetwork" feature. This method provides a more stable and secure connection. Plus, it's designed for sharing your internet with multiple devices. The implications here are significant.
Step-by-Step to WiFi Nirvana: A Simple Guide
Alright, are you ready to get started? Pull up a chair and let's begin.
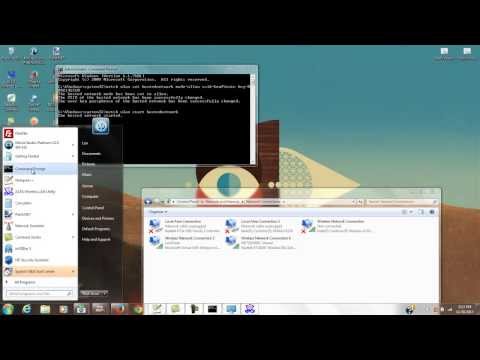
- Step 1: The Command Prompt Command: Launch the Command Prompt. You'll want to do this as an administrator. You can usually find it by searching in your start menu. Right-click and select "Run as administrator".
- Step 2: The Magic Words: Your next step involves typing a specific command into the Command Prompt. Don't worry; it's straightforward. Type the following command and hit Enter:
netsh wlan set hostednetwork mode=allow ssid=[YourHotspotName] key=[YourPassword]. Make sure to replace[YourHotspotName]with the name you want for your WiFi network. Also, change[YourPassword]to a secure password you'll remember. - Step 3: Activating the Hotspot: Now, you need to start the hosted network. Enter this command:
netsh wlan start hostednetwork. If all goes well, you should see a confirmation message. Hooray! - Step 4: Sharing the Internet: This step is crucial. Go to the Network and Sharing Center. You can typically find this by right-clicking the network icon in your system tray. Next, locate your internet connection (the one you're using to get online). Right-click on it. Select "Properties". Click the "Sharing" tab. Check the box that says "Allow other network users to connect through this computer's Internet connection." You will then select the hosted network you just created from the dropdown list. If you have followed all the commands correctly, you are almost there!
Troubleshooting: The Little Glitches and How to Annihilate Them
Let's face it. Not everything works perfectly the first time. Sometimes, gremlins get in the way. So, let's cover some common hiccups and how to resolve them.
- "Hosted network could not be started": This often means your Wireless LAN adapter drivers need updating. Go to Device Manager (search for it in the start menu), expand "Network adapters," right-click your wireless adapter, and select "Update driver."
- Devices Can’t Connect: Double-check your password. Also, confirm your internet connection is shared correctly. Revisit the Network and Sharing Center. Sometimes, even a reboot can work wonders.
- Slow Speeds: Your laptop's WiFi card might be the bottleneck. Consider upgrading to a faster one if possible. Also, location matters. Move closer to the laptop for a stronger signal. However, this is rarely a problem.
Beyond the Basics: Expanding Your WiFi Horizon
Once you've mastered the basics, you can fine-tune your hotspot. You can change the security settings (WPA2 is generally recommended for security). You can also limit the number of devices that can connect. Customizing the settings can enhance the experience. Doing so improves security.
The Grand Finale: Embracing Your WiFi Power
Congratulations! You've successfully transformed your Windows 7 laptop into a WiFi hotspot. You now have the power to share your internet connection with any wireless-enabled device. This is the ultimate digital freedom. It’s a skill that will serve you well in countless situations. Therefore, embrace your new WiFi wizardry. Share the knowledge. And never again fear the WiFi wilderness. Because now, you are the WiFi.
Laptop WiFi Setup: The SHOCKINGLY Easy Guide (No Tech Skills Needed!)Turn Your Windows 7 Laptop into a WiFi Hotspot: The Easiest Trick EVER!
Hey there, tech enthusiasts and fellow internet wanderers! Ever been in a pickle where your Wi-Fi signal is weaker than a kitten's meow? Or perhaps you're stuck on a road trip and your phone's data plan is crying for mercy? Well, buckle up, because we're about to unlock a super-secret, almost magical power that turns your trusty Windows 7 laptop into a personal Wi-Fi hotspot. And trust me, it's easier than making instant ramen!
1. The Wi-Fi Wilderness: Why Create a Hotspot in the First Place?
Let's be honest, we've all been there. That maddening moment when you’re desperate for a connection. Maybe you're in a hotel with a ridiculously expensive Wi-Fi plan, or your tablet is begging for internet access, or perhaps your phone's tethering feature is just… well, unreliable. That's where your Windows 7 laptop, our hero of the day, steps in. Think of it as your personal internet concierge, ready to beam Wi-Fi signals to your other devices. It’s like having a portable party – but the only guest is the internet, and everyone's invited!
2. Setting the Stage: What You'll Need (Spoiler Alert: Not Much!)
Good news! You don’t need to sell a kidney for fancy software or hardware. All you need is:
- A Windows 7 Laptop: Yep, that's the star of our show.
- An Active Internet Connection: Ideally, this would be an Ethernet connection (the wired one). Alternatively, a working Wi-Fi connection on your laptop will also work, but it's a bit like using the same hose to water your garden and fill your pool – it's possible, but you'll have less overall bandwidth.
- Patience (Just a Little Bit): We're going to make it easy, but even the smoothest road can have a few bumps.
3. The Secret Weapon: The Hosted Network Feature
Windows 7 actually has a built-in feature designed specifically for this. It's called the "Hosted Network," and it's the key to our Wi-Fi hotspot kingdom. Think of it as the secret ingredient in a delicious recipe – without it, you're just making a mess.
4. Summoning the Magic: Activating the Hosted Network (The Command Prompt Wizardry)
Alright, let's get down to business! This part might sound intimidating, but I promise you, it's not. We're going to use the Command Prompt, the digital equivalent of a spell book.
Open the Command Prompt: Click on the Start button, type "cmd" in the search bar, and then right-click on "Command Prompt" and choose "Run as administrator." This is important because we need administrative privileges to work this magic. It's like needing a key to open a secret door.
The Enchantment: In the Command Prompt window, type the following commands one by one, pressing Enter after each. Make sure you type them exactly as written, or the spell won’t work!
netsh wlan set hostednetwork mode=allow ssid="YourHotspotName" key="YourPassword"- Replace
"YourHotspotName"with the name you want for your Wi-Fi hotspot. Choose something catchy, maybe something that reflects your personality. Mine would be "TheWiFiWanderer'sLair". - Replace
"YourPassword"with a strong password. This is crucial for security. Use a mix of uppercase and lowercase letters, numbers, and symbols. Imagine your Wi-Fi is like your front door; you wouldn’t leave it unlocked, would you?
- Replace
netsh wlan start hostednetwork
Success! You should see a message confirming the hosted network has started. If you get an error, double-check that you typed the commands correctly and that you ran the Command Prompt as an administrator.
5. Sharing the Connection: The Internet Connection Sharing Dance
Okay, we’ve created the hotspot, but right now, it's just a ghost! We need it to borrow its Wi-Fi from another source. This is where we ‘share’ the internet connection.
- Open Network and Sharing Center: Click on the Start button, then click on "Control Panel," then "Network and Internet," and finally, "Network and Sharing Center."
- Change Adapter Settings: In the left panel, click on "Change adapter settings." You'll see a list of your network connections. Look for your "Wi-Fi" or "Ethernet" connection that's currently connected to the internet.
- The Sharing is Caring: Right-click on the connection you're using to access the internet (e.g., your Wi-Fi or Ethernet) and select "Properties."
- The Sharing Tab: Click on the "Sharing" tab.
- Allow Other Network Users to Connect: Check the box that says "Allow other network users to connect through this computer's Internet connection."
- Select Your Hosted Network: In the "Home networking connection" dropdown menu, select the name of your hosted network; the virtual adapter you created through the Command Prompt. It will probably have a name like "Microsoft Hosted Network Virtual Adapter."
- Click OK: And close all windows.
6. The Grand Unveiling: Connecting Your Devices
Now comes the fun part! Grab your phone, tablet, or any other Wi-Fi enabled gadget.
- Scan for Networks: Go to your device's Wi-Fi settings and scan for available networks.
- Find Your Hotspot: Look for the name you gave your hotspot (the "YourHotspotName" from Step 4).
- Enter Your Password: Enter the password you created.
- Connect and Conquer! Your device should now be connected to the internet via your Windows 7 laptop! You've successfully conjured Wi-Fi from thin air!
7. Troubleshooting Troubles: When Things Go Awry
Sometimes, things don’t go as planned. Here's a quick troubleshooting guide:
- Can't See the Hotspot: Make sure the hosted network is started (step 4). Double-check the Command Prompt to ensure it says "Hosted network started." Also, make sure your computer’s Wi-Fi adapter is enabled.
- Can Connect, But No Internet: This usually means there is a problem with the internet connection sharing (step 5) or your internet. Double-check the sharing settings and make sure you've selected the correct connections. Also, make sure your laptop actually has internet access from a wired or wireless connection.
- Slow Speeds: Speed can be influenced by your laptop's Wi-Fi adapter and internet speed. Consider using an Ethernet connection for your laptop to provide a more stable connection.
8. The Art of the Shutdown: Stopping the Hotspot
When you're done using your hotspot, you want to stop it so you can conserve battery life and protect security. Here's how:
- Open Command Prompt (as administrator): Just like before.
- The Deactivation Spell: Type
netsh wlan stop hostednetworkand press Enter.
9. Is It Safe? Security & Your Wi-Fi Fortress
Absolutely! But security is important. Your hotspot is only as secure as your password. A strong password and keeping your laptop's operating system and security software up-to-date are your best bets for ensuring a safe connection.
10. Beyond the Basics: Advanced Customization
Want to dive deeper? You can adjust the channel your hotspot uses (to avoid interference from other Wi-Fi networks) or limit the number of devices that can connect. But for the basics, the steps we’ve described are enough!
11. Comparing Apples and Oranges: Hosted Network vs. Tethering
Your phone's tethering function is similar, but there are advantages to using your laptop's hosted network. Your laptop typically has a stronger Wi-Fi signal and a larger battery, so it can serve more connected devices for longer.
12. Embracing the Power: When to Use Your Wi-Fi Hotspot
Think about all the times you might need a personal hotspot. Road trips? Absolutely. A busy coffee shop where the public Wi-Fi is sketchy? You bet. Maybe you have an internet-less device that needs to be updated? This tool has a myriad of uses!
13. The Power of Sharing: Sharing the Love of the Internet
Your laptop's Wi-Fi hotspot isn't just about convenience; it's about sharing. Share with friends, family, or even colleagues in a pinch. It's a modern act of digital generosity.
14. Keeping it Alive: Maintaining a Healthy Hotspot
Your hotspot’s health depends on your laptop’s. Keep it updated, keep an eye on its battery life, and keep it away from extreme temperatures.
15. The Wrap-Up: You're Now a Wi-Fi Wizard!
And there you have it! You
Steal Your Neighbor's Wi-Fi Password (It's Easier Than You Think!)Turn Your Windows 7 Laptop into a WiFi Hotspot

By AvoidErrors Turn Your Windows 7 Laptop into a WiFi Hotspot by AvoidErrors
How to Create a WiFi Hotspot with Windows 7

By 1stepatatime How to Create a WiFi Hotspot with Windows 7 by 1stepatatime
How to Turn Your Windows 7 Laptop Into WiFi Hotspot

By TechNet Guide How to Turn Your Windows 7 Laptop Into WiFi Hotspot by TechNet Guide
Title: Turn Your Windows 7 Laptop into a WiFi Hotspot 2
Channel: AvoidErrors
Turn Your Windows 7 Laptop into a WiFi Hotspot 2 by AvoidErrors
Laptop Wifi Hotspot
Turn Your Windows 7 Laptop into a WiFi Hotspot: The Easiest Trick EVER!
The digital landscape hums with the constant need for connectivity. Whether you are tethered to a static desk or roam freely, the demand for a reliable internet connection is paramount. Imagine yourself in a scenario where your primary internet source is inaccessible. Perhaps your home Wi-Fi is down, you're in a location with no open networks, or you're struggling with the limited connectivity of public Wi-Fi spots. Do you have a mobile device, or other devices that require an internet connection? There’s no need to panic. Your Windows 7 laptop, that workhorse of the early 21st century, holds a secret capability: it can transform into a WiFi hotspot, effectively turning itself into a mobile router. This elegant solution allows you to share your laptop’s internet connection with other devices, providing a vital lifeline in diverse situations.
The Magic of the Hosted Network: A Windows 7 Revelation
Windows 7, despite its age, incorporates a powerful feature known as the "Hosted Network." This allows your laptop to broadcast a Wi-Fi signal, sharing its internet connection with devices within range. The beauty of this feature lies in its simplicity—once configured, it's surprisingly straightforward to use. This method utilizes the built-in capabilities of your laptop’s wireless network adapter, eliminating the need for additional software. It is a native function of the operating system designed for ease of use.
Preparation is Key: Laying the Groundwork
Before you begin, ensure a few preliminary steps are taken. First, your Windows 7 laptop must have a functional wireless network adapter. This is the hardware responsible for sending and receiving Wi-Fi signals. Virtually all laptops ship with an embedded wireless adapter, but it is crucial to confirm its operational status. Second, ascertain that your laptop is connected to the internet via either an Ethernet cable (wired connection) or another Wi-Fi network. The hosted network will share the active internet connection; without it, you are left with a hotspot that isn't going anywhere.
Decoding the Command Prompt: The Gateway to Your Hotspot
The process of setting up the hotspot involves using the Command Prompt, a powerful tool that allows low-level interaction with your operating system. Do not be intimidated; the commands are simple and designed for practical use.
Step 1: Launching with Administrator Privileges:
To wield the full power of the Command Prompt, open it with administrator privileges. You can find the Command Prompt by typing "cmd" into the Start menu search bar. Right-click on the Command Prompt icon and select "Run as administrator." This is essential, allowing you to modify network settings.
Step 2: Unveiling the Adapter Secrets:
Once the Command Prompt window opens, type the following command and press Enter:
netsh wlan show driversThis command will display information about your wireless network adapter, including its capabilities. Specifically, look for the line labeled "Hosted network supported." If it says "Yes," your adapter is ready. If it says "No," it may indicate a hardware incompatibility, or out-of-date drivers which are likely not an obstacle.
Step 3: Activating the Hosted Network: Crafting Your Virtual Router
With the hosted network confirmed to be supported, it is time to create your virtual router. Execute the following commands one by one, pressing Enter after each:
netsh wlan set hostednetwork mode=allow ssid=YourHotspotName key=YourPasswordReplace "YourHotspotName" with the desired name for your Wi-Fi network (the SSID) and "YourPassword" with a strong password. The SSID is what others will see when searching for available Wi-Fi networks. The password secures your hotspot, preventing unauthorized access. Use a mixture of uppercase and lowercase letters, numbers, and symbols for the most reliable security.
netsh wlan start hostednetworkThis command activates your hosted network. Your laptop is now broadcasting a Wi-Fi signal.
Sharing Your Internet Connection: Bridging the Digital Divide
The hosted network is active but not yet sharing your internet connection. The final step involves configuring your internet connection to be shared with the hosted network.
Accessing Network Connections:
Open the "Network Connections" window. You can access this by searching for “Network Connections” in the Start menu, or by navigating to the Network and Sharing Center and clicking “Change adapter settings”.
Identifying Your Primary Connection:
Identify the connection you are sharing (either the Ethernet connection or the active Wi-Fi connection). It will usually be named “Local Area Connection” if using wired internet, or the name of your connected Wi-Fi network.
Sharing Properties:
Right-click on the connection you are sharing and select "Properties".
Enable Sharing:
Navigate to the "Sharing" tab within the properties window. Check the box that says "Allow other network users to connect through this computer's internet connection."
Selecting the Hosted Network:
In the dropdown menu under "Home networking connection," select the "Microsoft Virtual WiFi Miniport Adapter" or "Wireless Network Connection 2" (the name may vary). This identifies the hosted network you just created.
Confirming Your Settings:
Click "OK" to save your changes. Your laptop is now sharing its internet connection via the hosted network.
Troubleshooting: Addressing Potential Hiccups
While the process is typically smooth, there are potential issues.
- "The hosted network couldn't be started": This often indicates a problem with the drivers for your wireless adapter or a conflict with other network settings. Try updating your wireless adapter drivers through the Device Manager (search for "Device Manager" in the Start menu). You can also try restarting your laptop.
- Other Devices Cannot Connect: Double-check the password you entered when configuring the hosted network. Devices might fail to connect if they do not enter the correct password. Ensure that the SSID is correctly displayed on other devices and that the password is entered precisely as configured. Consider temporarily disabling any firewalls on your laptop for testing purposes, but remember to re-enable them afterward for security.
- Internet Not Working on Connected Devices: Verify that you have correctly enabled internet connection sharing as described in 'Sharing internet Connection' section, and that the hosted network is selected. Double-check your internet connection is active on your laptop.
Maximizing Your Hotspot Experience: Tips and Considerations
- Security: The stronger your password, the safer your hotspot. Never use easily guessable passwords like your birthdate or pet’s name. It is important to remember your own password as this will be used by all devices connecting.
- Bandwidth: The speed of your hotspot depends on your laptop’s internet connection, the wireless adapter’s capabilities, and the number of devices connected. Be mindful of bandwidth-intensive activities (streaming, large downloads) if you are experiencing slow speeds, and avoid them if possible, as this will improve the experience for all users.
- Battery Life: Broadcasting a Wi-Fi signal consumes battery power. Plug your laptop into a power outlet whenever possible when using the hotspot to preserve battery life.
- Range: The range of your hotspot depends on your laptop’s wireless adapter and any physical obstructions. In general, the range is around 30-100 feet, but this can fluctuate.
- Testing: After creating your hosted network and making the configurations, test its functionality on a mobile device to verify that it functions to your expectations.
A Flexible Solution for the Modern World
Turning your Windows 7 laptop into a Wi-Fi hotspot is a simple yet powerful technique. It offers a valuable solution for sharing your internet connection in a variety of settings. Whether you are traveling, working remotely, or simply experiencing an isolated internet outage, this trick ensures you stay connected. By mastering this straightforward process, you gain a valuable skill, transforming your laptop into a portable, personal Wi-Fi router, providing a powerful answer to the evolving demands of a connected world.
