create wifi hotspot on laptop windows 7

Title: How to Create a WiFi Hotspot with Windows 7
Channel: 1stepatatime
How to Create a WiFi Hotspot with Windows 7 by 1stepatatime
Unlock Your Laptop's Hidden WiFi Hotspot: Windows 7 Secret Revealed!
Unveiling the Wireless Oracle: Unleash Your Laptop's Hotspot Power!
Ever wished your laptop could morph into a portable WiFi genie? Well, it can—and the secret isn't locked away in a dusty vault. Windows 7, the operating system many still cherish, whispers a quiet secret: native hotspot functionality. It's a feature frequently overlooked, yet powerful. This article will unveil it. Get ready to transform your laptop into a wireless hub.
Deciphering the Code: What is a SoftAP?
Before we dive in, let’s clarify some jargon. We're discussing a SoftAP. This stands for Software Access Point. Essentially, your laptop will act as the router. It broadcasts its own WiFi signal. Other devices can then connect, sharing your internet connection. SoftAP functionality is often hidden. It's a treasure waiting to be unearthed.
The Prep Work: Getting Ready to Connect
Before you can conjure your wireless magic, some preparation is key. Firstly, ensure you have an active internet connection. This can be wired or wireless. However, it’s more effective to use a physical cable for this setup. Make sure your laptop has a working WiFi adapter. This may sound obvious, but a hardware issue is a common roadblock. Verify the network adapter driver is up to date. Outdated drivers can create connectivity problems.
Cracking the Windows 7 Hotspot Code: The Command Prompt Approach
Now for the exciting bit. Forget complex software downloads. Windows 7 hides its hotspot functionality within its core. We’ll use the Command Prompt. Think of it as a secret entrance.
Open the Command Prompt as Administrator: Click the Start button. Type "cmd" in the search bar. Right-click "Command Prompt" and select "Run as administrator." This is vital.
The Magical Commands: You will run two key commands. First, we share your internet connection. Then, we start your hotspot. Type these commands carefully. Replace
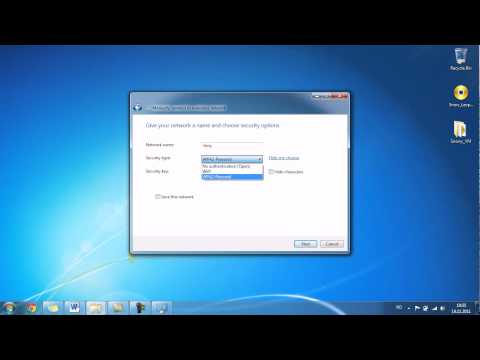
<YourNetworkName>with the name you desire for your wireless network. Furthermore, change<YourPassword>with a password you'll remember! These commands are crucial.netsh wlan set hostednetwork mode=allow ssid="<YourNetworkName>" key="<YourPassword>"netsh wlan start hostednetworkBe cautious and precise. Spelling errors can derail the process entirely.
Verification Check: After entering the commands, check their operation. You should see confirmations of the network created. It shows your WiFi name and the password you selected.
Troubleshooting the Tech Tangles
Sooner or later, you may hit a snag. Don't despair, it's often fixable. Sometimes, the hosted network fails to start. Here are a few steps for troubleshooting.
Driver Issues: As mentioned before, outdated drivers can be the culprit. Update your network adapter driver.
- Network Adapter: Select your network adapter. It's vital for it to work properly.
Firewall Fun: Your firewall could be blocking the hotspot. Temporarily disable your firewall. Then, test your ability to connect again. Re-enable the firewall once you're done.
Restart and Refresh: The simplest solutions often work. Try restarting your laptop. Sometimes, a fresh start is all it takes.
Connecting Your Devices: Spreading the Wireless Joy
Now you've created your hotspot. Your device will broadcast the new WiFi signal. Access the WiFi settings on your phone, tablet, or another laptop. Search for your created network name. Enter your password. Connect, and celebrate! You’ve successfully shared your internet. Sharing is caring.
Going Beyond the Basics: Customizing Your Hotspot
The Windows 7 SoftAP offers further customization options. However, it’s less intuitive. You can delve into these. You can modify the security type. You will need to look into more advanced Command Prompt commands. Also, you can explore third-party software. Explore at your own risk, though.
The Aftermath: Disabling Your Hotspot
When you no longer need your hotspot, it's easy to disable it. You can do this via the Command Prompt. Simply open Command Prompt again as an administrator. Type the following command, and you are done.
netsh wlan stop hostednetwork
Conclusion: Your Laptop, Your Wireless Domain
It's time to recap. You've learned how to activate Windows 7's hidden WiFi feature. Your laptop is now your personal wireless domain. You can now share your internet with your devices. Embrace the freedom to work or play anywhere. Enjoy your new-found wireless freedom! Now go forth, and connect!
Laptop WiFi Nightmare: 0 Signal? FIX IT NOW!Unlock Your Laptop's Hidden WiFi Hotspot: Windows 7 Secret Revealed!
Hey there, tech enthusiasts and fellow internet nomads! Ever been stuck in a situation where you desperately needed an internet connection but all you had was your trusty laptop and that lonely Ethernet cable? Or maybe you've been in a pinch, needing to share your precious internet with a friend's phone or tablet? Well, you're in for a treat! We're diving deep today into a secret – a hidden superpower, if you will – that Windows 7 laptops possessed: the ability to create a Wi-Fi hotspot, right out of the box! Forget fancy software or complicated setups; we're talking about unlocking a feature that's been hiding in plain sight. Think of it like discovering a secret compartment in your favorite old trunk – full of unexpected treasures! Let’s get started!
1. The Nostalgia Factor: Remembering Windows 7
Let's take a quick trip down memory lane, shall we? Windows 7 – ah, the good ol' days! Remember the sleek Aero interface, the intuitive Start menu, and the overall feeling of just working? For many of us, Windows 7 was a defining operating system, a reliable workhorse that got the job done. It was a time before the constant updates, the confusing interfaces, and the seemingly endless barrage of features that sometimes felt more like bloatware. It was simpler, cleaner, and unexpectedly, it held a hidden gem: the ability to turn your laptop into a Wi-Fi hotspot. We think of it like a well-loved teddy bear. It may be a bit worn, but it provides the comfort and familiar reliability you need.
2. Why This Matters: The Unseen Benefits of a Laptop Hotspot
Why is this even relevant, you might ask? Well, the benefits are surprisingly extensive. Think of it as having your own personal Wi-Fi router, wherever you go.
- Sharing the Love: Easily share your wired or existing Wi-Fi connection with multiple devices – your phone, your tablet, your friend's laptop, even that smart TV you've got tucked away!
- Emergency Internet: Stranded without Wi-Fi? Your laptop could be your lifeline, allowing you to connect your devices when they need it most.
- Cost Savings: In some cases, creating a hotspot can save you money, bypassing the need for a dedicated mobile hotspot device or tethering plan. Think of it as a handy trick that you can always carry.
- Convenience: No more juggling multiple Wi-Fi connections or struggling with complex sharing setups. You've got your own personal network at your fingertips.
It’s like having a versatile Swiss Army knife, but for your internet connectivity.
3. Unveiling the Secret Weapon: The Built-in Wireless Hosted Network (WCN)
The magic behind this hidden feature lies in something Windows 7 cleverly baked right in: the Wireless Hosted Network (WCN). It's a virtual adapter that allows your laptop to act as a Wi-Fi access point, broadcasting your internet connection to other devices. It's not a separate program you needed to download; it was just there, ready to go. I still remember the first time I stumbled upon it! It was like finding a secret passage in a castle.
4. Setting Up Your Hidden Hotspot: Step-by-Step Guide
Alright, enough anticipation! Let's get down to the nitty-gritty and get your laptop hotspot up and running. Warning: it's surprisingly easy; trust us.
Step 1: Check Your Wireless Network Adapter: First, you'll need a wireless network adapter. Most laptops have one built-in. To check, open Device Manager (search "Device Manager" in the Start menu). Expand "Network adapters." If you see a wireless adapter listed (like "Intel Wireless-N 7260"), you're good to go!
Step 2: Open the Command Prompt (As Administrator): Search for "cmd" in the Start menu. Right-click on "Command Prompt" and select "Run as administrator." This part is crucial. We have to let the program have a lot of power.
Step 3: Enable the Hosted Network: In the Command Prompt, type the following commands and press Enter after each one:
netsh wlan set hostednetwork mode=allow ssid=YourHotspotName key=YourPassword netsh wlan start hostednetwork- Replace "YourHotspotName" with the name you want for your hotspot (e.g., "MyLaptopWiFi").
- Replace "YourPassword" with a password you'll remember. Make it a strong one! Think of it as locking the door to your private internet connection.
Step 4: Share Your Internet Connection:
- Open "Network and Sharing Center" (search for it in the Start menu).
- Click on "Change adapter settings."
- Right-click on the network connection you're using to connect to the internet (e.g., your Ethernet connection, or your pre-existing Wi-Fi connection).
- Select "Properties."
- Go to the "Sharing" tab.
- Check the box that says "Allow other network users to connect through this computer's Internet connection."
- In the "Home networking connection" dropdown, select the "Microsoft Hosted Network Virtual Adapter" (it might have a funny name).
- Click "OK."
That's it! You are essentially telling your laptop to share the love!
Step 5: Connect Your Devices: On your other devices (phone, tablet, etc.), search for available Wi-Fi networks and connect to the hotspot name you created!
5. Troubleshooting Common Issues: When Things Don't Go Smoothly
Sometimes, even the best-laid plans go awry. Don't worry! Here are some common issues and how to fix them:
- “The hosted network couldn’t be started.” This usually means there's a problem with your wireless adapter drivers. Try updating your drivers, or even restarting your laptop.
- No Internet Connection on Connected Devices: Double-check the sharing settings in "Network and Sharing Center." Also, ensure that your laptop itself has an active internet connection!
- Slow Speeds: The speed of your hotspot will depend on the speed of your original internet connection. Keep in mind that sharing a connection can reduce speeds.
- Compatibility: Some older wireless adapters may not fully support the hosted network feature.
6. Securing Your Hotspot: Protecting Your Data
Remember, your hotspot is broadcasting an internet connection. That means it's essential to secure it to protect your data and privacy.
- Use a Strong Password: We hammered this home earlier, but it's worth repeating. Choose a strong, unique password for your Wi-Fi network.
- Enable Encryption: Always use WPA2 or WPA3 encryption for your wireless network. This encrypts the data transmitted over your Wi-Fi connection, making it significantly more difficult for others to intercept.
- Monitor Connected Devices: Keep an eye on the devices connected to your hotspot. If you see any unfamiliar devices, you may want to change your password.
- Keep Your Software Updated: Regularly update your Windows 7 operating system and your wireless adapter drivers to fix security vulnerabilities.
7. Is It Still Relevant Today? Windows 7 in the Modern World
Okay, so Windows 7 is officially "end of life," meaning Microsoft no longer provides security updates. Is this still relevant today? Actually, yes!
- Legacy Devices: Many older laptops still run Windows 7. If you're fortunate enough to have one, this guide can breathe new life into it.
- Offline Situations: Even without an active internet connection, you can still use this function. You may not be able to connect to websites, but you can share files, documents, and other offline information between devices.
- Educational Purposes: For those keen on learning about networking and operating systems, understanding how to create a Wi-Fi hotspot on Windows 7 is still a valuable exercise.
8. Bypassing the Need for Third-Party Software
One of the best things about this method is that you’re not relying on a bunch of third-party apps. This reduces the risk of malware and potential security vulnerabilities. It’s clean, efficient, and effective.
9. Comparing Methods: The Pros and Cons
We've explored the built-in Windows 7 method. Now it’s interesting to compare it with other options, like using a dedicated mobile hotspot device or tethering your smartphone’s connection.
- Mobile Hotspot Device:
- Pros: Dedicated device, often more reliable, potentially faster speeds.
- Cons: Requires purchasing an extra device, monthly fees, and may not be needed.
- Smartphone Tethering:
- Pros: Convenient if you have a smartphone with a data plan.
- Cons: Can drain your phone's battery quickly, may incur extra data charges.
- Windows 7 Hidden Hotspot:
- Pros: Free, built-in, no additional hardware needed.
- Cons: More complicated setup, may have lower speeds, and dependent
how to create a wifi hotspot on windows 7 Professional
By iTon how to create a wifi hotspot on windows 7 Professional by iTon
Create a laptop WiFi hotspot in under 30 seconds Windows 7
By jacobspeeds Create a laptop WiFi hotspot in under 30 seconds Windows 7 by jacobspeeds
How to create wifi hotspot on windows 7
By GAME Solver How to create wifi hotspot on windows 7 by GAME Solver

Title: HOW TO CREATE A HOTSPOT IN WINDOWS 7 create hotspots with cmd
Channel: Joko Gledeq
HOW TO CREATE A HOTSPOT IN WINDOWS 7 create hotspots with cmd by Joko Gledeq
My Laptop Work
Unlock Your Laptop's Hidden WiFi Hotspot: Windows 7 Secret Revealed!
Ever found yourself in a situation where you desperately needed an internet connection, but a readily available WiFi network was nowhere to be found? Perhaps you were on a train, in a remote park, or simply caught in a dead zone at your local coffee shop. Fortunately, your Windows 7 laptop holds a secret weapon, a hidden ability to transform itself into a WiFi hotspot, thus sharing its internet connection with other devices. This is a remarkably straightforward process to undertake, and it offers a range of benefits. We will equip you with the knowledge to unlock this hidden potential and unleash your laptop's power to create a personal WiFi network in a matter of minutes.
Understanding the Foundation: The Hosted Network
The core technology behind creating a WiFi hotspot on your Windows 7 laptop is the hosted network. This feature, built directly into the operating system, allows your laptop's wireless adapter to simultaneously connect to an existing Wi-Fi network (or use a wired connection) and broadcast its own wireless signal. Think of it as a translator, taking the internet connection and reshaping it to one that other devices can understand and share. This system is particularly advantageous because it provides a simple means to share your internet connection without resorting to complex software installations or command-line interfaces.
Step-by-Step Guide: Activating Your Hidden Hotspot
Activating your laptop's hidden WiFi hotspot through Windows 7 involves a series of concise steps. We'll guide you through each one in detail, ensuring you have a clear understanding of the process and the confidence to execute it successfully.
1. Accessing the Command Prompt: The Gateway to Your Network
The first step is to open the Command Prompt as an administrator. This is crucial because you'll be executing commands that require elevated privileges. To do this, click the Start button, type cmd in the search box, and right-click on cmd.exe from the provided search results, selecting Run as administrator.
2. Activating the Hosted Network Adapter: The Command Line Command Within the elevated Command Prompt window, type the following command and press Enter:
netsh wlan set hostednetwork mode=allow ssid="YourNetworkName" key="YourPassword"
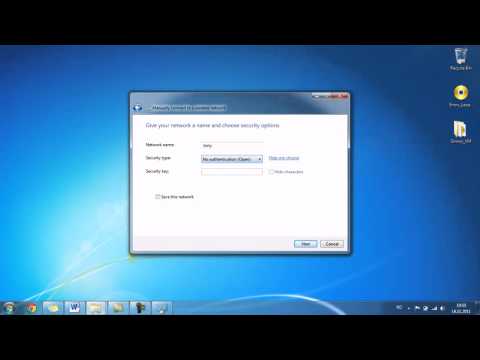
Replace "YourNetworkName" with the desired name for your hotspot (e.g., "MyLaptopHotspot") and "YourPassword" with a strong, secure password (at least eight characters long) to protect your network from unauthorized access. Be sure to replace all those text. Spaces can be included in the network's name, but avoid using special characters.
3. Starting the Hosted Network: Bringing Your Hotspot to Life
Following the successful configuration of the hosted network, you must start it. In the Command Prompt window, enter the following command and press Enter:
netsh wlan start hostednetwork
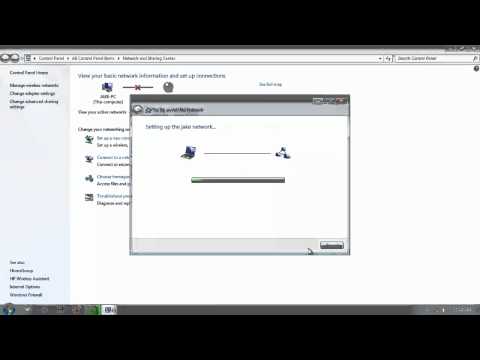
This command activates the hosted network, making it ready to broadcast your WiFi signal. At this point, you might not see any visible change, but your laptop is now broadcasting a hidden WiFi signal, awaiting connection.
4. Sharing Your Internet Connection: Connecting to the World
The final, crucial step involves sharing your existing internet connection with the newly created hosted network.
- Open the Network and Sharing Center. You can access this through the Control Panel or by right-clicking on the network icon in your system tray (bottom right corner of your screen).
- Click on Change adapter settings in the left-hand pane. This will display a list of your network adapters.
- Locate the adapter that currently connects to the internet (e.g., your Ethernet connection or your regular WiFi adapter). Right-click on it and select Properties.
- In the Properties window, navigate to the Sharing tab.
- Check the box that says, "Allow other network users to connect through this computer’s internet connection”.
- In the "Home networking connection" dropdown menu, select the network adapter associated with the hosted network. This is usually named something descriptive like "Wireless Network Connection 2" or a similar naming convention, depending on your system.
- Click OK to save the changes.
Your laptop is now functioning as a WiFi hotspot, sharing its internet connection with the specified network.
Troubleshooting Common Issues
While the process is generally straightforward, a few common issues can arise. Here's how to address them:
- "The hosted network couldn’t be started." This error typically stems from outdated or corrupted wireless drivers. Ensure your wireless network adapter drivers are updated to the latest version. Visit your laptop manufacturer's website or use the Device Manager to update your drivers.
- No Internet Access on Connected Devices: This is often caused by the sharing settings not being configured correctly. Double-check that you have followed Step 4 and that the correct network adapter is selected for sharing. Also, ensure that the firewall on your laptop isn't blocking internet access for connected devices.
- Network Not Appearing on Other Devices: Verify that your laptop's wireless adapter is enabled and functioning correctly. Check that you’ve typed the network name correctly when connecting other devices. If the network still doesn’t appear, try restarting your laptop.
Enhancing Your Hotspot Experience: Advanced Customization
While the basic setup suffices, you can customize further to tailor your WiFi hotspot to your particular needs.
- Changing Your Hotspot Name and Password: To modify your network's name or password, you must return to the Command Prompt and repeat the initialization command (Step 2) with the new settings. Stop the hosted network using
netsh wlan stop hostednetworkand then restart it. - Monitoring Connected Devices: You can see the number of connected devices using the command
netsh wlan show hostednetwork. This provides valuable information about network usage. - Optimizing Performance: If you experience slow speeds, consider moving your laptop closer to other devices or optimizing your internet connection.
- Advanced Security: For enhanced security, consider using a strong password. Additionally, while less common in a personal hotspot setting, you could explore MAC address filtering to control which devices can connect.
The Benefits of Unleashing Your Hidden Hotspot
The ability to create a personal WiFi hotspot on your Windows 7 laptop offers a wealth of practical benefits:
- Connectivity on the Go: Transform your laptop into a travel companion, ensuring access to the internet in various locations lacking public WiFi.
- Sharing Your Internet: Effortlessly share your internet connection with friends, family, and colleagues who may have multiple devices that need to go online.
- Cost Savings: Eliminate the need to acquire separate internet access for multiple devices.
- Convenience and Control: Have complete control over your network, including the password, network name, and connected devices.
Conclusion: Your Laptop's Hidden WiFi Potential Unlocked
By mastering these steps, you have unlocked your Windows 7 laptop's hidden ability to function as a WiFi hotspot. The described procedure provides a convenient and adaptable means to share your internet connection with multiple devices. From creating an impromptu network for a work project to providing entertainment on a road trip, your laptop has transformed into a versatile tool, ready to adapt to your connectivity needs. Embrace the freedom and convenience of your laptop's hidden potential, and never be caught without an internet connection solution again.
