how to convert windows 7 laptop into wifi hotspot
Title: Turn your Windows 7 Laptop into a Wi-Fi Hotspot or Repeater
Channel: Len Farneth
Turn your Windows 7 Laptop into a Wi-Fi Hotspot or Repeater by Len Farneth
how to turn your windows 7 laptop into a wifi hotspot
Turn Your Old Windows 7 Laptop into a FREE WiFi Hotspot! (Secret Trick Inside!)
Unlock Free Wi-Fi: Turning Your Old Windows 7 Laptop Into a Hotspot
Ever thought about breathing new digital life into that dusty old Windows 7 laptop gathering cobwebs in the attic? Believe it or not, there's a fantastic opportunity waiting! Yes, you can transform it into a personal Wi-Fi hotspot. It’s a digital resurrection of sorts. And the best part? It’s completely free!
The Forgotten Fortress: Your Windows 7 Laptop's Hidden Power
That seemingly obsolete Windows 7 laptop, once a symbol of innovation, is now a treasure trove. Its processing power, although perhaps not cutting-edge, is still remarkably useful. Consequently, it can easily handle acting as a Wi-Fi router. Think of the possibilities! You can share your internet connection wherever you go.
The Simple Steps: Crafting Your Wi-Fi Sanctuary
Now, let’s get down to brass tacks. Setting up this free Wi-Fi hotspot is surprisingly uncomplicated. We will take a dive into the simple, yet powerful method. Initially, ensure your Windows 7 laptop has a working internet connection. This is the crucial foundational step. It can be through an Ethernet cable or an existing Wi-Fi connection. Once you’ve confirmed this, it’s time for the magic!
Creating Your Virtual Hotspot: The Command Prompt Command
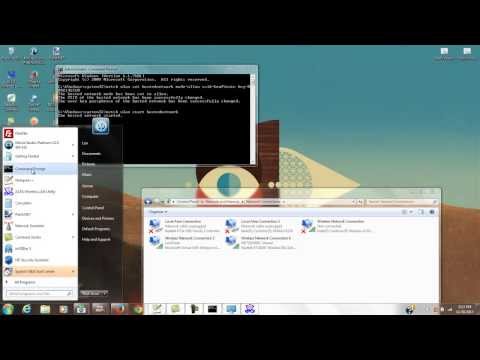
Here's where the secret sauce comes in. We’re going to use the Command Prompt. It's a powerful tool that can often be overlooked. Search for "cmd" in your Windows 7 Start Menu. Right-click on "Command Prompt" and select "Run as administrator." This is essential for the commands to work. Next comes the exciting part: typing in a few simple commands.
Setting Up the Virtual Network: Unveiling the Code
Inside the Command Prompt window, you'll type a specific command. It’s like a special key to unlock the Wi-Fi potential. Take a moment to marvel at the technicality. Type the following, and press Enter:
netsh wlan set hostednetwork mode=allow ssid="YourHotspotName" key="YourPassword"
Replace “YourHotspotName” with the name you want for your Wi-Fi network. This will be the name that devices see. Replace "YourPassword" with a strong password. Secure your wireless network! Then, press Enter. You’ll get a confirmation message.
Starting Your Hosted Network: The Final Act
Your virtual network is now created. Secondly, you need to start it. This is the final piece of the puzzle. Type the following command and press Enter:
netsh wlan start hostednetwork
You should see a success message. It signals you’ve successfully launched your hotspot. But wait, we are not done yet!
Sharing Your Internet Connection: The Crucial Link
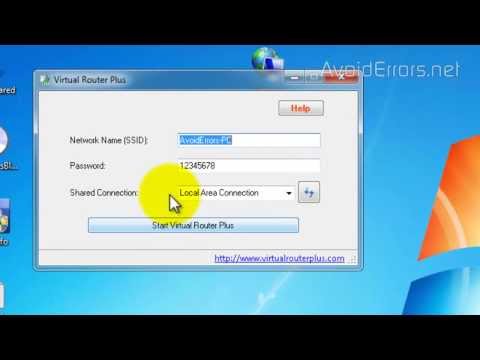
The hotspot exists. However, it doesn't automatically share your internet. You need to tell Windows 7 to share the connection. Go to the Network and Sharing Center. You can find this through the Control Panel. Click on "Change adapter settings." Find the connection your computer uses for internet access (e.g., Wi-Fi or Ethernet). Right-click on it, and select "Properties."
Enabling Internet Sharing: Connecting the Dots
In the "Sharing" tab, check the box that says "Allow other network users to connect through this computer's Internet connection." Choose the "hosted network" adapter from the dropdown menu. This will typically be named something like "Microsoft Hosted Network Virtual Adapter." Finally, click "OK." Now, your devices can connect to your new Wi-Fi hotspot!
Troubleshooting Tips: Navigating Potential Roadblocks
Sometimes things don’t go perfectly. Don't fret! There are a few common issues. For example, if the hotspot isn't working immediately, make sure your laptop's Wi-Fi adapter is enabled. Check your firewall settings; it might be blocking the connection. Restarting your laptop can often solve many simple glitches. Experiment and learn!
Security First: Safeguarding Your New Network
Remember, security is paramount. Use a strong and unique password for your Wi-Fi network. Update your password frequently, for added protection. Consider using WPA2 or WPA3 encryption. This is a critical step to protect your data. You are now ready to enjoy your free Wi-Fi!
The Power of Repurposing: A Sustainable Choice
Repurposing old technology is a smart move. Furthermore, it is environmentally conscious. Instead of letting your Windows 7 laptop gather dust, you're giving it a meaningful purpose. You are also saving money on a dedicated router. It’s a win-win. Embrace the power of technological recycling.
Beyond the Basics: Expanding Your Wi-Fi Horizons
You can customize your network further. You can adjust the Wi-Fi channel for better performance. Also, you can limit the number of devices that can connect. This offers you further control and flexibility. Consequently, you can tailor your hotspot to your specific needs. Isn't that amazing?
Conclusion: Embrace Your Free Wi-Fi Freedom
There you have it! You've successfully transformed your old Windows 7 laptop into a free Wi-Fi hotspot. It's convenient, cost-effective, and a testament to the enduring power of technology. So, fire up that old laptop, and enjoy the freedom of wireless internet anywhere, anytime! Go forth and connect!
Intel 3x3 WiFi: Blazing-Fast Laptop Wi-Fi You Won't Believe!Turn Your Old Windows 7 Laptop into a FREE WiFi Hotspot! (Secret Trick Inside!)
Ever felt that sting of being stranded, Wi-Fi-less, in a digital desert? We've all been there. That frantic scramble for a public hotspot, or the gut-wrenching realization your data plan is about to get decimated. But what if I told you there's a way to conjure your own personal Wi-Fi oasis, right from the dusty depths of your old Windows 7 laptop? Yep, you heard that right! Forget expensive mobile hotspots, and get ready to unlock a secret trick that turns your vintage tech into a Wi-Fi wizard. Let's dive in!
1. The Wi-Fi Wilderness: Why You Need This Skill
Let's paint a picture. You're on a road trip, miles away from any decent internet access. Or maybe you're just chilling at a friend's place and they don't have Wi-Fi. Perhaps your internet at home is down (it happens to the best of us!). In these moments, a personal hotspot is like having a magic portal to connectivity. It’s freedom. It’s convenience. It's the digital equivalent of a Swiss Army knife; you'll be glad you have it when you need it. And trust me, the feeling of being able to nonchalantly offer Wi-Fi to your friends? Priceless.
2. Your Weapon of Choice: The Windows 7 Powerhouse
Why Windows 7? Well, let's be honest, a lot of us still have an old laptop or two tucked away. Maybe it’s gathering dust in the attic, or maybe it’s chugging along as your dedicated Word processor. Windows 7, while no longer officially supported by Microsoft, is still perfectly capable of this neat trick. Think of it as a reliable, albeit slightly vintage, workhorse. We’re going to breathe new life into this old machine and turn it into your personal Wi-Fi router. It's a bit like giving that old car in your garage a fresh paint job and a super-charged engine!
3. The Magic Formula: The HostedNetwork Command
Here's where the secret sauce comes in. We're going to be using a built-in Windows 7 feature called "HostedNetwork." It's a bit like having a hidden superpower that's just waiting to be activated. This command allows your laptop to act as a Wi-Fi access point, broadcasting its internet connection to other devices. Don't worry, it's not as complicated as it sounds. We'll walk through it step-by-step. Think of it as a simple recipe for digital connectivity.
4. Step 1: Unleashing the Command Prompt - Your Digital Playground
First things first: we need to fire up the Command Prompt. Imagine it as the control panel for your laptop’s inner workings. You can find it by searching for "cmd" in your Start menu. Once the Command Prompt window pops open, it's time to get ready to get our hands dirty, or rather, our fingers!
5. Step 2: The Enablers - Activating Hosted Network
Now, this is where we start weaving the magic. In the Command Prompt, carefully type the following command:
netsh wlan set hostednetwork mode=allow ssid="YourWiFiName" key="YourPassword"
Let's break this down:
netsh wlan: This is the magic word, telling your laptop we're dealing with wireless LAN settings.set hostednetwork mode=allow: This is telling your laptop to allow the hosted network to be enabled.ssid="YourWiFiName": Replace "YourWiFiName" with the name you want for your Wi-Fi network. Be creative! Think of something memorable, or just something that tickles you. It's your digital identity.key="YourPassword": Replace "YourPassword" with a strong password for your Wi-Fi network. Make it something secure and long, like a secret code!
Once you've typed this command (or meticulously copied and pasted it), hit Enter. You should see a message saying the hosted network mode has been set successfully.
6. Step 3: The Launch Sequence - Starting the Hotspot
Now that we've set the stage, it’s time to launch our Wi-Fi hotspot. In the Command Prompt, type the following command:
netsh wlan start hostednetwork
This command tells your laptop to actually start broadcasting the Wi-Fi signal you just created. You should get a message confirming that the hosted network has started. Like a rocket launch, you're almost there!
7. Step 4: Sharing Your Internet Connection – The Crucial Link
This step is crucial. Your laptop needs to share its existing internet connection. Here's how:
- Go to your Network and Sharing Center (you can find this in your Control Panel).
- Click on "Change adapter settings".
- Find your internet connection (Wi-Fi or Ethernet), right-click on it, and select "Properties".
- Go to the "Sharing" tab.
- Check the box that says "Allow other network users to connect through this computer's Internet connection".
- In the "Home networking connection" dropdown, select the connection associated with the Hosted Network (it will usually have a name like "Local Area Connection*").
- Click "OK".
This is like connecting the dots, making sure the internet flows from your primary connection to your newly created Wi-Fi hotspot.
8. The Grand Reveal: Connecting Your Devices
Now, grab your phone, tablet, or other devices and scan for Wi-Fi networks. You should see your newly created Wi-Fi network name (the one you chose earlier!). Select it, type in your password, and voila! You're connected! You’ve officially created your own free Wi-Fi zone.
9. Troubleshooting Headaches: Common Pitfalls and Solutions
Things not working? Don’t panic! This process isn’t always perfect. Here are some common issues and how to tackle them:
- The "Hosted Network Not Supported" Error: This usually means your Wi-Fi adapter doesn't support the hosted network feature. Sadly, you might be out of luck here.
- Connectivity Issues: Double-check that you've correctly shared your internet connection in the Network and Sharing Center. Make sure the right adapter is selected.
- Password Problems: Ensure you've typed the password correctly.
- No Internet Access: Your Windows 7 laptop needs to have an active internet connection to share.
- Driver Woes: Outdated Wi-Fi drivers can also cause issues. Update your driver or reinstall them. Check the manufacturer's website.
- Firewall Interference: Your firewall might be blocking the connection. Try temporarily disabling it to check.
10. Power-Saving Considerations: Keeping Your Laptop Running
Creating a Wi-Fi hotspot uses up your laptop’s battery. It’s like running a mini-server. If you're on battery power, it's best to keep your laptop plugged in. You can also adjust your power settings to optimize battery life (Control Panel -> Power Options).
11. Security First: Protecting Your Digital Fortress
Never use a simple password. Make sure you choose a strong password for your Wi-Fi network. Avoid sharing your password widely. And if in doubt, regularly change your password.
12. Staying Connected: Useful Commands to Remember
Here are some handy commands:
netsh wlan stop hostednetwork: To stop the hotspot.netsh wlan show hostednetwork: To check its status (when activated)netsh wlan set hostednetwork mode=disallow: To disable the hotspot.
13. Expanding Your Reach: Turning Any Internet Connection into a Hotspot
The best part? This trick works with any internet connection your laptop can access. Use your home Wi-Fi, your mobile phone (tethering!), or even a wired connection. The possibilities are endless.
14. Beyond Windows 7: Exploring the Future
Even though this is a Windows 7 tutorial, remember that Windows 10 and 11 have similar features, although the interface and steps may vary slightly. The same principles apply.
15 . Unleash Your Inner Tech Wizard: The Benefits Beyond Connectivity
Think about it. You've just learned a valuable skill. You can now share your internet connection, troubleshoot network issues, and impress your friends with your technical prowess. This knowledge goes beyond the immediate need for Wi-Fi. It teaches you how to take something old and make it new, how to repurpose technology, and how to be less reliant on pricey solutions. Plus, you're saving money!
Closing Thoughts: Your Digital Freedom Awaits!
So, there you have it! Turning your old Windows 7 laptop into a free Wi-Fi hotspot. It's a simple trick with a big impact. Armed with this knowledge, you're now empowered to stay connected, share your internet freedom, and squeeze every last drop of usefulness out of your vintage tech. Go forth, and conquer the Wi-Fi wilderness!
Frequently Asked Questions
FAQ 1: Is this legal?
Yes, creating a personal Wi-Fi hotspot
HP Laptop Owners: This 5GHz WiFi Card Will SHOCK You!How to Turn Your Windows 7 Laptop Into WiFi Hotspot

By TechNet Guide How to Turn Your Windows 7 Laptop Into WiFi Hotspot by TechNet Guide
Turn Your Windows 7 Laptop into a WiFi Hotspot 2
By AvoidErrors Turn Your Windows 7 Laptop into a WiFi Hotspot 2 by AvoidErrors
Turn Your Windows 7 Laptop into a WiFi Hotspot
By AvoidErrors Turn Your Windows 7 Laptop into a WiFi Hotspot by AvoidErrors

Title: How to Create a WiFi Hotspot with Windows 7
Channel: 1stepatatime
How to Create a WiFi Hotspot with Windows 7 by 1stepatatime
My Laptop Work
Turn Your Old Windows 7 Laptop into a FREE WiFi Hotspot! (Secret Trick Inside!)
Have that trusty old Windows 7 laptop gathering dust? Before you consign it to the digital graveyard, consider this: you can breathe new life into it and harness its power to create a FREE WiFi hotspot. Yes, you read that correctly! This seemingly simple process unlocks a world of connectivity, transforming that vintage machine into a valuable resource for your home, workspace, or even when you're on the go. We’ll dive deep into the setup, ensuring you're equipped with the knowledge to get your hotspot up and running quickly and efficiently. Forget complex processes; this guide simplifies everything. Forget expensive routers; this guide will empower you to utilize what you already own.
Understanding the Foundation: How Windows 7 Enables WiFi Hotspots
The core principle behind this ingenious hack lies within Windows 7's built-in capabilities. A hidden feature, often overlooked, allows your laptop's wireless adapter to act as a virtual router. This means it can receive an internet signal (typically from an Ethernet cable or another WiFi network) and rebroadcast it as a new WiFi signal, accessible to any device within range. The beauty of this system is its simplicity and efficiency. No complicated hardware purchases are needed, and the software configuration is surprisingly straightforward, making it ideal for both tech novices and experienced users alike. This method is remarkably stable and offers surprisingly good performance, making it a practical solution for everyday use. The secret lies within the proper configuration of the hidden settings.
Step-by-Step Configuration: Setting Up Your Virtual WiFi Hotspot
The following steps detail the precise configuration needed to transform your Windows 7 laptop into a functioning WiFi hotspot. Follow these instructions meticulously, and you'll be enjoying free WiFi in no time.
Accessing the Command Prompt (Administrator Mode): To begin, you'll need to open the Command Prompt with administrative privileges. Click on the "Start" menu, type "cmd" in the search bar, right-click on "cmd.exe," and select "Run as administrator." This step is crucial, as it grants the necessary permissions to modify network settings. Without these permissions, the subsequent commands will fail.
Creating the Hosted Network: Within the Command Prompt, type the following command and press Enter:
netsh wlan set hostednetwork mode=allow ssid="YourHotspotName" key="YourPassword". Replace"YourHotspotName"with the specific name you want your WiFi hotspot to have (e.g., "MyFreeWiFi"). Replace"YourPassword"with a strong, secure password (at least eight characters) to protect your network from unauthorized access. This command creates the virtual network interface, setting up the basic configuration for your hotspot. Execute this command carefully, ensuring no typos are present. Correct spelling is critical; otherwise, the setup will fail.Starting the Hosted Network: After creating the hosted network, you need to start it. In the Command Prompt, type the following command and press Enter:
netsh wlan start hostednetwork. This command activates the virtual adapter, making your hotspot visible to other devices. If the command is successful, you should see a confirmation message. If the command fails, review your previous steps, especially the spelling of the commands.Enabling Internet Connection Sharing: This is where the magic happens. You'll need to share your existing internet connection with the newly created hotspot. Open the "Network and Sharing Center" by going to the Control Panel and selecting "Network and Internet," or by clicking the network icon in your system tray.
- Click on "Change adapter settings." This will open a window displaying all your network adapters.
- Identify the adapter that provides your internet connection (e.g., "Ethernet" if you're using a wired connection, or your primary WiFi adapter).
- Right-click on this adapter and select "Properties."
- In the "Sharing" tab, check the box next to "Allow other network users to connect through this computer's Internet connection."
- In the "Home networking connection" dropdown, select the "Microsoft Hosted Network Virtual Adapter" (or a similar name) that was created during steps 1 and 2.
- Click "OK." This crucial step tells your computer to share its existing internet connection with the virtual hosted network.
Connecting Devices to Your Hotspot: Now that your hotspot is active, the only step remaining involves connecting all compatible devices! On any device with WiFi capabilities (smartphones, tablets, laptops, etc.), scan for available WiFi networks. Your newly created hotspot should appear with the name you specified in step 2. Select it, enter your password, and connect. Congratulations, you’ve successfully created a free WiFi hotspot!
Troubleshooting Common Issues: Keeping Your Connection Stable
Even with the most straightforward setup, occasional issues may arise. Here are solutions to the most common challenges:
Hotspot Not Appearing: Double-check that you’ve started the hosted network using the command:
netsh wlan start hostednetworkin the Command Prompt (administrator mode.) If the hotspot still does not appear, verify that your wireless adapter is enabled and functioning correctly. You may also want to restart your laptop. Ensure the SSID name is properly written.Devices Connecting but Not Accessing the Internet: Verify that you enabled Internet Connection Sharing correctly (Step 4). Carefully review the sharing settings to ensure the correct adapter is selected. Also, confirm that your laptop is actively connected to the internet (via Ethernet or another WiFi network). Test the primary internet connection without other devices connected to verify that it is working.
Slow Connection Speed: The performance of your hotspot depends on various factors, including the speed of your internet connection, the number of connected devices, and the capabilities of your laptop's wireless adapter. Close any unnecessary applications running on your laptop to free up bandwidth. Consider upgrading your laptop’s wireless adapter if it supports older wireless standards. Reduce the distance between the connecting devices and the laptop.
Password Issues: If you're continually prompted for the password, triple-check that you're entering it correctly. If you've forgotten the password, you will need to disable the hosted network, re-create it with a new password, and enable it again.
Network Conflict: If you're using another network-related software, like a VPN, it may cause the hotspot to malfunction. Disable the VPN and test the hotspot. If this resolves the problem, the VPN program might need to be configured to work with the hotspot.
Enhancing Security: Protecting Your Free WiFi Hotspot
While you are providing free access, security is paramount. The following are key steps to protect your hotspot:
Use a Strong Password: As mentioned in the initial setup, choose a strong, complex password for your hotspot. Avoid easily guessable passwords. Use a combination of uppercase and lowercase letters, numbers, and symbols.
Keep Your Windows 7 Updated: Ensure your Windows 7 operating system has the latest security patches and updates installed. This will help to protect against known vulnerabilities.
Monitor Connected Devices: Regularly monitor the devices connected to your hotspot. If you notice any unknown devices, consider changing your password.
Consider a Firmware Update (if possible): While Windows 7 is the host, some laptops have updateable network adapters. Consult your laptop’s manual or manufacturer’s website to see if any firmware updates are available for your wireless adapter.
Advanced Considerations: Beyond the Basics
For those looking to further refine their hotspot experience, consider these advanced options:
Wireless Mode and Channel Selection: Some wireless adapters allow you to specify the wireless mode (e.g., 802.11n, 802.11g) and the channel. Experiment with different channels to find the one with the least interference from other WiFi networks in your area.
Limiting Bandwidth: Although not natively supported you can limit bandwidth with third-party software, if you want to control the amount of bandwidth each connected device can use. This can help ensure that no single device hogs all the bandwidth.
Using Third-Party Software (with caution): While we highly advise against it, some third-party software can simplify the hotspot creation and configuration process. Research and choose them carefully, and always be mindful of the security implications of installing third-party software.
Conclusion: Unleash the Power of Your Old Laptop
Transforming your old Windows 7 laptop into a free WiFi hotspot is a practical, cost-effective, and environmentally conscious way to extend your internet connectivity. By following the simple steps outlined in this guide, you can revitalize an underused piece of technology and unlock a world of seamless internet access for yourself and others. Embrace the opportunity to save money, and reduce the environmental impact of discarding electronics. With a touch of knowledge and a bit of effort, your old laptop can become a valuable tool.
