compartir wifi desde laptop windows 10
Title: Guia Compartir internet desde Windows 10 con otros dispositivos Sin Programas 2021
Channel: Vivantic
Guia Compartir internet desde Windows 10 con otros dispositivos Sin Programas 2021 by Vivantic
compartir wifi desde laptop windows 10, compartir wifi desde mi laptop windows 10, como compartir wifi desde mi laptop windows 10, programa para compartir wifi desde mi laptop windows 10, wifi shortcut key windows 10
Unlock Your WiFi: Share Your Windows 10 Laptop's Internet Like a Pro!
Unleash Your Inner Hotspot: Sharing Your Windows 10 Internet Without Breaking a Sweat!
Ever found yourself in a digital desert, thirsting for internet access? Perhaps you are trying to connect multiple devices at your place. Or maybe you're helping a friend in a pinch. Whatever the reason, sharing your Windows 10 laptop's internet connection can be a lifesaver. Fortunately, it's surprisingly straightforward. We'll explore how you can become a Wi-Fi wizard. Let's dive in!
Bridging the Gap: Understanding the Basics
Before we begin, let’s lay the groundwork. Your Windows 10 laptop can act as a Wi-Fi hotspot. It essentially creates a mini-network. The laptop then broadcasts its own internet signal. This allows other devices, like your phone or another laptop, to connect. The only requirement is a working internet connection on your laptop, like through Wi-Fi or an Ethernet cable. Essentially, you are extending your network.
Step-by-Step to Wi-Fi Freedom: The Mobile Hotspot Method
Windows 10 offers a built-in feature called "Mobile Hotspot." This is where the magic truly begins. It's your ticket to shared internet bliss. Here's how to activate it:
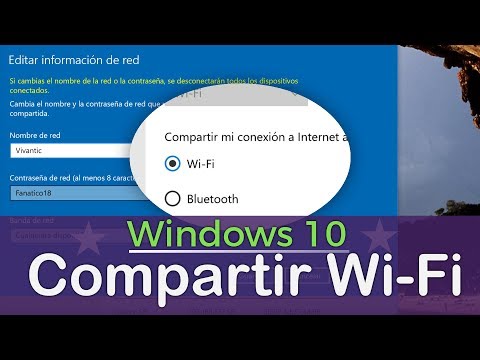
- Navigate to Settings: First, click the Start button. Then, select the gear icon to open "Settings."
- Network & Internet: In the Settings window, choose "Network & Internet."
- Mobile Hotspot: Next, select "Mobile hotspot" from the options on the left.
- Share Your Internet Connection: There should be a drop-down menu labeled "Share my Internet connection from." Select the connection you’re using. For example, pick your Wi-Fi network or Ethernet.
- Edit Your Hotspot Details: You can modify the name and password of your hotspot. Do this by clicking "Edit." Customize your network name (SSID) and password as you desire. Ensure the password is strong.
- Toggle It On: Finally, toggle the "Share my Internet connection with other devices" switch to "On."
And there you have it! Your laptop is now broadcasting its own Wi-Fi signal. Other devices can now discover it.
Beyond the Basics: Tweaking Your Hotspot
Now you know the core procedure. However, you can further customize your hotspot settings. This allows you to manage it more effectively.
- Band Selection: Some laptops allow you to choose the network band. You can choose between 2.4 GHz and 5 GHz. The 5 GHz band is faster. However, it has a shorter range.
- Maximum Connections: You might also have the option to limit the number of devices that can connect. This feature can help optimize performance.
- Data Usage: Keep an eye on data usage. Especially if you have a limited data plan. Windows 10 often provides data usage statistics for your hotspot.
Troubleshooting Common Hotspot Headaches
Sometimes, however, things don't go as planned. Don't worry! Troubleshooting is part of the process. Here is some help for common issues:
- Can't Find the Hotspot: Make sure your wireless adapter is enabled on your laptop. Also, double-check that the mobile hotspot is turned on.
- Connection Issues: Ensure you have a stable internet connection on your laptop. Restarting your laptop and the connecting devices can often work wonders.
- Limited Connectivity: If devices connect but have no internet access, verify your internet connection sharing settings. Also, check your firewall settings.
- Slow Speeds: Multiple devices connected to your hotspot can slow down the speeds. Try limiting the number of connections. Or, consider upgrading your internet plan.
Alternative Approaches: Other Sharing Methods
While Mobile Hotspot is the easiest method, other approaches exist. You can also consider these options.
- Internet Connection Sharing (ICS): This older method is still available. However, it’s generally more complex.
- Third-Party Apps: Several third-party applications offer hotspot functionality. Nevertheless, the built-in Mobile Hotspot is often sufficient.
Securing Your Wireless Fortress
Security is important. It is a must. Thus, you must secure your hotspot. Use a strong, unique password. Change it regularly. This prevents unauthorized access. Also, keep your Windows 10 updated. Updates often include security patches. These protect your laptop.
Wrapping Up: Empowering Your Digital Life
Sharing your Windows 10 laptop's internet is not only useful. It’s also a valuable skill in the digital age. You can assist family, friends, or yourself. Knowing how to create a hotspot unlocks a world of connectivity possibilities. Go forth. Embrace your newfound ability! Your internet is now at your fingertips.
Windows 8 WiFi Nightmare? FIX Your Laptop's Dropouts NOW!Unlock Your WiFi: Share Your Windows 10 Laptop's Internet Like a Pro!
Hey there, tech adventurers! Ever found yourself in a situation where your laptop, a beautiful beacon of internet connectivity, is the only game in town? Maybe you’re visiting family, stuck in a hotel room with patchy Wi-Fi, or just want to share your mobile hotspot connection with your tablet. We’ve all been there! And that's where the magic of sharing your Windows 10 laptop's internet connection comes in. Think of it as your laptop transforming into a portable Wi-Fi router, a digital Swiss Army knife ready to rescue you from the internet wilderness. Let’s dive in, shall we?
1. Why Share Your Laptop’s Internet? The Perks You Didn't Know You Needed!
Seriously, why bother? Well, the reasons are as diverse as the apps on your phone! Imagine this: a friend visits, and their phone's data plan is screaming for mercy. Boom! Your laptop to the rescue. Or perhaps you're on a train and the in-carriage Wi-Fi is slower than a snail in molasses. Your laptop, tethered to your phone's hotspot, becomes your personal broadband provider. It’s about flexibility, convenience, and occasionally, saving the day! Sharing your internet is akin to having a secret weapon in your digital arsenal – you never know when you’ll need it!
2. Before We Begin: A Quick Checklist to Ensure Smooth Sailing
Before we transform your laptop into a Wi-Fi hotspot guru, let's make sure we're starting with a solid foundation. Think of it as preparing a delicious meal; you need the right ingredients!
- A Windows 10 Laptop: This is, of course, the star of our show. Ensure your device is running Windows 10 (or later).
- An Active Internet Connection: This could be a wired Ethernet connection, a Wi-Fi connection (though sharing that can sometimes be tricky), or a mobile hotspot connected to your laptop via USB.
- Administrative Rights: You'll need to be logged in as an administrator on your laptop to make changes to network settings. This is a must-have!
- Sufficient Bandwidth: Sharing your internet uses your existing bandwidth. Consider the number of devices you'll be sharing with, and ensure you have enough bandwidth so everyone gets a decent connection. Don't be that person hogging all the data!
3. The Built-in Hero: Using the Mobile Hotspot Feature
Windows 10, bless its digital heart, comes with a built-in Mobile Hotspot feature. This is the easiest and most straightforward way to share your internet. It's like having a pre-installed Wi-Fi router in your laptop.
- Navigating to the Right Place: Click the Start button (the little Windows logo in the bottom left corner), then click the Settings cogwheel.
- Network & Internet: In the Settings window, click on "Network & Internet." This is the command center for all things network-related.
- Mobile Hotspot: On the left-hand side, you'll see "Mobile hotspot." Click it.
- Enable the Magic: Toggle the "Share my Internet connection from" switch to "On."
- Choose Your Connection: Below, select the internet connection you want to share – usually Ethernet or Wi-Fi.
- Edit the Details (Optional but Recommended): Click "Edit" to change the network name (SSID) and password. Make it something memorable, and definitely, use a secure password!
And that's it! Your laptop is now broadcasting its own Wi-Fi signal. This feels amazing, doesn’t it?
4. Understanding the Different Connection Types: Wired, Wireless, and Mobile Broadband
Let's quickly touch on the different ways you can connect to the internet, since the source of your internet will affect how well the Wi-Fi sharing works.
- Wired Ethernet: This is the most stable and often the fastest connection. If you're connected to the internet via an Ethernet cable, sharing the connection will be a breeze. Perfect for a reliable Wi-Fi hotspot.
- Wi-Fi: You can share a Wi-Fi connection (meaning your laptop receives Wi-Fi and rebroadcasts it). However, this can sometimes be a bit finicky, as it works by creating a "virtual" Wi-Fi adapter. It's not always as smooth as a wired connection.
- Mobile Broadband (Hotspot from Phone): Ideal for sharing your phone’s data connection, your laptop acts as a hub, providing Wi-Fi to other devices.
- Consider your Data limits. If you're using a mobile hotspot, be mindful of your data limits! Sharing the internet can quickly eat up data.
5. Troubleshooting Common Roadblocks: What to Do When Things Go Sideways
Ah, the inevitable hiccups! Don't worry; it's all part of the tech journey. Encountering issues? Here’s what to do:
- Check the obvious: Is the Mobile Hotspot turned on? Are you connected to the internet yourself?
- Restart: The classic "have you tried turning it off and on again?" might surprisingly work wonders! Restart your laptop.
- Network Adapter Drivers: Outdated or corrupted network adapter drivers can cause problems. Search online for "device manager". Then locate the Network adapters. Right-click on your Wi-Fi adapter and select "Update driver."
- Firewall Issues: Your firewall might be blocking the outgoing traffic. Temporarily disable your firewall (only for testing!) to see if that's the culprit.
- Mobile Hotspot Limitations: Some ISPs or mobile data plans might restrict the ability to share a connection. Check your service agreement.
6. Securing Your Shared Connection: Password Protection is Key!
Never leave your Wi-Fi open! Think of it as leaving your front door unlocked. Always set a strong password.
- Strong Passwords: Use a combination of uppercase and lowercase letters, numbers, and symbols. Avoid using easily guessable words or personal information.
- Regular Password Changes: Consider changing your password periodically, especially if you're sharing your connection in public places.
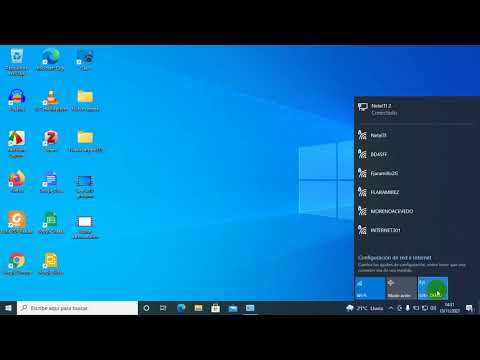
- Monitor Connected Devices: See the devices connected to your hotspot from Settings > Network & Internet > Mobile hotspot. Remove any unknown devices.
7. Enhancing Your Hotspot's Performance: Speed Optimization Tips
Want a smoother, faster experience? Here are a few tricks:
- Choose the Right Channel: Your Wi-Fi router broadcasts on a specific channel. Interference from other Wi-Fi networks can slow things down. Use a Wi-Fi analyzer app (there are free ones!) to find a less congested channel.
- Limit Connected Devices: The more devices connected, the slower the speed.
- Close Unnecessary Apps: Background apps can consume bandwidth.
- Place Your Laptop Strategically: Put your laptop in a central location and away from obstructions like walls and metal objects. They can interfere with the Wi-Fi signal.
8. Sharing over Ethernet: The Wired-to-Wireless Transformation
Sharing over Ethernet is often the most reliable method.
- Connect via Ethernet: Physically connect your laptop to the internet using an Ethernet cable.
- Follow the Mobile Hotspot Steps: As outlined in section 3, enable the Mobile Hotspot feature. Your Ethernet connection should be automatically selected to be shared with your other devices.
- Performance: You'll typically achieve the best performance this way.
9. Sharing Your Wi-Fi: A More Advanced Approach (With Caveats!)
Sharing your Wi-Fi when your laptop is receiving Wi-Fi can be tricky but still possible. Your Windows 10 laptop will then act as a sort of "Wi-Fi repeater" or "virtual router".
- Ensure Driver Support: Ensure your Wi-Fi adapter can act as an access point.
- Follow the steps in section 3: Set up your Mobile Hotspot.
- Expect Potential Issues: Performance may be reduced.
10. Mobile Hotspot vs. Dedicated Routers: Weighing the Pros and Cons
Is your laptop a permanent Wi-Fi solution? Probably not. Let's compare:
- Laptop Hotspot: Fantastic for temporary needs, doesn't require additional hardware. Easy to set up.
- Dedicated Router: Offers superior performance, wider range, and advanced features. A worthwhile investment if you need a permanent Wi-Fi setup.
11. Monitoring Data Usage: Don’t Run Out of Data!
Especially vital if you’re using a mobile hotspot! Keep an eye on the data consumption.
- Check Data Usage: Go to Settings > Network & Internet > Data usage. Observe which apps are consuming the most data.
- Set a Data Limit: Set a monthly data limit to prevent overage charges. You can find this option in the Data Usage settings.
12. Customizing Your Hotspot: Advanced Settings & Configurations
While the built-in Mobile Hotspot is simple, there are ways to customize it. The options are a bit limited.
- Explore Advanced Settings: Some advanced settings can be tweaked via the Windows Registry or third-party apps (proceed with caution
Como CONVERTIR MI Laptop EN ROUTER WIFI, COMPARTIR WIFI DESDE LAPTOP 2020 sin programas

By Luis Ovalle Como CONVERTIR MI Laptop EN ROUTER WIFI, COMPARTIR WIFI DESDE LAPTOP 2020 sin programas by Luis Ovalle
CONVERTIR MI PC EN UNA ZONA WIFI, COMPARTIR WIFI DESDE UNA COMPUTADORA
By Sistemas y Configuraciones CONVERTIR MI PC EN UNA ZONA WIFI, COMPARTIR WIFI DESDE UNA COMPUTADORA by Sistemas y Configuraciones
programa para compartir wifi desde mi pc windows 10
By DE TODO Y PARA TODOS programa para compartir wifi desde mi pc windows 10 by DE TODO Y PARA TODOS

Title: como compartir internet de mi pc a mi celular Windows 10 2020
Channel: JisusPrime
como compartir internet de mi pc a mi celular Windows 10 2020 by JisusPrime
My Laptop Work
Unlock Your WiFi: Share Your Windows 10 Laptop's Internet Like a Pro!
The digital landscape thrives on connectivity. We live in an era where access to the internet is not just a luxury, but a necessity. Whether you're working remotely, collaborating on a project, or simply enjoying your favorite entertainment, a stable and readily available internet connection is paramount. Your Windows 10 laptop, often overlooked as a simple productivity tool, has a hidden talent: the ability to transform into a powerful WiFi hotspot, allowing you to share its internet connection with other devices. This comprehensive guide will equip you with the knowledge and skills to master this capability, transforming you from a casual user into a WiFi-sharing virtuoso.
Understanding the Power of Hosted Networks on Windows 10
Before we delve into the practical steps, it's essential to grasp the foundational principles of Windows 10's hosted network feature. This isn't merely a case of broadcasting your existing WiFi signal. Instead, it allows your laptop to create a new, independent WiFi network. Think of it as building a mini-router within your laptop. This feature is particularly beneficial when you have a wired Ethernet connection and want to share it wirelessly, or in situations where your primary WiFi network is unreliable or unavailable. By activating this functionality, you are essentially creating a new access point, allowing other devices to connect and access the internet through your laptop's internet connection.
Setting Up Your WiFi Hotspot: A Step-by-Step Guide
The process of setting up your WiFi hotspot in Windows 10 is remarkably straightforward, guided by the user-friendly interface. Here's a detailed walkthrough to get you started:
Accessing the Network and Sharing Center: Begin by navigating to the "Network and Sharing Center." You can quickly access this by either searching for it in the Windows search bar or by right-clicking the network icon in your system tray (typically located in the bottom right corner of your screen) and selecting "Open Network & Internet settings" followed by "Network and Sharing Center."
Initiating the Mobile Hotspot: Inside the Network and Sharing Center, locate the "Mobile hotspot" option. You’ll find it under the "Change adapter settings" category which is located to the left-hand side. Clicking this will take you to Mobile Hotspot settings page.
Configuring Your Hotspot Settings: Before activating your hotspot, take the time to customize its settings. Here, you have full control over the network name (SSID) and the security key.
- Network Name (SSID): Choose a distinctive name for your hotspot. This is the name that will appear on other devices when they search for available WiFi networks. Opt for a name that is easily recognizable so that you can quickly identify your hotspot among the available options.
- Security Key (Password): Setting a strong password is crucial for security. This key will prevent unauthorized users from accessing your internet connection. Windows 10 provides default suggestions, but it is always better to customize your password. A strong password should consist of a mix of uppercase and lowercase letters, numbers, and symbols. Avoid easily guessable passwords like your name, birthday, or pet's name.
Sharing Your Internet Connection: Now that you’ve configured your hotspot, you need to specify which internet connection to share. If you are using an Ethernet connection or a wireless connection, you can choose which connection to share through your Mobile Hotspot. Your laptop will now be ready to share its internet access with other devices.
Turning On Your Mobile Hotspot: To activate your hotspot, simply click the toggle switch to the "On" position. Your laptop will now begin broadcasting its WiFi signal, allowing other devices to connect.
Connecting Your Devices: On devices like smartphones, tablets, and other laptops, search for available WiFi networks within your network settings. The name you provided to your hotspot will appear in the list. Select your hotspot and enter the security key (password) you configured to connect.
Troubleshooting Common Issues and Optimizing Your Hotspot
While the process of setting up a WiFi hotspot is generally smooth, you might encounter some challenges. Here's how to overcome common hurdles and optimize your hotspot for optimal performance:
- Hotspot Not Appearing or Not Working:
- Verify Network Adapter Drivers: Outdated or corrupted network adapter drivers can impede hotspot functionality. Visit the Device Manager (search for it in the Windows search bar), expand "Network adapters," right-click your WiFi adapter, and select "Update driver." Choose the option to search for updated driver software automatically. Restart your computer for the changes to take effect.
- Check Network Adapter Settings: In the Network Connections window (accessible through the Network and Sharing Center), right-click your network adapter and select "Properties." Ensure that "Internet Connection Sharing" is enabled and that the correct connection is selected for sharing.
- Firewall Interference: Your Windows Firewall or third-party security software might be blocking the hotspot. Temporarily disable your firewall to test if this resolves the issue. If it does, you'll need to configure your firewall settings to allow hotspot traffic. Consult your firewall's documentation for specific instructions.
- Slow Internet Speeds:
- Limit Connected Devices: The more devices connected to your hotspot, the more your bandwidth is divided. Limit the number of connected devices to improve performance.
- Optimize Your Internet Connection: Run a speed test on your laptop to determine the actual internet speed you are receiving. If your speeds are significantly slower than what your internet provider promises, contact your provider for troubleshooting or potential adjustments.
- Update Your Router: Ensure your router's firmware is up-to-date. Visit your router manufacturer's website for instructions on how to update its firmware. A new router can often provide a boost if your current hardware is older or outdated.
- Device Connections Dropping:
- Check Signal Strength: Ensure your laptop has a strong and stable WiFi signal. Move your laptop closer to your router to improve signal strength.
- Interference: Other devices or objects can interfere with WiFi signals. Keep your laptop away from microwave ovens, cordless phones, and other devices that may emit radio waves.
Advanced Techniques: Maximizing Your WiFi Hotspot's Potential
Beyond the basic setup, several advanced techniques can enhance your WiFi hotspot experience:
- Using Command Prompt for More Control: For more control over your hotspot settings, you can use the Command Prompt, which offers more granular control than the graphical user interface. Launch Command Prompt as an administrator (search for "cmd" in the Windows search bar, right-click it, and select "Run as administrator"). Then type
netsh wlan set hostednetwork mode=allow ssid="YourHotspotName" key="YourPassword"to create your hotspot. Then, typenetsh wlan start hostednetworkto start the hotspot. - Monitoring Data Usage: To prevent unexpected data overages, monitor data usage on your laptop. If you have data caps, monitor internet usage closely. Windows 10 provides built-in tools for tracking data usage. Go to "Settings" > "Network & Internet" > "Data usage" to view your data consumption.
- Conserving Battery Life: Sharing your internet connection consumes extra power, draining your laptop's battery faster. Reduce the impact on your battery life by plugging your laptop into a power source whenever possible. Also, consider adjusting your power plan settings to optimize performance and conserve energy. Go to "Control Panel" > "Hardware and Sound" > "Power Options" to customize your power plan.
- Use a Dedicated WiFi Adapter (Optional): If you regularly use your laptop as a WiFi hotspot, consider using a dedicated USB WiFi adapter. This will allow you to use your laptop's internal WiFi adapter to connect to your primary network and the external adapter to create your hotspot. This avoids using your one WiFi adapter for multiple tasks.
Security Best Practices: Protecting Your Network and Data
Protecting your network from unauthorized access is critical. Implement these security best practices to ensure the safety of your information and the privacy of your devices:
- Strong Passwords: Always use a strong, unique password for your hotspot.
- Regular Password Changes: Change your hotspot password periodically to prevent potential breaches.
- Monitor Connected Devices: Keep track of devices connected to your hotspot and disconnect any suspicious devices.
- Keep Your Windows 10 Up-To-Date: Install the latest Windows 10 updates to patch security vulnerabilities. Go to "Settings" > "Update & Security" > "Windows Update" to check for updates.
- Use a Firewall: Ensure that your Windows Firewall or a third-party firewall is enabled to protect your devices from malicious traffic.
- Beware of Public WiFi: Avoid connecting to public WiFi networks, as they are often unsecured. If you must use public WiFi, use a Virtual Private Network (VPN) to encrypt your internet traffic.
Conclusion: Unleashing the Potential of Your WiFi Hotspot
By following this comprehensive guide, you've gained the knowledge and tools to transform your Windows 10 laptop into a versatile WiFi hotspot. From basic setup to advanced techniques and security best practices, you now possess the ability to share your internet connection with ease and confidence. Embrace this powerful feature and enjoy the freedom of staying connected, regardless of your location. Now go forth and master the art of WiFi sharing!
