how to make wifi from laptop windows 8.1

Title: How to Connect to WiFi on Windows 8
Channel: HOWTECH
How to Connect to WiFi on Windows 8 by HOWTECH
Turn Your Windows 8.1 Laptop into a WiFi Hotspot — INSTANTLY!
Unleash Your Inner Wi-Fi Wizard: Transform Your Windows 8.1 Laptop into a Hotspot!
Ever found yourself in a Wi-Fi desert? We've all been there. You’re stranded. No internet access. Frustration mounts. But what if I told you your Windows 8.1 laptop holds a secret? It’s a hidden power. It has the ability to become a personal Wi-Fi hotspot. It's an instant solution, right at your fingertips.
The Magic Behind the Curtain: Activating the Hosted Network
Forget complicated configurations. This process is surprisingly straightforward. First, you'll need to peek under the hood. You need to ensure your network adapter supports hosted networks. Don't worry; it’s easier than you think. Open the Command Prompt. You'll need administrator privileges. So, right-click the Start button and choose "Command Prompt (Admin)." Then, type the following command and press enter: netsh wlan show drivers.
Carefully scrutinize the results. Look for a line labeled "Hosted network supported". If it says "Yes," you're in luck. Your laptop is ready for action. If the answer is "No," unfortunately, your adapter doesn't support this feature. But, for most modern laptops, the answer is a resounding "Yes!". Assuming you are set, you can now proceed to the next stage.
Crafting Your Personalized Wi-Fi Signal
With compatibility confirmed, it's time for the fun part. We must create the virtual Wi-Fi network. Back in your elevated Command Prompt, enter the following command and adapt it to your needs: netsh wlan set hostednetwork mode=allow ssid="YourHotspotName" key="YourPassword".
Replace "YourHotspotName" with your desired network name. Make it catchy. Make it unforgettable. Next, replace "YourPassword" with a secure password. Choose something strong. Use a combination of letters, numbers, and symbols. This password secures your network. It’s essential for safeguarding your data. Once entered, hit Enter.
Igniting the Connection: Turning Your Hotspot On
Congratulations! You've successfully created your Wi-Fi hotspot. Now, it's time to bring it to life. Use the following command to start the hosted network: netsh wlan start hostednetwork. Then, give it a few seconds. Your Wi-Fi hotspot should now be active. Look for your network on other devices. You should see it appear as an available Wi-Fi network.
Sharing Your Internet: The Final Step
You’ve now created and activated your hotspot. But there’s one crucial step remaining. You need to share your internet connection. Navigate to the Network Connections settings. You can find this in the Control Panel. Locate your current internet connection. Right-click on it. Then, select "Properties".
Go to the "Sharing" tab. Then, check the box that says, "Allow other network users to connect through this computer's Internet connection." Choose your hosted network from the dropdown menu. Finally, click "OK". You’ve now successfully shared your internet connection. So, your hotspot is ready. Your other devices can now surf the web.
Troubleshooting Common Roadblocks
Sometimes, things don’t go according to plan. Errors can occur. But don't fret. Several common issues arise. First, ensure your network adapter drivers are up-to-date. Outdated drivers can cause connection problems. You can update them via Device Manager. Also, double-check your password. Ensure it’s entered correctly. A forgotten character can stop connectivity.
Another issue: Sometimes, firewalls can interfere. They can block connections to the hotspot. You can temporarily disable your firewall. Or, create an exception for your hotspot. Finally, restart your computer if problems persist. A simple reboot can often resolve connectivity issues.
Embrace the Freedom: The Benefits of Your Personal Hotspot
So, you’ve set up your hotspot. Consider the possibilities. Suddenly, you're in control. You have a portable Wi-Fi network. This opens doors to limitless flexibility. You can connect multiple devices. Your tablet, phone, and other laptops can now share the connection. Furthermore, you can share the internet connection with friends. It’s perfect for travel. It is also incredibly useful for remote work.
Beyond the Basics: Advanced Customization and Management
You don’t have to stop there. Windows 8.1 offers more advanced customization options. You can modify your hotspot’s settings. Explore power-saving features. You can also monitor data usage. Use the "netsh wlan show hostednetwork" command. This will show you your hotspot status. It's also a great way to monitor connected devices.
Conclusion: Staying Connected, Effortlessly
Now you understand. Your Windows 8.1 laptop is a powerful tool. It can create a personal Wi-Fi hotspot. The process ensures you are connected. It’s a simple process. It empowers you to stay online, anytime, anywhere. So, embrace the freedom. Unleash your inner Wi-Fi wizard. Enjoy the convenience of your personal hotspot.
Lenovo Laptop WiFi Nightmare? This FIX Will Blow Your Mind!Turn Your Windows 8.1 Laptop into a WiFi Hotspot — INSTANTLY!
Ever been in a situation where you desperately needed internet access, but your Wi-Fi signal was as elusive as a unicorn sighting? Maybe you’re stuck in a hotel room with spotty Wi-Fi, or perhaps your phone's data plan is about to explode. We've all been there. Thankfully, your trusty Windows 8.1 laptop can be a lifesaver, transforming itself into a personal Wi-Fi hotspot, allowing you to connect other devices to the internet in a pinch. Think of it as your laptop being a generous friend, sharing its internet connectivity like the last slice of pizza (minus the grease stains, hopefully!). Let’s dive in, shall we?
Title 1: The Unexpected Superpower of Your Windows 8.1 Laptop
Who knew that your Windows 8.1 laptop held a secret superpower? It can be more than just a productivity machine; it can be a wireless access point, broadcasting an internet signal for all your compatible gadgets – phones, tablets, other laptops – to enjoy. It’s like having a mini-router tucked away in your bag, ready to deploy at a moment's notice. And the best part? The process is surprisingly straightforward.
Title 2: Why Turn Your Laptop into a Hotspot? More Than Meets the Eye!
The reasons for creating a hotspot are varied and, let's face it, often crucial. Perhaps you’re on a road trip, and the kids are clamoring for some entertainment on their tablets. Or maybe you're working remotely from a coffee shop with unreliable Wi-Fi. Whatever the scenario, establishing your own Wi-Fi hotspot can bring a sense of freedom and control. It’s like having your own private network, a digital sanctuary, offering peace of mind and connectivity wherever you go.
Title 3: Before We Begin: What You Need to Get Started
Before we launch into the nitty-gritty, let's make sure you're prepped and ready to go. To successfully create a hotspot, you need a few essential things.
- A Windows 8.1 Laptop: This is kind of a given, right?
- An Active Internet Connection: This is the source of the Wi-Fi signal you'll be sharing. It can originate from either an Ethernet connection (a wired internet cable) or a Wi-Fi connection.
- A Little Patience: Trust me, it's simpler than it sounds!
Title 4: Method 1: Using the Built-In Mobile Hotspot Feature (The Easiest Way!)
Windows 8.1 actually features a built-in "Mobile Hotspot" function, making the whole process a breeze. This is by far the easiest method, requiring minimal technical know-how. It’s like ordering a pizza – fast, reliable, and satisfying.
Title 5: Step-by-Step Guide: Activating the Mobile Hotspot
Let's get this mobile party started! Here’s how to activate the mobile hotspot feature:
- Open the Settings App: Click the Start button, then head to the Charms bar by either moving your mouse to the bottom-right corner of the screen (or swiping in from the right if you have a touchscreen). Select "Settings."
- Go to Network and Internet: In the Settings app, click on "Network and Internet."
- Find Mobile Hotspot: Look for the "Mobile hotspot" option and click on it.
- Enable the Feature: Toggle the "Share my Internet connection with other devices" switch to "On."
- Customize Your Hotspot (Optional): You can change the network name (SSID) and password to something you'll remember. Click "Edit" to customize. Choose a strong password!
Title 6: Method 2: Using the Command Prompt (For the Tech-Savvy!)
For those who like to get a little more hands-on, you can also create a Wi-Fi hotspot using the Command Prompt. It offers greater flexibility but is slightly more involved. Think of it as building your own pizza from scratch, a more personalized experience, but requiring a little more work.
Title 7: Setting up Your Hotspot via Command Prompt: A Deeper Dive
Here's how to configure your hotspot using the Command Prompt:
- Open Command Prompt as Administrator: Search for "cmd" in the Windows search bar, right-click on "Command Prompt," and select "Run as administrator."
- Run the Following Commands: Type in these lines one at a time, pressing Enter after each:
netsh wlan set hostednetwork mode=allow ssid="YourHotspotName" key="YourPassword"(Replace "YourHotspotName" and "YourPassword" with your desired network name and password.)netsh wlan start hostednetwork
- Share Your Internet Connection: Go to your Network Connections settings (search for "View network connections" in the Windows search bar). Right-click on your active internet connection (Wi-Fi or Ethernet), select "Properties," and go to the "Sharing" tab. Check the box that says "Allow other network users to connect through this computer's Internet connection." Choose your hosted network from the drop-down menu below and click "OK."
Title 8: Security First: Protecting Your Hotspot
Just as you wouldn't leave your front door unlocked, you must secure your hotspot. A strong password is your first line of defense, making it harder for unauthorized users to piggyback on your internet connection. Change your password regularly to keep it fresh!
Title 9: Monitoring Your Hotspot: Staying in Control
It’s good practice to keep an eye on who's connected to your hotspot. This will help you identify any unknown devices and ensure your internet connection isn't getting bogged down by multiple users. Make sure your password is secure.
Title 10: Troubleshooting Common Issues: When Things Go Wrong
Sometimes, the process doesn't go as planned. Don't panic! Here are some common issues and how to address them.
- "The hosted network couldn’t be started": This often means there's a driver issue. Try updating your wireless network adapter drivers.
- Devices can connect, but can’t access the internet: Double-check that you've properly shared your internet connection in the Network Connections settings.
- Slow speeds: Consider the number of connected devices, their activities, and your internet plan.
Title 11: How to Deal with Limited Data Plans
Be mindful of your data plan, especially on mobile connections. Streaming videos and downloading large files will quickly eat into your data allowance. Consider setting data limits on your connected devices or using a data-saving app.
Title 12: Maximizing Performance: Speed and Efficiency Tips
To get the best performance from your hotspot, place your laptop in an area with good Wi-Fi reception. The further away connected devices are, the weaker the signal will be. Also, minimize the number of devices connected simultaneously.
Title 13: Exploring Alternative Software Options
While the built-in features are generally sufficient, several third-party software options offer more advanced features, such as bandwidth monitoring, connection management, and more customization options. Explore your options.
Title 14: Hotspot Etiquette: Being a Good Digital Citizen
Remember to be considerate of others. Don't hog all the bandwidth if you're sharing your hotspot in a public setting. And always respect network security – don't try to access other people's private resources. Be a responsible and ethical Internet user.
Title 15: The Future of Hotspots: What's Next?
As technology evolves, so too will the features and functionalities of hotspots. Expect advancements in speed, security, and ease of use. The future holds exciting possibilities for staying connected on the go.
Closing Thoughts: Embrace the Power of Connection!
So there you have it! Now you know how to transform your Windows 8.1 laptop into a powerful Wi-Fi hotspot. It’s a fantastic tool to stay connected, whether you're at home, on the road, or in a pinch. Embrace the power of connection, experiment with the settings, and enjoy the freedom of having your own personal Wi-Fi network at your fingertips. You are now equipped to be the hero in any connectivity conundrum.
FAQs: Your Burning Questions Answered
1. Can I use my laptop as a hotspot even if it's not connected to the internet via Wi-Fi?
Yes, you can! If your laptop is connected to the internet via an Ethernet cable, it can still share that connection as a Wi-Fi hotspot.
2. How many devices can connect to my hotspot simultaneously?
Theoretically, there is no hard limit imposed by Windows 8.1 on the number of devices that can connect. However, the practical limit depends on your laptop's hardware and your internet connection speed. The more devices connected, the slower the internet will be for everyone. So, keep it reasonable.
3. Will using a hotspot drain my laptop's battery quickly?
Yes, creating a hotspot does consume more power as it keeps your wireless adapter active. Make sure your laptop is plugged in when you’re planning on using it for extended periods. It’s like running a marathon, expect your laptop to tire out faster.
**4. Is there a
Unlock Your Apple TV: The Laptop WiFi Trick!Make a Wi fi Hotspot Using your Windows 8 Laptop

By Syed Shah Zahurullah Hussaini Make a Wi fi Hotspot Using your Windows 8 Laptop by Syed Shah Zahurullah Hussaini
Turn Windows 8 Laptop into WiFi HotSpot How To

By TechEmpty Turn Windows 8 Laptop into WiFi HotSpot How To by TechEmpty
Create WiFi Hotspot in windows 8.1, 8, 7 LaptopPC
By ANDREW CRUZ Create WiFi Hotspot in windows 8.1, 8, 7 LaptopPC by ANDREW CRUZ
Title: Windows 8.1 - No Internet Connection Available
Channel: MDTechVideos
Windows 8.1 - No Internet Connection Available by MDTechVideos
Lenovo WiFi Nightmare? Solved! (Easy On/Off Guide)
Turn Your Windows 8.1 Laptop into a WiFi Hotspot — INSTANTLY!
In today's interconnected world, the ability to share your internet connection on the fly is not just a convenience; it’s a necessity. Imagine you’re in a coffee shop, airport, or even a remote location without readily available Wi-Fi. You desperately need to access the internet on your phone, tablet, or your other devices, but the public network is unreliable or nonexistent. Thankfully, your Windows 8.1 laptop can be transformed into a personal WiFi hotspot, enabling you to share your internet connection with ease. This guide will demonstrate how to accomplish this, providing a seamless and straightforward process for creating your own instant internet access point.
Why Create a WiFi Hotspot from Your Windows 8.1 Laptop?
The benefits of turning your laptop into a WiFi hotspot are manifold. Primarily, it provides internet access to devices that might not have their own cellular data plans or are struggling with connectivity issues. This is particularly useful for:
- Sharing a Wired Ethernet Connection: Perhaps you're in a hotel room with only a wired internet connection, but you want to connect your phone or tablet wirelessly. Your laptop acts as the bridge.
- Extending Your Wireless Range: Your home router's signal might not reach every corner of your house. Your laptop can serve as an intermediary.
- Connecting Multiple Devices: Instead of paying for multiple data plans, you can utilize your laptop's existing internet connection to connect multiple devices.
- Troubleshooting Network Issues: Using your hotspot isolates the problem, allowing you to determine if the issue stems from your main router or a specific device.
- Guest Access: You can allow visitors to connect to your internet without revealing your primary Wi-Fi password.
The Simple Method: Using the Built-in Mobile Hotspot Feature
Windows 8.1 offers a surprisingly easy and effective built-in solution for creating a WiFi hotspot. This feature, while seemingly hidden, is readily accessible and user-friendly. Here's how to tap into this powerful functionality:
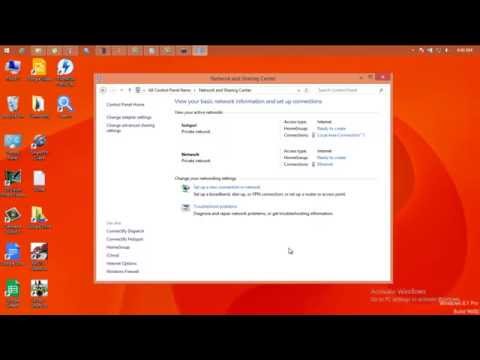
- Open the Network and Sharing Center: The easiest way to access this is through the system tray, at the bottom right. Click the WiFi icon, then choose "Open Network and Sharing Center." You can also find it through the Control Panel.
- Change Adapter Settings: Go to the left-hand panel and click on "Change adapter settings." This will open a window displaying all your network adapters, including your Ethernet and WiFi adapters.
- Select Your Internet Connection: Identify the network adapter currently providing your internet connection. This is typically the one labeled “Ethernet” if you’re connected via a cable, or your existing WiFi adapter. Take note of the adapter’s name; we'll need it later.
- Set Up Mobile Hotspot: Unfortunately, the actual 'Mobile Hotspot' feature wasn't directly built into the Network and Sharing Center in Windows 8.1. Instead, we will be utilizing the "Internet Connection Sharing" feature.
- Right-Click and Configure Sharing: Right-click the adapter providing the internet (either the WiFi adapter that is connected to your wireless internet or the Wired Ethernet Adapter). Select "Properties" from the contextual menu.
- Navigate to the Sharing Tab: In the properties window, click the "Sharing" tab.
- Enable Internet Connection Sharing: Check the box that says "Allow other network users to connect through this computer's Internet connection."
- Select Your WiFi Adapter: In the "Home networking connection" dropdown menu, select the network adapter associated with your wireless network. This will be the adapter that will broadcast the WiFi signal.
- Optional: Change the Name and Password: In the Windows 8.1 setting, you can customize the name and password for the WiFi hotspot on the wireless adapter itself.
- Start Using Your Hotspot: Once the adapter is connected, your Windows 8.1 laptop immediately begins broadcasting a WiFi signal.
Troubleshooting Common Issues with the Built-in Feature
Even with its simplicity, the built-in feature can sometimes present challenges. Here are some frequent issues and their solutions:
- No Internet Access on Connected Devices: The most common cause is a failure to properly configure the internet connection sharing feature. Double-check steps 7 and 8, particularly ensuring the correct network adapters are selected. Consider restarting your laptop.
- Slow Internet Speed: The speed of your hotspot directly reflects the speed of your laptop’s internet connection. Ensure you have a strong signal. Also, consider disabling any bandwidth-intensive processes running on your laptop, like large downloads or online video streaming.
- Hidden Network: Sometimes, the hotspot might be created but is not visible. Verify the SSID (Service Set Identifier - the network name) in the settings. If it's hidden, you might have to manually enter the network name and password on your connecting device.
- Conflict with Existing WiFi Profile: If your laptop is already connected to a WiFi network, it might interfere with the hotspot's creation. Temporarily disconnect from the existing WiFi network before setting up the hotspot.
- Firewall Blocking Connection: Your Windows Firewall or third-party firewall might be interfering with the sharing. You can try temporarily disabling your firewall to test whether this is the problem. If it resolves the issue, you'll need to configure your firewall to allow the hotspot connection.
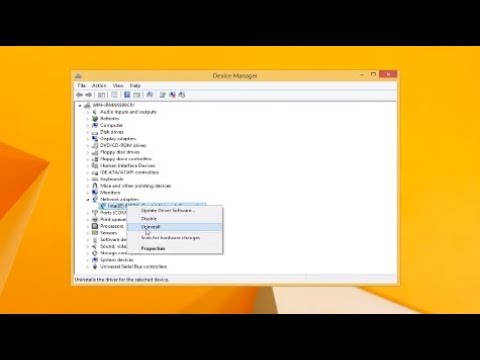
- Driver Issues: Outdated or corrupted network adapter drivers can prevent the hotspot from functioning correctly. Update your drivers through Device Manager. Right-click on the network adapter and select "Update driver software."
Optimizing Your WiFi Hotspot for Performance and Security
Creating a functional hotspot is the first step; optimizing it is the next. Prioritize these practices to ensure a secure and efficient experience:
- Choose a Strong Password: A weak password makes your network vulnerable to unauthorized access. Use a complex combination of uppercase and lowercase letters, numbers, and symbols. At least 12 characters are recommended.
- Change the Network Name (SSID): The default network name might be generic (e.g., “Wireless Network”). Customizing the name makes your network easier to identify. Avoid using personally identifiable information in the SSID.
- Choose the Correct Security Type: The built-in hotspot uses WPA2-Personal encryption, which is generally secure. Ensure this is enabled in your settings.
- Monitor Connected Devices: Most laptops provide a method to view connected devices. This allows you to identify any unknown devices and potentially block them if necessary.
- Limit Connected Devices: The performance of your hotspot degrades as more devices connect. Limit the number of devices to maintain a satisfactory speed.
- Protect Your Laptop: Ensure your laptop has a good antivirus program and is up-to-date. The hotspot effectively shares your laptop’s internet connection, so any security flaws on your laptop could compromise your network.
- Consider Your Data Usage: Streaming video, transferring large files, or heavy online gaming can quickly consume your data allowance, particularly on mobile broadband connections. Keep your data usage in mind.
Making the Most of Your Hotspot: Advanced Tips and Tricks
Beyond the basic setup, you can enhance your hotspot experience with these advanced techniques:
- Prioritize Bandwidth: Some laptops have Quality of Service (QoS) settings that allow you to prioritize network traffic for certain applications or devices. This can improve the performance of your most important tasks.
- Use a WiFi Analyzer: A WiFi analyzer app (available for smartphones and other devices) can help you identify the best channel for your hotspot, minimizing interference from other networks.
- Extend Your Hotspot's Range: If your hotspot's range is limited, consider using a USB WiFi adapter with a more powerful antenna. This can significantly boost the signal range, enabling more devices to tap into the WiFi signal.
- Schedule Your Hotspot Availability: You can disable the sharing feature when you're not actively using the hotspot to conserve resources.
- Consider Specialized Software (Optional): While the built-in feature is usually sufficient. Some third-party applications offer more advanced control over your hotspot, including bandwidth monitoring, MAC address filtering, and advanced security options. However, the built-in tools are more than enough for most users.
Conclusion: Empower Yourself with Instant Connectivity
Turning your Windows 8.1 laptop into a WiFi hotspot provides an easy, versatile, and reliable way to share your internet connection. From accessing the internet on multiple devices on vacation to providing a temporary internet solution in an emergency. By following the straightforward steps detailed above and implementing the optimization tips, you can unlock the full potential of this powerful feature. Embrace the freedom of instant connectivity and stay connected wherever life takes you. With a few simple steps, you instantly transform your laptop into a powerful wireless hub.
