how to increase wifi speed on laptop software

Title: How to Increase Your Internet Speed Increase WiFi Speed on Laptop
Channel: Tweak Library
How to Increase Your Internet Speed Increase WiFi Speed on Laptop by Tweak Library
Laptop WiFi Speed: SHOCKING Software Trick to Get Blazing Fast Internet!
Unleash Warp Speed: The Secret Software Key To Ridiculously Fast Laptop WiFi!
Ever felt like your laptop's WiFi was stuck in the digital Stone Age? You’re not alone. We've all been there, staring at a loading screen that seems to mock our modern existence. It's a frustrating experience indeed. But what if I told you there's a secret weapon? A software trick potentially unlocking internet speeds you never thought possible? Prepare to have your mind blown.
The Frustration of WiFi: A Shared Digital Headache
Let's face it. Slow internet is the bane of our modern lives. We depend on a fast, reliable connection for everything. We use it for work, streaming, gaming, and staying connected with loved ones. A sluggish WiFi connection grinds productivity to a halt. Moreover, it kills the joy of your favorite entertainment. That spinning wheel of doom can test anyone's patience. Therefore, it’s crucial to find solutions.
Decoding the WiFi Puzzle: Beyond the Obvious
Most people immediately blame their internet service provider. However, the problem frequently lies elsewhere. The router might be outdated, or the signal strength could be weak. Consequently, these are common culprits. But the potential for optimization often goes overlooked. We should look beyond bandwidth tests and router resets and explore deeper.
Unveiling the Software Secret: A Hidden Performance Booster
I’m about to reveal a software trick. It can significantly boost your laptop's WiFi speed. This is a technique that often gets missed. It involves tweaking a hidden setting within your network adapter. This can unlock previously untapped potential. Ready to take the plunge? First, let's find the right place to begin.
Step 1: Accessing the Network Adapter Settings (The Gateway)
Navigate to your Windows search bar. Type "Device Manager" and open it. This is your central control hub. Then, expand the "Network adapters" section. You will see a list of all the network devices connected to your laptop.
Step 2: Locating Your WiFi Adapter (The Key Player)
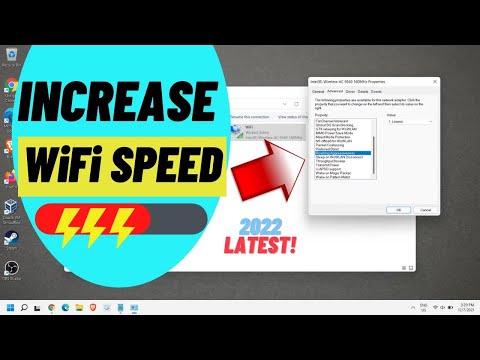
Identify your specific WiFi adapter. It might be labeled something like "Intel(R) Wireless-AC 9620" or a similar name. Right-click on it and select "Properties." This window holds the secrets.
Step 3: Delving into Advanced Settings (The Power Play)
In the Properties window, go to the "Advanced" tab. This is where the magic happens. However, the exact settings will vary depending on your network adapter model. Look for the settings related to "Wireless Mode" or "802.11 mode." Your goal is to experiment.
Step 4: Fine-Tuning the Wireless Mode (The Speed Dial)
The default setting is often set to a compatibility mode. This sacrifices speed for broader compatibility. Therefore, try changing it to a newer standard, such as 802.11ac or 802.11ax (if supported). Subsequently, this will depend on your router. Experiment with different options. Apply the changes and restart your laptop.
Step 5: The Reboot and the Revelation (Showtime!)
After the restart, test your WiFi speed. Run a speed test online to measure the difference. You should notice a significant improvement. Naturally, the exact results will vary. Yet, many users report a substantial boost.
Why This Trick Works: The Underlying Science
Your WiFi adapter communicates with your router using specific protocols. These settings essentially determine the maximum speed. Older settings prioritize compatibility over speed. This software tweak optimizes the communication pathway. It allows your laptop and router to communicate faster. Consequently, this will lead to higher transfer rates.
Troubleshooting and Fine-Tuning: Achieving Perfection
Not everyone will experience dramatic results instantly. Some factors affect the outcome. First, ensure your router supports the selected wireless mode. Secondly, consider your distance from the router. Finally, try other advanced settings. Experimentation is key. Furthermore, drivers can be outdated. So, update them to the latest version.
Beyond the Software: Complementary Strategies
Software is just one part of the equation. Consider other factors. For instance, ensure your router is in a central location. Reduce interference from other electronic devices. Also, consider upgrading your router to the latest standard.
The Takeaway: Embrace the Power of Optimization
Laptop WiFi speed doesn't have to be a source of frustration. Utilize this software trick. You'll potentially unlock faster, more reliable internet. Furthermore, always remember that optimization is a journey. Continuously experiment. Keep learning. Your digital life will thank you. Isn't that exciting? Now, go forth and conquer the internet, one blazing-fast connection at a time!
Turn Your Windows 8.1 Laptop into a WiFi Hotspot INSTANTLY!Laptop WiFi Speed: SHOCKING Software Trick to Get Blazing Fast Internet!
Alright, folks, let's talk about something that plagues us all: slow internet on our laptops. You're in the middle of streaming your favorite show, and bam! buffering. You're trying to download a crucial document for work, and it crawls along like a snail in molasses. Sound familiar? We’ve all been there, staring at that spinning circle of despair. But what if I told you there’s a secret weapon, a software trick that can drastically improve your laptop's Wi-Fi speed? A trick so simple, so effective, it'll make you wonder why you didn't try it sooner. Buckle up, because we're about to dive into the world of blazing-fast internet!
1. The Wi-Fi Woes: Recognizing the Problem
First things first: let's acknowledge the elephant in the room. Slow Wi-Fi isn't just annoying; it's a productivity killer. Think about it – how much time have you wasted waiting for websites to load, emails to send, or videos to start playing? It adds up, right? We're talking about lost hours, frustration, and maybe even the urge to throw your laptop across the room (we've all been that close). Before we get to the solution, let's pinpoint the culprits. Is it your router? Your internet service provider? Or, could it be… your laptop? Gasp
2. Beyond the Basics: Why Your Laptop Matters
We often blame our router or the ISP, and sure, they sometimes deserve the blame. But your laptop itself plays a huge role in your Wi-Fi experience. Think of your laptop as your gateway to the internet. If the gateway is congested, your internet speed will suffer. The problem isn't always the signal strength or the internet plan. Your laptop’s software configurations, particularly the settings related to how it handles Wi-Fi, can be the bottleneck.
3. The Hidden Culprit: Your Wireless Adapter Settings
Here's where the magic begins. Buried deep within your laptop’s settings lie a treasure trove of customization options for your wireless adapter. These settings, often overlooked and left untouched by default, can be the key to unlocking faster Wi-Fi speeds. It's like having a sports car, but driving it in economy mode. We want to rev that engine!
4. Diving In: Accessing Your Wireless Adapter Settings (Windows)
Okay, let's get practical. We’re going to navigate Windows settings. The process is a little different depending on your Windows version, but the general path is similar.
- Step 1: Open the Control Panel (or Settings App). You can usually find this by searching in the Windows search bar (the magnifying glass icon on your taskbar).
- Step 2: Go to Network and Internet.
- Step 3: Select Network and Sharing Center.
- Step 4: Click "Change adapter settings" on the left side. This will show you a list of your network connections, including your Wi-Fi adapter.
5. The Software Trick Unveiled: Tweaking Your Adapter Properties
Now, the moment of truth. Right-click on your Wi-Fi adapter (it'll be labelled something like "Wi-Fi" or "Wireless Network Connection") and select "Properties." This opens a new window where you'll find a list of "Properties" for your Wi-Fi adapter. This is where the real magic happens!
6. The Key Property: "802.11n/ac/ax" or "Wireless Mode"
Within the properties, we're looking for a specific setting. (This might be labeled differently depending on your adapter, but it's usually something along the lines of "802.11n/ac/ax" or "Wireless Mode"). This setting controls the maximum speed that your adapter can handle. We're going to make sure it's set to use the fastest standard your router supports.
7. What is 802.11ac/ax? Understanding Different Wi-Fi Standards
To clarify, 802.11ac and 802.11ax are the newer, faster Wi-Fi standards. If your router supports them, you'll see options like "802.11ac" or "802.11ax" in the settings. If your router only supports older standards, "802.11n" might be the highest option. Selecting the highest standard supported by both your router and your laptop's Wi-Fi adapter is critical. Think of it like this: you wouldn't drive a race car on a dirt road!
8. Fine-Tuning: Other Settings to Consider
While the wireless mode is the primary focus, a few other settings can also impact your Wi-Fi speed. Explore settings like:
- Roaming Aggressiveness: This determines how aggressively your laptop searches for a stronger Wi-Fi signal. A more aggressive setting might give you a slightly better connection in some cases.
- Power Saving Mode: Make sure this is not set to maximum power saving, as it can throttle your Wi-Fi adapter's performance.
9. Implementing the Changes: Step-by-Step Guide
Here’s a quick, step-by-step recap:
- Open your Network Connections settings (as described in Section 4).
- Right-click on your Wi-Fi adapter and select "Properties."
- Go to "Configure" and then "Advanced" tab.
- Find the “Wireless Mode” or similar setting.
- Select the fastest standard supported by your router (802.11ac or 802.11ax if available).
- Make other tweaks as needed (Roamings or Power Saving settings).
- Click "OK" to save your changes.
10. Restart and Reconnect: The Final Step
After making these changes, it’s a good idea to restart your laptop. This ensures that the new settings take effect. Once your laptop restarts, reconnect to your Wi-Fi network.
11. The Proof is in the Pudding: Testing Your New Speed
Now comes the fun part: the speed test! There are tons of free online speed test tools (like Speedtest by Ookla) that you can use to check your Wi-Fi speed before and after making these changes. Compare the results. You should hopefully see a noticeable improvement in your download and upload speeds.
12. Troubleshooting: What If It Doesn't Work?
Not every situation will yield dramatic results, and it's possible the software trick isn't the only answer. If you don't see an immediate improvement, don't panic. Consider these potential culprits:
- Router issues: Is your router outdated? Is it placed optimally?
- Interference: Are there other electronic devices (microwaves, other Wi-Fi networks) interfering with the signal?
- ISP bottlenecks: Is your internet service provider delivering the speed you're paying for?
- Laptop limitations: Does your laptop's Wi-Fi adapter support the latest standards?
13. Beyond Software: Hardware Considerations
While this software trick is impactful, it's important to remember that your hardware also plays a role. If your laptop's Wi-Fi adapter is old, it may not support the latest standards. Upgrading to a newer Wi-Fi adapter might be necessary in some cases.
14. Keeping Your Connection Fast: Maintenance Tips
Once you've supercharged your Wi-Fi, maintenance is key. Regularly update your laptop's drivers (including your Wi-Fi adapter drivers) to ensure optimal performance. Keep your router's firmware up-to-date too. If you're running into consistent issues, sometimes, restarting both your router and your laptop can work wonders.
15. The Verdict: Enjoying Lightning-Fast Internet
We’ve covered a lot of ground, but the takeaway is simple: optimizing your laptop's Wi-Fi settings can significantly improve your browsing experience. Now, you can hopefully bid farewell to buffering and hello to lightning-fast internet! With this newfound knowledge, you're well-equipped to tackle the digital world head-on.
Closing Thoughts
So there you have it – a surprisingly simple software trick to boost your laptop’s Wi-Fi speed. We hope this helps – and we'd love to hear about your experiences! Did these tweaks make a difference? Let us know in the comments below. Happy surfing!
FAQs
Will this trick work on any laptop?
- The basic principles apply to most Windows laptops. However, the specific settings and options available may vary slightly depending on your laptop's model and Wi-Fi adapter.
Is this trick safe?
- Yes, adjusting your Wi-Fi adapter settings is generally safe. You're not modifying any critical system files, and you can always revert to the default settings if needed.
Will this increase my actual internet speed?
- No, this trick can't magically increase your internet speed beyond what your
How To Increase WiFi Speed On Windows 11 - Full Guide

By GuideRealm How To Increase WiFi Speed On Windows 11 - Full Guide by GuideRealm
Make Your Laptop's Wifi Signal Faster On Windows 1087 Tutorial

By MDTechVideos Make Your Laptop's Wifi Signal Faster On Windows 1087 Tutorial by MDTechVideos
How To Speed Up Any Internet Connection On Windows 1110 PC REALLY EASY

By EasyTechGeek How To Speed Up Any Internet Connection On Windows 1110 PC REALLY EASY by EasyTechGeek
Title: Best Way To Improve Wi-Fi Connection On PCLaptop 2022
Channel: EasyTechGeek
Best Way To Improve Wi-Fi Connection On PCLaptop 2022 by EasyTechGeek
Laptop SHOCKER: Some DON'T Have WiFi?!
Laptop WiFi Speed: Unleash Blazing Fast Internet with This Unexpected Software Secret
We've all been there: that frustrating lag, the endless buffering, the feeling of being trapped in digital molasses. You're staring at your laptop, ostensibly ready to work, stream, or connect, but instead, you're battling a sluggish WiFi connection. You've likely tried the usual suspects – restarting your router, moving closer to the signal, cursing the internet gods – but the problem persists. What if the solution wasn't about your hardware, but rather a fundamental, often overlooked aspect of your *software *configuration? Prepare for a revelation, because the key to unlocking lightning-fast WiFi on your laptop might be hidden in plain sight.
Decoding the WiFi Bottleneck: Beyond the Router
We often place the blame squarely on our routers, and while a good router is undoubtedly crucial, it's only half the story. Your laptop itself plays a significant role in determining your WiFi speed. Think of your router as a powerful engine and your laptop as the driver. Even the most robust router – the highest-spec model – risks being hamstrung if the laptop's software isn't optimized to receive and process the incoming data efficiently. This is where the secret lies: a software trick that can dramatically improve your laptop's WiFi throughput.
The Hidden Culprit: A Deep Dive into QoS (Quality of Service)
The unsung hero, the often-ignored setting that can transform your WiFi experience, is Quality of Service (QoS). QoS is a mechanism that prioritizes network traffic, ensuring that critical data packets – like those related to streaming video or online gaming – receive preferential treatment, minimizing lag and maximizing speed. However, many laptops ship with default QoS settings that are often either poorly configured or simply disabled. This can be a massive performance killer, particularly in crowded WiFi environments where multiple devices compete for bandwidth.
To understand how QoS works, picture a highway. Without any traffic management, all cars – the data packets from your laptop – travel at the same speed. If there's congestion, everyone slows down. QoS acts like a prioritized lane on that highway. Designated lanes allow certain vehicles (critical data) to travel faster, ensuring a smoother, more efficient journey. Activating and optimizing the QoS settings on your laptop gives your WiFi connection that essential, crucial, enhanced boost.
Unveiling the Software Trick: Step-by-Step Optimization
Now, we’ll delve into the practical steps to unlock this software secret. These instructions are generally applicable across Windows operating systems, though minor visual differences may exist depending on your specific version.
Accessing the Network Adapter Settings: Begin by navigating to your laptop's network adapter settings. The quickest way is to search for "Network Connections" or "View network connections" in the Windows search bar. Alternatively, you can access this through the Control Panel, navigating to "Network and Internet" and then "Network and Sharing Center." From there, click "Change adapter settings" on the left-hand menu.
Identifying Your WiFi Adapter: A list of your network adapters will appear. Locate the adapter specifically designated for your WiFi connection (usually labeled as "Wi-Fi" or "Wireless Network Connection"). Right-click on this adapter and select "Properties."
Configuring QoS through Advanced Settings: In the Properties window, select the "Configure" button. This will reveal the properties for your specific WiFi adapter. A new window will open. In this window, you'll want to locate the "Advanced" tab. Here’s the crucial part. Scroll through this list until you find the settings related to "QoS Packet Scheduler" or "WMM" (Wi-Fi Multimedia). The exact terminology might vary depending on your adapter, but it should be something clearly related to prioritizing network traffic.
Enabling and Optimizing QoS: Ensure that the QoS-related settings are enabled. In most instances, you'll simply need to toggle the setting or select "Enabled" from a dropdown menu. If you see options like "Priority & VLAN," or "WMM," it's important to understand their implications. WMM is a standard QoS implementation, and enabling it is usually a good starting point. If your router supports it, this will enhance the capabilities of your WiFi connection.
Refreshing the Connection: After making these changes, it is essential to refresh the connection.
Beyond Basic Optimization: Fine-Tuning for Maximum Performance
Once you've enabled the core QoS settings, consider these additional steps to fine-tune your WiFi for peak performance:
Driver Updates: Make sure your WiFi adapter drivers are up to date. Outdated drivers can limit performance and create compatibility issues. Visit your laptop manufacturer’s website or the device manager to check for and install the latest drivers.
Router Compatibility: Ensure your router supports QoS or WMM. Many modern routers have this feature enabled by default. If you’re using an older router, you may need to enable QoS in its settings as well. Consult your router’s manual for specific instructions.
Channel Optimization: Check if your router automatically selects the optimal WiFi channel, or manually configure it. Overlapping channels can severely degrade WiFi performance. Tools like WiFi analyzer apps (available for both smartphones and laptops) can help you identify the least congested channels in your area.
Background Applications: Close bandwidth-hungry applications running in the background, such as cloud-based backup services that often use a significant amount of network resources.
Real-World Results: Experiencing the Transformation
The impact of these software tweaks can be substantial. You can experience a noticeable difference in your WiFi speed and performance with these changes. You'll see faster loading times, smoother streaming, and reduced latency in online gaming. The frustrating delays and buffering that once plagued your laptop will become less frequent, replaced with a more responsive and enjoyable online experience.
Troubleshooting Common Issues
If you've followed these steps and are not seeing the expected results, consider these troubleshooting tips:
Restart Your Laptop and Router: This one might seem obvious, but a simple restart can often resolve temporary glitches and ensure that all settings are properly applied.
Check for Interference: Physical obstructions, such as walls and microwave ovens, can interfere with WiFi signals. Try moving your laptop closer to the router or eliminating potential sources of interference.
Network Connection Diagnostics: Utilize the built-in network diagnostics tools in Windows to identify any potential problems with your connection.
Revert to Default Settings: If you suspect that your QoS settings are causing issues, you can always revert to the default configurations. Go back into the network adapter properties and disable QoS, or reset your adapter settings.
The Future of WiFi Optimization
The software trick we've uncovered is just the beginning. Technology is constantly evolving, and new methods for optimizing WiFi performance are emerging. Keep an eye out for advanced features like MU-MIMO (Multi-User, Multiple-Input, Multiple-Output), which allows routers to communicate with multiple devices simultaneously, and the latest WiFi standards like WiFi 6 and 6E.
Conclusion: Claim Your Blazing Fast WiFi
The secret to unlocking blazing-fast WiFi on your laptop is in your hands. By understanding and optimizing the QoS settings, you can reclaim control of your internet experience and say goodbye to frustrating lag and buffering. Start implementing these software tricks today, and prepare to experience the lightning-fast WiFi you deserve. Enjoy the speed! Your online world is waiting.
