how to make laptop wifi hotspot windows 7 starter
Title: Create a laptop WiFi hotspot in under 30 seconds Windows 7
Channel: jacobspeeds
Create a laptop WiFi hotspot in under 30 seconds Windows 7 by jacobspeeds
Turn Your Windows 7 Starter Laptop into a WiFi Hotspot! (Easy!)
Unlock the Internet: Transform Your Windows 7 Starter Laptop into a WiFi Hotspot
Let's face it: Life needs Wi-Fi. You're constantly connected these days. Furthermore, that old Windows 7 Starter laptop? It might seem obsolete. Yet, it still holds potential. Consequently, you can breathe new life into it. You can transform it into a personal Wi-Fi hotspot. Indeed, it's surprisingly simple. Moreover, it provides internet access.
Why Bother? The Perks of a Laptop-Powered Hotspot
Firstly, consider the possibilities. Think of those times with spotty Wi-Fi. Imagine being able to share your internet. For instance, picture yourself on a road trip. You're away from home, perhaps. You might lack a reliable connection. Suddenly, your laptop becomes the hero. Therefore, it provides internet for all your devices. In addition, it can be a backup plan. Perhaps your main internet connection fails. Then, your laptop saves the day. Therefore, you can stream movies. You can keep working productively.
Setting the Stage: Before You Begin
Before we jump in, some preparation is vital. First, ensure your Windows 7 Starter laptop has an active internet connection. It matters how your laptop connects. Is it via Ethernet? Do you use a USB modem? Ensure it works. Consequently, this connection fuels your hotspot. Consequently, you’re granting internet access. Next, your laptop should have a built-in Wi-Fi adapter. Most laptops do, but always double-check. It's what will broadcast the Wi-Fi signal. Finally, you’ll need to have administrator privileges. Because of this, you can change network settings.
The Magic Begins: Turning Your Laptop into a Hotspot
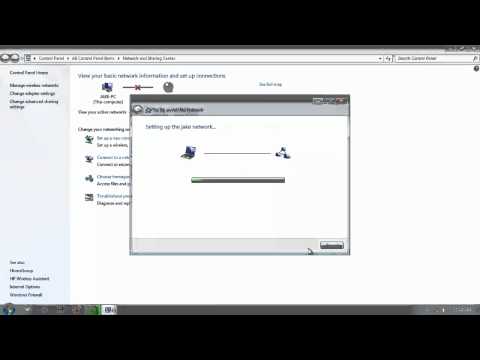
Now, let's begin the process. Firstly, open the “Network and Sharing Center.” You can find it in the Control Panel. Alternatively, click the network icon in your system tray. After that, click "Set up a new connection or network." Then choose “Set up a wireless ad hoc network.” Therefore, this is the crucial step. You are creating the hotspot.
Crafting Your Wireless Network
Consequently, a new window will appear. Now, you'll configure your hotspot settings. Choose a network name. This is the name that your devices will see. Make it memorable. Then, select a security type. In other words, you should choose “WPA2-Personal.” This offers good security. Next, create a strong password. It is vital to do this. Make it at least eight characters long. This will keep your network secure. Finally, check the box that says, "Save this network." Then, hit "Next."
Sharing Your Internet Connection
Now, enable your internet connection’s sharing. Return to the “Network and Sharing Center.” Click “Change adapter settings.” Then, locate the connection you want to share. This is likely the one used for your wired internet. Right-click this connection. Now, select “Properties.”
The Sharing Tab: Letting the World In
Within the properties window, click the "Sharing" tab. Check the box labeled “Allow other network users to connect through this computer’s internet connection.” Therefore, this is the key to sharing. Under “Home networking connection,” select your newly created wireless network. Finally, click “OK” to save your settings. This setting should be in place now.
Testing and Troubleshooting: Ensuring Success
Almost there! Almost. Now, test your hotspot. On another device, search for available Wi-Fi networks. Find your network’s name. Enter your password. If all goes well, you should connect. If you don't connect, don’t panic. Troubleshooting is often straightforward. Make sure your connection sharing is enabled. Double-check your password. Restart your laptop and the connecting device. Also, make sure your firewall isn’t blocking the connection.
Considerations and Advanced Options
You have the basics down. But, there are a few extra considerations. Remember, this method works. Moreover, it uses the laptop’s resources. Because of this, battery life might decrease. Thus, keeping your laptop plugged in is ideal. Moreover, advanced users can explore alternative software. For instance, Connectify is popular. However, the built-in method is typically sufficient. Furthermore, the ad-hoc setup is still functional.
Enjoy Your Newfound Connectivity!
Congratulations! You’ve transformed your Windows 7 Starter laptop. Now, you have a Wi-Fi hotspot. Because of your new found ability, you can share your internet connection. You can do this with friends or other devices. It’s a great tool to keep in your arsenal. So, embrace the freedom of constant connectivity. Therefore, enjoy your new hotspot! You deserve it. Therefore, go forth and connect!
Laptop WiFi Nightmare: Is Your Inverter Blocking Your Signal?!Turn Your Windows 7 Starter Laptop into a WiFi Hotspot! (Easy!)
Alright, tech adventurers! Let's dive headfirst into a project that's been a digital lifesaver for me on more than one occasion. Remember those times when your trusty Windows 7 Starter laptop felt a little… left behind? Maybe you upgraded to a super-fast phone, or your newer tablet craves the sweet embrace of the internet, but your Wi-Fi router is just – plop – too far away? Or perhaps, you're like me, and you're traveling, and the hotel Wi-Fi is about as reliable as a politician's promise. Well, fear not! Today, we're turning that old Windows 7 Starter laptop into a personal Wi-Fi hotspot. It's easier than you think, and trust me, it's a skill that will keep you connected in all sorts of sticky situations. We're going to tackle this project with a smile, a (virtual) cup of coffee, and a healthy dose of "we can do this!" attitude.
1. The Why: Why Bother with a Wi-Fi Hotspot?
Before we get our hands dirty (metaphorically speaking, of course, with all this digital dust!), let's chat about why this is such a valuable trick. Think of it as a digital Swiss Army knife.
- Instant Internet on Demand: Need Wi-Fi for your tablet, phone, or another laptop when you're away from home? Boom! You’ve got it.
- Emergency Backup: When your main internet connection decides to take a vacation, your laptop can step in.
- Cost Savings: Maybe you don't want to pay for multiple devices to piggyback on your home internet connection, which is a pretty simple thing to do, right?
- Sharing the Love: Easily share your internet connection with friends and family (with their permission, of course!).
- Travel Companion: Perfect for hotels, airports, or anywhere with spotty or non-existent Wi-Fi.
These are just a few of the many reasons why having a personal Wi-Fi hotspot is a fantastic tool to have in your tech arsenal.
2. What You'll Need (Besides a Can-Do Attitude!)
Okay, let's gather our digital supplies. Thankfully, this project is surprisingly low-maintenance.
- Your Windows 7 Starter Laptop: Obviously! Make sure it's charged, and that it has a Wi-Fi card (which most laptops do).
- An Internet Connection: This is the source of your Wi-Fi. This could be a wired Ethernet connection (like at home) or a mobile broadband connection (using a USB modem or a cellular phone).
- A Little Patience: Sometimes, technology throws a curveball. Don't worry, we'll handle it together.
3. The Magic Method: Using the Command Prompt
This is where the real fun begins! We're going to use the Command Prompt, which is essentially the brains behind the operation. Don't worry; it's not as scary as it sounds. Think of it as giving your laptop a direct order.
4. Open Command Prompt as Administrator: The Key Step
First things first: Open Command Prompt as an administrator. This is crucial. Consider it your laptop's equivalent of getting a permission slip signed.
- Click the "Start" button.
- In the search box, type "cmd."
- Right-click on "cmd" in the results and select "Run as administrator." This will give you the necessary permissions to make changes.
5. Setting Up the Hosted Network: The First Command
Now, let's feed some commands into the Command Prompt. Each one is a step closer to hotspot paradise. One step at a time!
Type (or copy and paste – I'm a big fan of efficiency!) the following command and hit Enter:
netsh wlan set hostednetwork mode=allow ssid="YourHotspotName" key="YourPassword"
- Important notes:
- Replace
YourHotspotNamewith the name you want your hotspot to have (e.g., "MyAwesomeWifi"). Keep it unique and memorable, like naming your pet. - Replace
YourPasswordwith a strong password (at least eight characters) that you'll use to connect to your hotspot. Think of it as the lock on your digital door.
- Replace
The command should provide a success message.
6. Start the Hosted Network: Switching It On!
Next up, we'll activate your newly configured hotspot. Type the following command and hit Enter:
netsh wlan start hostednetwork
You should see another success message. This means your laptop is now broadcasting a Wi-Fi signal!
7. Sharing Your Internet Connection: Bridging the Gap
Here’s where we bridge the gap, and tell your laptop to share with the network. We have another set of steps.
- Open "Network and Sharing Center" (search for it in the Start Menu).
- Click "Change adapter settings." You'll see a list of your network connections.
- Identify your Internet connection (e.g., "Ethernet" or "Wi-Fi"). Right-click on it and select "Properties."
- Go to the "Sharing" tab.
- Check the box that says "Allow other network users to connect through this computer's Internet connection."
- In the "Home networking connection" dropdown, select "Microsoft Hosted Network Virtual Adapter" (this is created when when you enable the hosted network).
- Click "OK."
This is like turning on the tap to share your connection.
8. Connecting to Your Hotspot: The Proof is in the Pudding
Now for the moment of truth! Test your new hotspot:
- On your phone, tablet, or another laptop, scan for Wi-Fi networks.
- You should see the network name you created in Step 5 ("YourHotspotName").
- Enter the password you set in Step 5 ("YourPassword").
- If you're connected, congratulations! You're officially a Wi-Fi hotspot provider!
9. Troubleshooting: When Things Don't Go as Planned
Sometimes, things don't work perfectly the first time. Don't panic! Here are some common troubleshooting tips:
- Check Your Internet Connection: Make sure your laptop has an active internet connection.
- Restart Your Laptop: A simple restart can solve many tech headaches.
- Firewall Issues: Your firewall might be blocking the connection. Temporarily disable it (for testing purposes only) and see if that helps. If you still can't connect, you may want to consider making the hosted network an exception in the firewall but be careful.
- Driver Issues: Outdated network drivers can cause problems. Update your Wi-Fi adapter drivers.
- Double-Check Commands: Make sure you typed the commands correctly, paying close attention to spaces and capitalization.
10. Turning Off the Hotspot: When It's Time to Shut Down
When you're done using the hotspot, you can easily turn it off.
- Open Command Prompt as administrator (as we did in Step 4).
- Type the command
netsh wlan stop hostednetworkand hit Enter.
This will disable the hotspot, saving your battery and connection bandwidth.
11. Security Considerations: Keeping Your Data Safe
This is a crucial point! When setting up a hotspot, you need to be mindful of security.
- Use a Strong Password: Never use a weak password. Make it long, complex, and unique.
- Enable Encryption: The commands we used already enable WPA2 encryption, which is a good start. Avoid using WEP encryption.
- Monitor Connected Devices: Keep an eye on who is using your hotspot. If you see any suspicious devices, you can disconnect them.
- Keep Your Laptop Updated: Regularly update your Windows 7 Starter laptop, so you have the latest security patches.
12. Battery Life: A Symbiotic Relationship
Creating a Wi-Fi hotspot drains battery life (similar to how using any internet connection does).
- Plug In If Possible: When you're using the hotspot, plug your laptop into a power source whenever you can.
- Monitor Battery Usage: Pay attention to how quickly your battery drains.
- Adjust Power Settings: You can adjust your power settings (in Control Panel) to maximize battery life while the hotspot is running.
13. Beyond the Basics: Advanced Settings
Sure, we've established the basics for setting up a Wi-Fi hotspot, but let's dig a little deeper.
- Network Mode, Channel Number and Band: You can change the network mode (e.g., 802.11b, g, n) and the channel number in the Command Prompt. It may be necessary to adjust these, or the band type (2.4 GHz or 5 GHz), in case your devices fail to connect. However, this requires a bit more technical expertise.
- Create a WiFi Profile: You can save your hotspot settings as a WiFi profile on your phone.
14. Upgrade Time? Why This Still Works (Even
Lenovo Laptop WiFi: The SHOCKING Fix You NEED!How to Create a WiFi Hotspot with Windows 7

By 1stepatatime How to Create a WiFi Hotspot with Windows 7 by 1stepatatime
How to turn your Windows 7810 Laptop or PC into a WiFi Hotspot UpdatedHD

By iTech How to turn your Windows 7810 Laptop or PC into a WiFi Hotspot UpdatedHD by iTech
Turn Your Windows 7 Laptop into a WiFi Hotspot

By AvoidErrors Turn Your Windows 7 Laptop into a WiFi Hotspot by AvoidErrors
Title: Turn Your Windows 7 Laptop into a WiFi Hotspot 2
Channel: AvoidErrors
Turn Your Windows 7 Laptop into a WiFi Hotspot 2 by AvoidErrors
Unlock Your Laptop's Hidden Hotspot: Free WiFi Anywhere!
Turn Your Windows 7 Starter Laptop into a WiFi Hotspot! (Easy!)
The world runs on connection. We rely on the internet for communication, entertainment, and productivity. But what happens when you’re on the go, cradling your trusty Windows 7 Starter laptop, and desperate for a WiFi connection? You might be surprised to learn that your lightweight machine, often perceived as limited, can be transformed into a powerful WiFi hotspot, sharing its internet access with other devices. This guide will walk you through the process, step by step, ensuring you can easily create your own mobile hotspot using your Windows 7 Starter laptop.
Understanding the Windows 7 Starter Edition and Its Capabilities
Before diving into the setup, it's crucial to understand the nuances of the Windows 7 Starter edition. Designed for netbooks, this version of Windows 7 had specific limitations compared to its Professional or Ultimate counterparts. One significant difference was the lack of the “Virtual WiFi” feature, which natively allows creating a hotspot. However, do not be discouraged! There are still effective methods to achieve the same result. We will use the Command Prompt, a powerful tool available in all Windows 7 editions, to circumvent this limitation and establish a functional WiFi hotspot. This approach is incredibly straightforward and doesn't require any third-party software.
Prerequisites: Ensuring You're Ready to Go
Before we begin, let's ensure you have everything in place for a seamless setup. First, your Windows 7 Starter laptop needs a working internet connection. This could be via an Ethernet cable, a 3G/4G USB dongle, or any other method that provides internet access to your laptop. Second, you need a built-in or external wireless network adapter. Most laptops already come equipped with one. Ensure that your wireless adapter is properly installed and enabled. You can confirm this by checking your network settings in the Control Panel. Finally, take a moment to jot down the essential data you'll need for your hotspot: the network name (SSID) and a strong, secure password. This information is the key to connecting other devices to your hotspot.
The Command Prompt Method: Your Gateway to a Mobile Hotspot
Now, the moment we've been waiting for: the creation of your WiFi hotspot using Command Prompt. Accessing the Command Prompt is simple. Click on the Start button and type "cmd" in the search box. Right-click on “cmd.exe” in the search results and select “Run as administrator.” This is a crucial step, as it grants the Command Prompt the necessary permissions to make network configuration changes.
Once the Command Prompt window opens, it's time to enter the commands. We'll proceed with the following steps:
Step 1: Hosting Network Configuration
Type the following command and press Enter:
netsh wlan set hostednetwork mode=allow ssid="YourHotspotName" key="YourPassword"
Replace "YourHotspotName" with your desired network name (SSID), and "YourPassword" with a strong password of at least eight characters. Note: Make sure you replace what's in quotes with your chosen network name and password. This command sets up the hosted network, defining your hotspot's characteristics.
Step 2: Starting the Hosted Network
Enter the next command and press Enter:
netsh wlan start hostednetwork
This command initiates the hosted network, effectively activating your hotspot. If successful, you'll receive a confirmation message indicating the hosted network has started.
Step 3: Sharing Your Internet Connection
The final step involves sharing your existing internet connection with the newly created hotspot.
- Open the Network and Sharing Center. You can access it by clicking on the network icon in your system tray (usually found in the bottom right corner of your screen) and then clicking "Open Network and Sharing Center."
- Click on "Change adapter settings" in the left pane. This will display a list of your network adapters.
- Identify the adapter currently providing your internet connection (e.g., Ethernet, Wireless Network Connection). Right-click on this adapter and select "Properties."
- Go to the "Sharing" tab.
- Check the box that says "Allow other network users to connect through this computer's Internet connection."
- In the "Home networking connection" dropdown, select your "Microsoft Hosted Network Virtual Adapter" (or a similar name).
- Click "OK."
This process configures your laptop to share its internet connection through the WiFi hotspot you have just created.
Troubleshooting Common Issues
While the process is generally straightforward, you might encounter some issues. Let's address common problems:
- "The hosted network couldn't be started" error: This usually indicates a problem with your wireless adapter driver. Ensure the driver is up to date by visiting the laptop manufacturer's website or using the Device Manager in Windows.
- Devices can connect to the hotspot but have no internet access: This is typically due to connection sharing issues. Double-check the steps in the "Sharing Your Internet Connection" section to ensure you've correctly configured your internet connection sharing. Also, verify that your laptop actually has an active internet connection.
- The hotspot doesn't appear on other devices: Make sure you've correctly entered the SSID (network name) when starting the hosted network in the Command Prompt. Also, confirm that your wireless adapter is enabled.
- Password Issues: Ensure your password meets the complexity requirements (at least eight characters). Double-check the password's accuracy when connecting devices.
Advanced Customization Options
Once your hotspot is running, you can customize it further.
- To stop the hosted network: Use the command
netsh wlan stop hostednetworkin the Command Prompt (run as administrator). - To check the status of the hosted network: Enter
netsh wlan show hostednetwork. This command will show you the SSID, authentication type, and connected clients. - Changing the SSID or password: You must stop the hosted network first (
netsh wlan stop hostednetwork), then repeat the commands in "Step 1: Hosting Network Configuration," using your new SSID and password. After that, you can start the hosted network again using "Step 2: Starting the Hosted Network."
Optimizing for Security and Performance
For optimal security and performance, consider the following:
- Use a strong password: Choose a password that is at least eight characters long and includes a mix of uppercase and lowercase letters, numbers, and symbols. Avoid using easily guessable information such as your name or birthdate.
- Regularly change your password: This adds an extra layer of security, especially if you are using your hotspot in public places.
- Monitor connected devices: Use the
netsh wlan show hostednetworkcommand to keep track of which devices are connected to your hotspot. If you see any unfamiliar devices, change your password immediately. - Limit data usage: Streaming videos and downloading large files can quickly consume your internet data allowance. Be mindful of your usage, especially if you have a data cap.
- Position your laptop optimally: Place your laptop in an open location with minimal obstructions (walls, metal objects) to maximize the range of your WiFi signal.
Benefits of Creating a WiFi Hotspot
Creating a WiFi hotspot on your Windows 7 Starter laptop offers several benefits:
- Connectivity on the go: Access the internet on your tablet, smartphone, or other devices when you don't have access to a public WiFi network.
- Cost savings: Avoid paying for expensive cellular data plans by leveraging your laptop's internet connection.
- Convenience: Easily share your internet connection with friends, family, or colleagues.
- Increased productivity: Stay connected and productive, regardless of your location.
Conclusion: Embrace the Power of Your Windows 7 Starter Laptop
Your seemingly limited Windows 7 Starter laptop is more powerful than you think. By following this detailed guide, you can effortlessly transform it into a reliable WiFi hotspot, creating a portable internet access point wherever you go. It's a straightforward process that unlocks the full potential of your laptop and keeps you connected. So, grab your laptop, embrace the convenience, and enjoy seamless internet access wherever life takes you! Say goodbye to internet woes and hello to a world of connectivity!
