laptop cannot connect to wifi windows 8

Title: How to Connect to WiFi on Windows 8
Channel: HOWTECH
How to Connect to WiFi on Windows 8 by HOWTECH
hp laptop windows 8 cannot connect to wifi, why my laptop is not connecting to wifi windows 8, why is my windows 8 not connecting to wifi
Windows 8 Wi-Fi Nightmare? FIX Your Laptop Connection NOW!
Windows 8 Wi-Fi Woes: Conquer Your Connection Chaos!
Have you ever found yourself staring blankly at a flickering Wi-Fi symbol? Or worse, an ominous "no internet" message taunting you? If you're a Windows 8 user, you might have experienced these frustrating scenarios firsthand. It's a common complaint: seemingly random Wi-Fi dropouts, slow speeds, and the general feeling of digital isolation. However, don't despair! Thankfully, numerous solutions exist. Prepare to reclaim your online freedom!
The Silent Saboteur: Unmasking Your Wi-Fi Villain
Before you start throwing your laptop across the room, let's perform some detective work. Is your Wi-Fi connection behaving erratically? Are websites loading at a glacial pace? These issues could stem from a few culprits. Therefore, understanding these potential problems will help us troubleshoot.
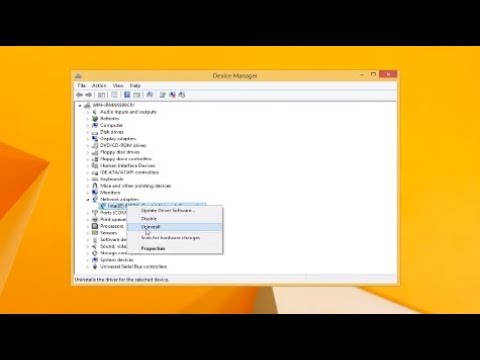
Firstly, consider your wireless network adapter. It functions as the bridge between your laptop and the online world. Is it enabled? Has it been updated recently? Outdated drivers are often the root of connectivity problems. To check, head to your Device Manager. Right-click on your "Network adapters" and explore the options. Now check for any yellow exclamation marks or warnings. These strongly indicate potential problems.
Furthermore, your router itself might be the culprit. This little box is the gatekeeper of your internet signal. Is it positioned optimally? Walls and other obstructions can weaken signal strength. Try relocating your router to a more central, open location. Also, remember to restart it periodically. Restarting your router allows it to refresh its settings.
Driver Dilemma: The Key to Consistent Connectivity
Outdated network drivers are like a broken spoke in a wheel. They can cripple your Wi-Fi performance significantly. Fortunately, fixing this is usually straightforward. Here's a simple process:
First, access your Device Manager (search it in the Windows 8 start menu). Then, locate your network adapter. Right-click and select "Update driver software." Windows will, hopefully, search for the latest driver automatically. If that fails, you may have to manually download the drivers. Visit your laptop manufacturer's website; they provide necessary drivers.
After installation, restart your laptop. This ensures the updated driver takes effect. You should notice immediate improvements.
Power Management Pandemonium: Taming the Energy Vampire
Windows 8, in its quest for energy efficiency, sometimes gets a little overzealous. Specifically, it may limit power to your network adapter. Consequently, this can result in intermittent Wi-Fi disconnections. Fortunately, you can easily adjust these settings.
Go back to Device Manager. Locate your network adapter once more. Right-click on it and select "Properties." Navigate to the "Power Management" tab. Uncheck the box labeled "Allow the computer to turn off this device to save power." Afterwards, click "OK" and reboot your system.
Troubleshooting Tactics: A Toolkit of Solutions
Even with these steps, problems may stubbornly persist. Therefore, it's time for more advanced troubleshooting techniques.
Firstly, ensure your Windows 8 is up to date. Microsoft frequently releases updates that include bug fixes and driver improvements. Check your Windows updates regularly. Then, consider running the built-in network troubleshooter. It is designed to identify and resolve common Wi-Fi issues. Access it by right-clicking on the Wi-Fi icon in your system tray.
Moreover, try flushing your DNS cache. This cache can sometimes store outdated information that conflicts with your current internet settings. To flush it, open Command Prompt as administrator. Type "ipconfig /flushdns" and press Enter.
Channel Surfing: Optimizing Your Wireless Signal
Wi-Fi routers operate on different channels. These channels can get congested, especially in areas with numerous wireless networks. This congestion may cause slowdowns or disconnections. Thus, changing your router's Wi-Fi channel can often improve performance.
Access your router's configuration page (usually through your web browser by typing its IP address). Then, navigate to the wireless settings. Look for the channel setting. Experiment with different channels, such as 1, 6, or 11. You can also use Wi-Fi analyzer apps on your smartphone to identify the least congested channels.
Security Savvy: Protecting Your Wireless Network
Weak security settings can cause Wi-Fi problems. They can also expose your network to unauthorized access. Make sure your Wi-Fi network is protected with a strong password and WPA2 or WPA3 encryption. Then consider changing your router's default password.
Embrace the Digital Realm: Conclusion
Battling Wi-Fi problems can be frustrating. Nevertheless, persistence and these troubleshooting tips can resolve most issues. After you implement these solutions, you should be back online in no time. Now, you can enjoy a smooth and reliable internet connection. So, go forth and conquer your Wi-Fi woes!
Unlock Your Laptop's WiFi Hotspot: Windows 7 Secret Revealed!Windows 8 Wi-Fi Nightmare? FIX Your Laptop Connection NOW!
Hey, fellow tech travelers! Ever stared at your Windows 8 laptop, willing the Wi-Fi signal to magically appear, only to be greeted by a frustrating blank space? We’ve all been there. It’s like your laptop decided to take a permanent vacation from the internet, and you, my friend, are stuck on the digital tarmac. Windows 8, bless its heart (or sometimes, curse it), can be a bit of a diva when it comes to Wi-Fi. But don't despair! We’re here to navigate this digital drama together. This isn't just about fixing a connection; it’s about reclaiming your sanity and getting back to the things you love – streaming that show, video chatting with family, or just, you know, existing online. Buckle up; we're about to untangle this Wi-Fi web.
1. The Symptoms: Is Your Windows 8 Wi-Fi Acting Up?
Before we dive into solutions, let's diagnose the problem. It's like figuring out if you have a cold or the flu – knowing the symptoms is key. Are you experiencing slow speeds, intermittent dropouts, or a complete refusal to connect? Is the Wi-Fi icon taunting you with a red "X"? Maybe you can see available networks but can't connect. Perhaps you can connect but can't access the internet. All these are classic signs of a Windows 8 Wi-Fi headache. If you're nodding your head, congratulations! You're in the right place. We're going to make this Wi-Fi nightmare a distant memory.
2. The Usual Suspects: Common Culprits Behind Wi-Fi Woes
Let's address the elephant in the room: what’s causing this digital drama? Often, the problems aren't complicated. We're talking about the usual suspects:
- Driver Issues: Think of drivers as the translators between your laptop’s hardware (the Wi-Fi adapter) and its operating system (Windows 8). If the translator is out of sync, the connection suffers.
- Router Problems: Your router is the gatekeeper to the internet. If it's not working correctly, you're not getting online. Think of it as a grumpy bouncer denying you entry.
- Network Settings: Sometimes, the settings in your laptop are just… off. A misplaced checkmark or an incorrect IP address can wreak havoc.
- Software Conflicts: Occasionally, other programs can interfere with your Wi-Fi connection. It's like a crowded party where nobody can hear each other.
3. Driver Deep Dive: Updating Your Wi-Fi Adapter Driver
Okay, let's get our hands dirty with the driver. This is often the low-hanging fruit, the first thing to check. Here's how to give your Wi-Fi adapter a driver refresh:
- Open Device Manager: Press the Windows key + X simultaneously. Select "Device Manager" from the menu.
- Find Your Network Adapter: Expand "Network adapters." Your Wi-Fi adapter will be listed there; it might be called something like "Wireless Network Adapter" or "Wi-Fi Adapter."
- Update the Driver: Right-click on your Wi-Fi adapter and choose "Update driver." Windows can automatically search online for the latest driver. You can also manually browse for a driver if you have one downloaded.
- Restart Your Laptop: After the update, restart your laptop to apply the changes.
If you still can't connect, don't give up! Sometimes the automatic update doesn't find the best driver. In that case, try visiting the manufacturer’s website (e.g., Intel, Broadcom, Realtek) and download the latest driver specifically for your adapter and Windows 8.
4. Router Reboot: The Unsung Hero of Internet Troubleshooting
Ah, the router reboot. It's the classic fix, the tech equivalent of "have you tried turning it off and on again?" (yes, I'm quoting The IT Crowd). But seriously, it works surprisingly often.
- Unplug Your Router and Modem: Unplug both devices from their power source.
- Wait: Give it a good 30 seconds – longer if you want to be extra cautious.
- Plug Them Back In: Plug the modem in first, wait for it to power up and establish a connection, and then plug in your router.
- Test the Connection: Once the router is back online, try connecting your laptop to Wi-Fi.
This simple step can clear out temporary glitches and refresh the connection, like a reset button for your internet.
5. Network Troubleshooter: Let Windows 8 Be Your Detective
Windows 8 actually has a built-in detective – the Network Troubleshooter. It's like a digital Sherlock Holmes, searching for clues and trying to solve the mystery.
- Open Network and Sharing Center: Right-click the Wi-Fi icon in the system tray (lower right corner of your screen) and choose "Open Network and Sharing Center."
- Troubleshoot Problems: Click on "Troubleshoot problems" or "Fix a problem" (the wording may vary slightly). Windows will then guide you through a series of checks and fixes.
This can automatically identify and resolve many common issues, saving you the headache of manually troubleshooting.
6. Firewall Fury: Checking Your Security Settings
Sometimes, your built-in firewall can get a little overzealous and block your Wi-Fi connection. It's like a overly protective bouncer.
- Open Windows Firewall: Search for "Windows Firewall" in the Start menu and open the Windows Firewall control panel.
- Allow Apps Through Firewall: Click on "Allow an app or feature through Windows Firewall."
- Check for Wireless Connections: Make sure "Wireless Network Connection" or similar entries are checked in both the "Private" and "Public" columns. If they're not, click "Change settings" and check the appropriate boxes.
This ensures your firewall doesn't accidentally block your Wi-Fi.
7. Static IP vs. Dynamic IP: Understanding Your Network Address
Your laptop needs an IP address to communicate with your router and the internet. Think of it as your digital postal address. There are two main types:
- Dynamic IP (DHCP): Your router automatically assigns an IP address to your laptop. This is usually the default setting and what you want.
- Static IP: You manually enter an IP address. This is generally not necessary unless you have a specific reason, such as setting up a server.
To check your IP settings:
- Open Network and Sharing Center (again!): See section 5.
- Click on Your Wi-Fi Connection: Click on the blue link that refers to your current Wi-Fi network. Ex: "Wi-Fi (Network Name)".
- Click on "Details": This will show you your current IP address, gateway, DNS servers, etc.
- If troubleshooting: Click on the "Properties" button. Ensure the "Internet Protocol Version 4 (TCP/IPv4)" is selected and click on "Properties." Make sure "Obtain an IP address automatically" and "Obtain DNS server address automatically" is checked (unless you have a specific reason to use static settings).
If your settings are incorrect or you've accidentally assigned a static IP, changing back to automatic can often fix the problem.
8. Network Adapter Reset: A More Aggressive Approach
If the basic troubleshooting steps haven't worked, you might need to reset your network adapter. This is like hitting the "reset" button on your laptop's Wi-Fi brain.
Open Command Prompt as Administrator: Search for "cmd" in the Start menu. Right-click on "Command Prompt" and select "Run as administrator."
Enter Commands: Type the following commands one by one, pressing Enter after each:
netsh winsock resetnetsh int ip resetipconfig /releaseipconfig /renewipconfig /flushdns
(It can be useful to write these lines in notepad first to make sure there are no syntax errors.)
Restart Your Laptop: After running these commands, restart your laptop.
This set of commands resets the Winsock catalog, resets the TCP/IP stack, releases your current IP address, renews a new one, and flushes the DNS cache.
9. Antivirus Interference: The Security Guard That Went Rogue
Sometimes, your antivirus software might be the culprit. It's like a security guard who's gotten a bit too protective.
- Temporarily Disable Your Antivirus: Try disabling your antivirus software to see if it's blocking your Wi-Fi connection. Be careful when doing this; don't browse risky websites when your antivirus is off.
- Check Antivirus Settings: If disabling your antivirus fixes the problem, go into its settings and check for options related to network protection or firewalls. You may need to create an exception for your Wi-Fi connection.
10. Check the Physical Connections: Is Everything Plugged In?
This might seem obvious, but
Laptop WiFi Fix: Phone Hotspot Hack (Lightning Fast!)Windows 8.1 - No Internet Connection Available
By MDTechVideos Windows 8.1 - No Internet Connection Available by MDTechVideos
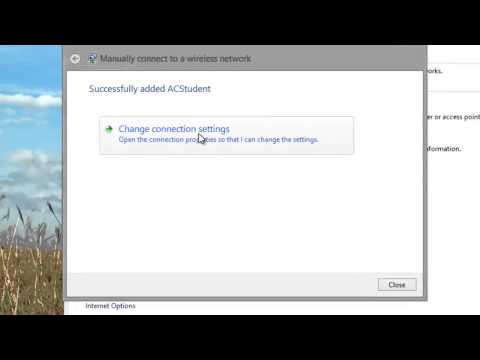
Connecting Manually to a Wireless Network in Windows 8 HP Computers HP Support

By HP Support Connecting Manually to a Wireless Network in Windows 8 HP Computers HP Support by HP Support
Cara Mengatasi Laptop Tidak Bisa Connect Wifi Windows 10, 8 & 7
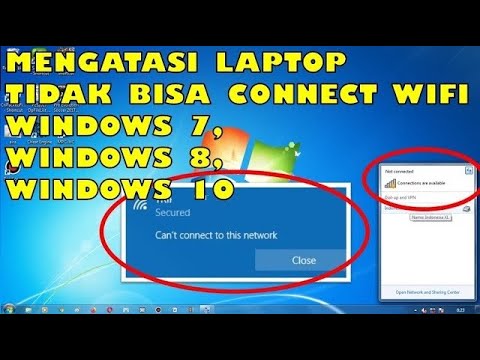
By Jari Mungil Rayyan Cara Mengatasi Laptop Tidak Bisa Connect Wifi Windows 10, 8 & 7 by Jari Mungil Rayyan
Title: Connecting to Wifi Windows 8
Channel: Academic Algonquin
Connecting to Wifi Windows 8 by Academic Algonquin
Wifi On Laptop
Windows 8 Wi-Fi Woes: Conquer Your Laptop's Connection Crisis
We understand the frustration. You purchased a sleek, modern laptop, anticipating seamless wireless connectivity. But instead, you're wrestling with intermittent drops, infuriatingly slow speeds, or a complete inability to connect to your Wi-Fi network. You're not alone. The transition to Windows 8, while promising advancements, introduced a host of Wi-Fi-related challenges for many users. But fret no more! We've compiled a comprehensive toolkit of solutions, meticulously crafted to eradicate these connectivity nightmares and restore your laptop's wireless freedom. Prepare to kiss those frustrating connection problems goodbye and embrace the digital experience you deserve.
Diagnosing the Root of Your Wi-Fi Troubles
Before plunging into fixes, a little detective work is crucial. Is your laptop simply refusing to connect, or are you experiencing intermittent disconnects? Is the signal strength weak, or are speeds excruciatingly slow, even when connected? A precise understanding of the problem will guide us to the most effective solutions.
- Complete Disconnection vs. Intermittent Drops: If your laptop flat-out refuses to see your Wi-Fi network, the issue likely resides with your network adapter, driver incompatibility, or system settings. Intermittent drops, however, might indicate a problem with your router, signal interference, or power management settings that are too aggressive. Slow speeds, even when connected, suggest congestion on your network, bandwidth limitations, or problems with the driver configuration.
- The Power of Observation: Pay close attention to when the problem surfaces. Does it occur only at certain times of day? Does it coincide with you using other devices on your network? Identifying these patterns will offer vital clues. Note the error messages, if any, displayed by Windows. Every detail, no matter how subtle, can assist with pinpointing the cause.
Step-by-Step Solutions: Restoring Wi-Fi Harmony
Now, let's dive into practical solutions. We'll proceed systematically, starting with the simplest fixes and progressing to more advanced troubleshooting techniques.
1. The Restart Remedy: A Simple but Often Effective Solution
It sounds overly simple, but a quick restart of both your laptop and your router can often resolve temporary glitches. Think of it as a digital reset. Turn off your laptop completely. Unplug your router and modem for at least 30 seconds, allowing them to fully reset. Plug the modem and router back in, waiting for them to fully power up. Then, turn on your laptop and see if it connects.
2. Driver Drama: Ensuring Compatibility and Performance
Outdated, corrupted, or incompatible network adapter drivers are a frequent culprit. Ensuring your drivers are up-to-date is critical. Here's how to update or reinstall your drivers:
- Accessing Device Manager: Right-click the Start button (or press Windows key + X) and select "Device Manager."
- Locating Your Network Adapter: In Device Manager, expand the "Network adapters" section. You'll see the name of your Wi-Fi adapter (e.g., "Intel Wireless-AC 9560," "Realtek RTL8821CE").
- Updating Drivers: Right-click your Wi-Fi adapter and select "Update driver." Choose "Search automatically for drivers." Windows will search for updated drivers online and install them.
- Manual Driver Search: If auto-update finds nothing, visit your laptop manufacturer's website (e.g., Dell, HP, Lenovo). Go to the support or drivers section, enter your laptop's model number, and download the latest Wi-Fi adapter drivers for Windows 8. Install these manually.
- Reinstalling Drivers: If updating doesn't work, try uninstalling the driver (right-click, "Uninstall device") and then restarting your laptop. Windows will automatically attempt to reinstall the driver. If not, reinstall the driver that you downloaded manually.
3. Power Management Puzzles: Optimizing for Reliability
Windows 8 often employs aggressive power management settings to conserve battery life. Sometimes, these settings inadvertently interfere with your Wi-Fi connection.
- Accessing Power Options: Go to "Control Panel" (search for it in the Start screen or the search bar). Select "Hardware and Sound," then "Power Options."
- Changing Plan Settings: Choose your active power plan (usually "Balanced" or "Power saver") and click "Change plan settings."
- Advanced Power Settings: Click "Change advanced power settings."
- Wireless Adapter Settings: Scroll down to expand "Wireless Adapter Settings."
- Setting to Maximum Performance: Set "On battery" and "Plugged in" to "Maximum Performance." This disables the power-saving measures that can disrupt your connection.
- Reconnecting and Testing: After applying these changes, restart your laptop or simply disconnect and reconnect to your Wi-Fi network.
4. Network Adapter Tweaks: Fine-Tuning for Stability
Sometimes, adjusting network adapter settings can dramatically improve performance and stability.
Accessing Adapter Properties: In Device Manager (as described in Step 2), right-click your Wi-Fi adapter and select "Properties."
Advanced Tab: Go to the "Advanced" tab.
Key Settings to Adjust: Look for the following settings and experiment with adjusting their values:
- 802.11n Channel Width: Try setting this to "20MHz only" or "20/40MHz Auto." Experiment to see which provides the best speed and reliability.
- 802.11n Mode: Enable or disable this setting to see if it improves connection stability.
- Roaming Aggressiveness: If you frequently move around, try lowering this setting. This can help prevent the adapter from constantly searching for a better signal, causing drops.
- Transmit Power: Set this to "Highest" for maximum range and signal strength (though this can consume more battery life).
- Preferred Band: If your router supports dual-band Wi-Fi (2.4GHz and 5GHz), you can set the preferred band here. 5GHz often provides better speeds and less interference, but 2.4GHz has a wider range.
Applying Changes and Testing After making changes to these settings, click "OK" and then reconnect to your Wi-Fi network. Test your connection thoroughly.
5. Router Renaissance: Ensuring a Healthy Gateway
Your router is the heart of your home network. Sometimes, the problem lies not with your laptop, but with the router itself.
- Router Firmware Updates: Outdated firmware can lead to performance issues and connectivity problems. Check your router manufacturer's website for firmware updates. Download and install the latest firmware. The process varies depending on your router model; consult your router's manual.
- Channel Selection: Wi-Fi routers broadcast on various channels. These channels can experience interference from other devices, including other Wi-Fi networks and microwaves. Access your router's configuration page (usually by typing its IP address in your web browser – consult your router's manual for the IP address, often 192.168.1.1 or 192.168.0.1.). In the wireless settings of your router, experiment with changing the Wi-Fi channel, starting with channel 1, 6, or 11, these are often the least congested.
- Router Placement: Ensure your router is placed in a central, elevated location, away from walls, metal objects, and other electronic devices that could cause interference.
- Router Reset: Sometimes, simply rebooting your router can resolve connectivity problems.
6. Network Profile Profiling: Eliminating Quirks
Corrupted or misconfigured network profiles can also cause Wi-Fi issues. Deleting your Wi-Fi profile and recreating it from scratch can resolve these problems.
- Accessing Network Settings: In the system tray (bottom right corner of your screen), click the Wi-Fi icon.
- Managing Wireless Connections: Select "Open Network and Sharing Center."
- Manage Wireless Networks: Click "Manage wireless networks."
- Deleting the Profile: Right-click the name of your Wi-Fi network and select "Remove network."
- Reconnecting and Entering Credentials: Turn off your Wi-Fi on, go back to available networks and then reconnect to your Wi-Fi network. Windows will prompt you to re-enter your Wi-Fi password.
- Testing the Connection: After reconnecting, test your internet connection.
7. IPv4 and IPv6 Configuration: Understanding Your Network's Language
Incorrectly configured TCP/IP settings can sometimes lead to problems. While less common, ensuring the correct settings can be crucial. Here's how to check and adjust settings if needed.
- Accessing Adapter Properties: Go to and access the "Network Connections" window (search in the Start menu). Right-click on your Wi-Fi adapter and go to the "Properties" option.
- Checking IPv4: Ensure "Internet Protocol Version 4 (TCP/IPv4)" is checked and selected. Click "Properties."
- Obtain IP Address Automatically: This is the recommended setting for most home networks.
- Obtain DNS Server address automatically: Again, this is usually the best option.
- Static IP Address: If you've been assigned a static IP address by your ISP, enter it correctly
