hp laptop wifi antenna replacement step

Title: Replace the Wireless Antenna Cables HP Pavilion Gaming Notebook HP Support
Channel: HP Support
Replace the Wireless Antenna Cables HP Pavilion Gaming Notebook HP Support by HP Support
HP Laptop WiFi Antenna: Dead-Simple Replacement Guide (Shockingly Easy!)
Reviving Your HP Laptop's Wi-Fi: A Surprisingly Simple Fix!
Let's face it; a flaky Wi-Fi connection is a modern-day torment. You're in the middle of streaming your favorite show, and bam! Buffering hell. Or, worse, you're trying to meet a deadline, and your internet decides to take a vacation. If you are experiencing consistent Wi-Fi issues on your HP laptop, the culprit might be the internal Wi-Fi antenna. Fortunately, replacing it doesn't require advanced tech ninja skills. Instead, it's a task surprisingly manageable for even the most novice computer users.
Identifying the Problem: Is It Really the Antenna?
Before you tear apart your laptop, let's confirm the diagnosis. First, try the usual suspects. Restart your laptop. Then, reboot your router. After that, check your internet speed on another device. If other devices work fine, the issue probably lies with your HP laptop. If the signal strength on your laptop is consistently weak or nonexistent, even when close to the router, the antenna is a likely suspect. Furthermore, slow download speeds compared to other devices strongly indicate a problem. Finally, intermittent connection drops are another telltale sign.
Gathering Your Supplies: The Prep Work That Matters
Now that you've pinpointed the potential problem, it’s time to gather your essential tools. You’ll need a small Phillips head screwdriver. Also, a set of plastic opening tools or a spudger will be indispensable. Consider a magnetic mat or tray to keep track of the tiny screws. That will save you headaches later. Of course, you'll need a replacement Wi-Fi antenna, specifically designed for your HP laptop model. You can find these online. Double-check the compatibility before you purchase. Most importantly, it’s better to be safe than sorry.
Step-by-Step: The Antenna Replacement Adventure
Alright, are you ready to jump in? Great! Here's the straightforward process.
Step 1: Power Down and Disconnect
First and foremost, shut down your HP laptop completely. Unplug the power adapter. Then, disconnect any external devices. This ensures safety and prevents accidental damage.
Step 2: Removing the Battery
Locate the battery compartment. Usually, a latch or a set of latches secures the battery. Slide the latch(es) to release the battery. Carefully remove it.
Step 3: Accessing the Internal Components
Next, you need to access the laptop's interior. The exact process varies slightly between models. Generally, you'll need to remove screws on the bottom panel. Use your Phillips head screwdriver. Make sure to remember where each screw goes. A magnetic mat will be useful here. Gently pry the bottom panel open using your plastic opening tools. Start at an edge and cautiously work your way around.
Step 4: Locating the Wi-Fi Card and Antenna
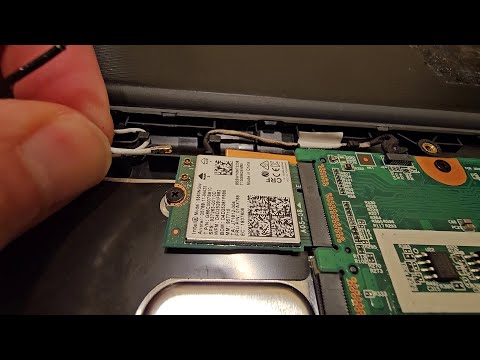
Once the panel is off, you'll likely see the Wi-Fi card. The antennas are usually tiny wires connected to this card. They snake around the inside of the laptop. Look for the antenna wires. Often, they're clipped into place.
Step 5: Disconnecting the Old Antenna
Carefully detach the antenna wires from your Wi-Fi card. They usually snap on or off with a gentle tug. Be patient. Avoid yanking them forcefully. Also, note their position. You’ll need to connect the new antenna in the same spots.
Step 6: Removing the Old Antenna (If Necessary)
Depending on your laptop model, you might need to remove the old antenna itself. If so, it will often be adhered to the chassis. Gently peel it away.
Step 7: Installing the New Antenna
Now, take your new antenna. Position it inside the laptop. Connect its wires to the Wi-Fi card in the corresponding locations. Ensure the connection is secure.
Step 8: Reassembly is Key!
Carefully replace the bottom panel. Align it properly. Screw it back into place. Replace the battery. Reconnect the power adapter and any other peripherals.
Step 9: The Moment of Truth: Testing Your Wi-Fi
Turn on your laptop. Connect to your Wi-Fi network. Test your internet connection. If everything worked correctly, you should see improved signal strength and speed.
Troubleshooting Tips: When Things Don't Go Smoothly
If your Wi-Fi is still acting up, don’t panic. First, check all your connections again. Make sure the antenna wires are securely attached. Next, ensure you’ve installed the correct replacement part. Furthermore, certain metallic surfaces can impede Wi-Fi signals. Therefore, avoid blocking the antennas’ path. Finally, if problems persist, you might have a different issue, such as a faulty Wi-Fi card.
Conclusion: You Did It!
There you have it! Replacing your HP laptop's Wi-Fi antenna isn't as daunting as it seems. Indeed, in most cases, it’s a straightforward procedure. You've saved yourself a repair bill and gained a new skill. Now get back online and enjoy a stronger, more reliable Wi-Fi connection. Because ultimately, you deserve it. You are now the master of Wi-Fi related problems!
Lenovo WiFi Nightmare? FIX It NOW!HP Laptop WiFi Antenna: Dead-Simple Replacement Guide (Shockingly Easy!)
Hey there, tech adventurer! Ever found yourself staring glumly at your HP laptop, desperately trying to conjure a WiFi signal that just won't appear? That frustrating little symbol with the crossed-out bars? Yeah, we’ve all been there. It's like your digital lifeline is cut, leaving you stranded in a sea of buffering videos and disconnected Zoom calls. More often than not, the culprit isn't your internet provider, but a sneaky little component tucked away inside your laptop: the WiFi antenna. And the great news? Replacing it is often far easier than you think. Forget the hours-long repair shop visits and the hefty bills. We're talking a DIY project that even I, a notorious tech klutz at times, can manage! Let's dive in and get your HP laptop back online, shall we?
1. The Unlikely Suspect: Why Your WiFi Might Be Failing
Before we get our hands dirty, let’s understand the enemy. Think of your WiFi antenna as the radio receiver for your laptop. It’s the little workhorse that grabs those invisible radio waves bouncing around your home and translates them into that sweet, sweet internet connection. When this antenna goes kaput, you're left staring at that dreaded "no connection" message. The causes can vary, from a loose wire that's jiggled loose from countless laptop-closing-opening cycles to physical damage from being dropped (oops!), or even just plain old wear and tear. Sometimes, the antenna itself is simply fried. Whatever the reason, the result is the same: no internet.
2. Gathering Your Supplies: The Pre-Replacement Checklist
Okay, time to play detective and gather our tools. The good news is, you won't need a workshop full of expensive gadgets. Here's what you’ll need:
- A New WiFi Antenna: This is the star of the show. Make sure you get the right one for your HP laptop model. Double-check the model number on the bottom of your laptop to ensure compatibility. You can usually find these on Amazon, eBay, or any reputable electronics retailer.
- A Small Phillips Head Screwdriver: You’ll need a small, precision screwdriver, because the screws holding your laptop together are usually tiny. A magnetic tip can be a lifesaver.
- A Plastic Spudger or Pry Tool (Optional, but recommended): This is a thin, non-conductive tool (often made of plastic) that helps you gently pry open your laptop without damaging the casing. A guitar pick can sometimes work in a pinch!
- Anti-Static Wrist Strap (Highly Recommended): This is a simple device that grounds you, preventing static electricity from frying your laptop’s delicate components. You can find them very inexpensively.
- A Clean, Well-Lit Workspace: Somewhere with plenty of room to work and good lighting is essential. Trust me, you don’t want to be hunting for tiny screws in a dimly lit corner!
- A Small Container or Tray: Somewhere to keep those tiny screws safe and organized. Lost screws are the bane of a DIY repair!
- Patience and a Can-Do Attitude: Because sometimes things go a little sideways, and that’s okay!
3. Power Down and Prepare: The First Steps to Wireless Freedom
Before even thinking about touching your laptop, it's crucial to make yourself safe.
- Power Down Completely: Unplug your laptop from the power outlet and remove the battery (if possible and if you are comfortable with it). This is a non-negotiable step to avoid any electrical mishaps!
- Ground Yourself: Put on your anti-static wrist strap and connect it to the laptop chassis (a metal part). This will discharge any static electricity you may have built up.
- Find Your Model Number: Look for a sticker on the bottom of your laptop. The model number is usually a string of letters and numbers (e.g., HP Pavilion 15-cs0000). Write it down – you’ll need it.
- Back Up Your Data: Although unlikely, always back up your important data before starting any hardware repair. Better safe than sorry!
4. Unveiling the Antenna: Disassembly Time!
Now for the fun part! The process varies slightly depending on your specific HP laptop model, but the general steps are usually the same. Before you begin, carefully consult your laptop's service manual or search for a specific teardown video on YouTube (search “[Your HP Laptop Model] WiFi Antenna Replacement”). This will help you get familiar with the specific layout of your laptop.
- Remove the Back Panel: Locate the screws holding the back panel in place. Use your Phillips head screwdriver to carefully unscrew them. Take note of which screws go where, or better yet, take a picture before you remove them and use a screw organization mat. Some screws may be hidden under rubber feet or stickers.
- Pry Open the Panel: Using your spudger or pry tool, gently work around the edges of the back panel to detach it from the chassis. Be patient and go slowly to avoid breaking anything.
- Identify the WiFi Antenna: Inside, you should see the WiFi card (a small circuit board) and the antenna wires. The antenna wires will lead to two metal connectors, usually attached to the screen hinge, which are where the antennas are.
- Disconnect the Antenna Wires: Carefully detach the antenna wires from their respective terminals on the WiFi card. These connections are usually very small and can be fragile.
5. Removing the Old Antenna: Out with the Old, In with the New!
Now that we have isolated the antenna, it's time to remove the faulty one.
- Locate the Antenna: The antenna itself will vary depending on your model, but it usually consists of two wires that run along the edges of the screen.
- Detach the Antenna: The antenna will typically be held in place by adhesive tape or small clips. Carefully detach the existing antenna from the laptop components.
6. Inserting the New Antenna: The Rebirth of Your WiFi
Time to breathe new life into your laptop!
- Position the New Antenna: Carefully position the new antenna in the same location as the old one. This is where that picture you took comes in handy.
- Reattach the Antenna Wires: Reconnect the new antenna wires to the WiFi card. Ensure you connect them to the correct terminals.
- Secure the Antenna: Use the existing adhesive or install any new adhesive (often included). Ensure that the antenna wires are routed correctly and don’t obstruct any other components.
7. Reassembly: Putting It All Back Together
We’re almost there!
- Replace the Back Panel: Carefully align the back panel and snap it back into place.
- Secure the Screws: Replace the screws, making sure you replace them in the correct locations.
- Insert the Battery: If you removed the battery, replace it now.
8. Testing Your Work: The Moment of Truth!
Now, power on your laptop and cross your fingers!
- Boot Up: Turn on your laptop and let it boot up normally.
- Check Your WiFi Connection: Look for the WiFi icon in the system tray. Hopefully, the crossed-out bars are gone, and you have a signal!
- Connect to Your WiFi Network: Select your WiFi network and enter your password.
- Test Your Connection: Browse the internet, load a video, or make a video call. If everything works, congratulations!
9. Troubleshooting: What to Do If Things Go Wrong
Don’t panic if your WiFi still isn't working. Sometimes, it takes a little extra troubleshooting.
- Check the Connections: Double-check that all antenna wires are securely connected to the WiFi card.
- Driver Issues: It's possible that a driver issue is causing the problem, not the antenna itself. You could try re-installing or updating the wireless network driver. Visit HP support, enter your model number and download the latest drivers for your wireless network adapter.
- Hardware Malfunction: Sometimes, there might be an issue with the WiFi card itself. You can attempt to replace the card.
10. Avoiding Future Problems: Protecting Your WiFi Antenna
Prevention is always better than cure!
- Handle Your Laptop with Care: Avoid dropping your laptop or subjecting it to extreme temperatures or humidity.
- Keep Your Laptop Clean: Dust buildup can sometimes affect the performance of components, so periodically clean the vents on your laptop.
- Upgrade the Hardware: From time to time, there are new, improved parts released.
11. Finding Replacement Parts: Where to Buy a New Antenna
Finding the right parts is easy!
- Online Retailers: Amazon, eBay, and Newegg are great places to start.
- HP's Website: Check the official HP support website.
- Local Electronics Stores: Some local computer repair shops may sell replacement parts.
12. Safety Precautions: Keep Yourself and Your Laptop Safe
It's essential to prioritize safety throughout the whole process!
- Do Not Work While Plugged In: This cannot be overstated.
- Use Anti-Static Protection: Ground yourself properly to prevent damaging sensitive components.
- Double-Check Everything:
Replace the wireless antenna cables HP Pavilion Sleekbook 15-b000 HP Support

By HP Support Replace the wireless antenna cables HP Pavilion Sleekbook 15-b000 HP Support by HP Support
HP Pavilion 14-ab166us Network Card and Antenna Upgrade

By TechTube HP Pavilion 14-ab166us Network Card and Antenna Upgrade by TechTube
Replace the wireless antennas HP ProBook 6560b Notebook HP Support

By HP Support Replace the wireless antennas HP ProBook 6560b Notebook HP Support by HP Support
Title: How to remove and reattach WiFi antenna cables
Channel: James Has Answers
How to remove and reattach WiFi antenna cables by James Has Answers
Working With Laptop
HP Laptop Wi-Fi Antenna: The Ultimate Replacement Guide for Lightning-Fast Connectivity
Has your HP laptop's Wi-Fi performance begun to resemble dial-up speeds of yesteryear? Perhaps you're experiencing frustrating drops in signal strength, intermittent connection failures, or the dreaded "no internet connection" notification. Before you consider replacing your entire machine, let's explore a surprisingly simple solution: replacing your HP laptop's Wi-Fi antenna. This guide provides a step-by-step approach designed to restore your high-speed internet and get you back to streaming, working, and connecting with confidence. This process is far less daunting than you might think, and with a bit of patience and the right tools, you'll be back online in no time.
Identifying the Problem: Is It Really Your Wi-Fi Antenna?
Before you embark on this repair, it's essential to confirm that the Wi-Fi antenna is indeed the culprit. While a faulty antenna can manifest as the symptoms described above, other factors can contribute to poor Wi-Fi performance. Here are some troubleshooting steps to isolate the problem:
- Restart Your Laptop: A simple reboot can often resolve temporary software glitches that might be hindering your Wi-Fi connection.
- Check Your Router: Ensure your router is functioning correctly. Restarting your router can resolve many connectivity issues. Try connecting another device to the router to ensure that the problem is your laptop and not your internet source.
- Update Your Network Drivers: Outdated or corrupted network drivers can cause Wi-Fi connectivity issues. Visit the HP support website, enter your laptop's model number, and download the latest network drivers.
- Run the Windows Network Troubleshooter: Windows has a built-in troubleshooter that can often detect and fix common network problems. Search for "Network troubleshooter" in the Windows search bar.
- Test in Different Locations: Move your laptop closer to the router or try connecting to a different Wi-Fi network. This will help determine if the issue is related to your laptop's antenna or external interference.
- Examine the Wi-Fi Card: If you’ve already tried the above suggestions and the issue persists, inspect your Wi-Fi card. Specifically, look for any visible physical damage, such as burnt components, discoloration, or loose connections within the card itself.
If you've exhausted these troubleshooting steps, and the performance problems persist, it's time to consider replacing the Wi-Fi antenna.
Gathering Your Supplies: What You'll Need for a Successful Replacement
Preparation is key to a smooth replacement process. Gather the following tools and materials before you begin:
- Replacement Wi-Fi Antenna: Ensure you purchase an antenna compatible with your HP laptop model. Check your laptop's service manual or the HP support website to identify the correct part. Search for your laptop model plus "Wi-Fi antenna replacement" to find the compatible part.
- Small Phillips Head Screwdriver(s): Precisely sized screwdrivers are required for removing the small screws that secure your laptop's components. A magnetic screwdriver can be especially helpful for keeping track of those tiny screws.
- Plastic Opening Tools or Spudger: Plastic tools, such as spudgers or guitar picks, are crucial for safely prying open your laptop's case without causing damage.
- Anti-Static Wrist Strap: Protecting your laptop's sensitive electronic components from static discharge is essential. An anti-static wrist strap will ground you and prevent accidental damage.
- Small Container or Tray: Use a small container or tray to hold the screws you remove. This will prevent them from getting lost. Label it clearly.
- Optional: Fine-Point Tweezers: Tweezers can assist in manipulating the delicate antenna cables.
- Optional: Work Light: A well-lit workspace is essential for visibility, particularly when dealing with small components. Consider using a headlamp!
Step-by-Step Replacement Guide: A Painless Approach
With your tools and materials assembled, you're ready to begin the replacement process. Always work in a well-lit, clean, and static-free environment.
- Power Down and Disconnect: Completely shut down your HP laptop and disconnect the AC adapter. Remove the battery to eliminate any risk of electrical shock.
- Ground Yourself: Attach the anti-static wrist strap to your wrist and connect the other end to a grounded metal object. This will prevent static discharge.
- Locate the Service Door (or access panel): Many HP laptops have a dedicated service door on the bottom, typically providing access to the hard drive, RAM, and Wi-Fi card. Refer to your laptop's service manual if you're unsure where to find it.
- Remove the Service Door: Carefully remove the screws securing the service door. Place the screws in your labeled container. Gently pry the service door loose, using a plastic opening tool if necessary.
- Identify the Wi-Fi Card: Inside the service door, locate the Wi-Fi card. It's usually a small card with two or three antenna cables attached.
- Disconnect the Antenna Cables: Carefully detach the antenna cables from the Wi-Fi card. These cables often snap on or clip onto the card. Use tweezers, if necessary, to avoid damaging the connectors. Note the position of each cable to reinstall the wires exactly like they were placed before. You can take a picture with your mobile device if needed.
- Remove the Wi-Fi Card: Remove any screws securing the Wi-Fi card to the motherboard. The card may be held in place with a clip or retaining bracket. Slide the Wi-Fi card out of its slot.
- **Locate the Antenna Cables and Remove: ** Trace the antenna cables from the Wi-Fi card to the area where they are attached to the laptop's screen bezel or other internal components. These cables are routed through the laptop's chassis, often held in place with adhesive or small clips. Carefully release the antenna cables from their restraints. Patience is key here, so you do not damage any wires.
- Open the Laptop Case (if needed): Some HP models may require you to open the entire laptop case to access the antenna cables. This can be a more involved process, so it is important to refer to your laptop's service manual. Using the plastic opening tools, gently pry the top cover from the bottom case. Place the screws in your labeled container. Use caution not to damage any delicate components or cables.
- Replace the Antenna Cables: Once the top of the laptop is open (if necessary), locate the current antenna cable and carefully remove the antenna cables. Detach the old antenna cables from the screen bezel or other mounting points using the plastic opening tools.
- Install the New Antenna Cables: Route the new antenna cables through the laptop's chassis, following the path of the old cables. Secure them in place using the existing clips or adhesive. Attach the new antenna cables to the Wi-Fi card, being sure to align them correctly.
- Reassemble the Laptop: Carefully reassemble the laptop in reverse order of disassembly. Ensure all components are correctly seated and that all screws are properly tightened.
- Testing Your Connection: After you reassemble the laptop, reinstall the battery and connect the AC adapter. Power on the laptop and test your Wi-Fi connection. Verify that you can successfully connect to your Wi-Fi network and browse the internet. Check the signal strength to confirm a reliable connection.
Troubleshooting Common Issues
- No Wi-Fi Signal After Replacement: Double-check that the antenna cables are securely connected to both the Wi-Fi card and the antenna.
- Weak Signal Strength: Re-evaluate the placement of the antenna cables. Ensure that there are no obstructions blocking the signal. Review the antenna cables for bends or kinks, which can disrupt the signal.
- Laptop Not Powering On: Ensure all components are correctly connected. Check that you have reconnected the battery and that all flex cables are properly seated and connected.
Conclusion: Reclaim Your Connectivity
Replacing your HP laptop's Wi-Fi antenna is a straightforward process that can resolve frustrating connectivity issues. With this comprehensive guide, you can confidently tackle this repair and restore your high-speed internet. Remember to take your time, work methodically, and always consult your laptop's service manual for model-specific instructions. You'll be back to enjoying seamless Wi-Fi connectivity on your HP laptop.
