how to repair laptop wifi card

Title: Cara Cabut WIFI Card ASUS TUF Fix Masalah WIFI Hilang Asus TUF
Channel: Kenny DP - Tech & Games
Cara Cabut WIFI Card ASUS TUF Fix Masalah WIFI Hilang Asus TUF by Kenny DP - Tech & Games
how to replace laptop wifi card, how to fix laptop wifi card, how to fix laptop wifi adapter, how to replace laptop wifi adapter, how to fix my laptop wifi adapter, how to fix hp laptop wifi adapter, laptop wifi card not working
Laptop WiFi Dead? This SHOCKING Trick Will FIX It!
Laptop WiFi Woes? Unleash This Unexpected Fix!
Have you ever found yourself staring blankly at your laptop screen? The dreaded WiFi symbol glaring back at you, stubbornly refusing to connect? It's a universally frustrating experience. Moreover, it often happens at the most inopportune times. Perhaps you're scrambling to finish a crucial project. Or maybe you're just trying to unwind with your favorite streaming service. The good news is that a dead WiFi connection doesn't have to be a digital death sentence. In fact, the solution might be simpler than you imagine.
The Silent Slayer: Common WiFi Killers
Before we plunge into the unexpected trick, let's briefly address the usual suspects. We have all been there, haven’t we? Firstly, your router could be experiencing a momentary hiccup. It’s a temperamental machine sometimes. Resetting it, therefore, is usually the first step. Then, check your laptop's physical WiFi switch. It's a small, often overlooked detail. Also, ensure airplane mode isn't accidentally enabled. This is a surprisingly common culprit behind the missing WiFi signal. However, if these basic checks fail, don't despair.
Beyond the Basics: Unearthing the Hidden Solution
Now, for the revelation. Are you ready? The shocking (but often overlooked) trick to revive your laptop's WiFi is… a simple driver update! Yes, you read that right. It sounds almost too good to be true, doesn't it? However, in many cases, outdated or corrupted network drivers are the silent saboteurs. They're secretly hindering your WiFi connection. Consequently, updating them can often work wonders. It’s like giving your laptop a fresh, digital breath of life.
Navigating the Driver Update Process
Don’t worry; it’s not as intimidating as it sounds. Let's break down the process step-by-step. First, you'll need to access your Device Manager. For Windows users, you usually do this by right-clicking the Windows icon. Then, select "Device Manager." Mac users have a slightly different process. You can access System Information from the Apple menu.
Pinpointing Your Network Adapter
Inside the Device Manager, or System Information, look for "Network adapters." Expand this section. This is where your WiFi adapter resides. It's the hardware that allows your laptop to connect to wireless networks. Locate your specific network adapter's name. It might be something like "Intel Wireless." Note it down; you'll need it later.
The Crucial Update: A Driver's Destiny
Now, right-click on your network adapter’s name. A menu will appear. Select "Update driver." You’ll then be presented with two options. Choose "Search automatically for drivers." Your computer will then search the internet for the latest driver version. In the meantime, if a newer driver is found, it will install automatically. It is normally a quick process. After it's complete, you might need to restart your laptop. As a result, this will allow the new driver to take effect.
When Automatic Updates Fail: A Manual Approach
Sometimes, the automatic update doesn't work. Hence, you might need to take a more hands-on approach. Head to your laptop manufacturer's website, such as Dell or HP. Search for the "Support" or "Drivers" section. Enter your laptop's model number. You will find the correct drivers for your specific machine. Download the latest WiFi driver from there. Then, install it manually. It's a bit more involved. However, this method ensures you have the correct, up-to-date driver.
Troubleshooting After the Update
After the driver update, attempt to connect to your WiFi network. Hopefully, your connection problems will be resolved. However, if issues persist, consider these extra steps. First, try uninstalling and reinstalling the driver. Find the network adapter's name within the Device Manager. Right-click on it and choose "Uninstall device." Then, restart your laptop. Windows will attempt to reinstall the driver automatically. Eventually, you may need to seek professional assistance if nothing works.
Beyond the Fix: Maintaining a Healthy WiFi Life
Updating your WiFi drivers is a proactive measure. Moreover, regular maintenance ensures a smoother online experience. Keep your drivers updated. Furthermore, restart your router periodically. This is a simple way to prevent minor issues from escalating. Lastly, run a network diagnostics tool. These tools can identify potential problems before they impact your connection.
The Grand Finale: Reclaiming Your Digital Life
A dead WiFi connection can be incredibly irritating. Fortunately, the solution is often simpler than you think. By updating your network drivers, you can breathe new life into your laptop's WiFi. Consequently, you can regain access to the digital world. Therefore, don't let connectivity issues ruin your day. Take control and get back to browsing, streaming, and working. After all, a stable WiFi connection is essential in today's world.
Dell Laptop WiFi Dead? 😱 Fix It NOW!Laptop WiFi Dead? This SHOCKING Trick Will FIX It!
Hey everyone! We've all been there, right? That moment of sheer, unadulterated panic when your laptop’s WiFi icon turns into a little X, or worse, it just disappears altogether. Suddenly, you're cut off from the digital world, staring into the abyss of a blank screen. No emails, no streaming, no cat videos (the horror!). But before you chuck your laptop out the window (we’ve all almost been there), take a deep breath. We're going to crack this WiFi conundrum together. This isn't just about getting back online; it's about reclaiming your digital life!
1. The WiFi Apocalypse: Recognizing the Symptoms
First things first: let’s diagnose the problem. Is your laptop WiFi truly dead, or just… playing possum? Here's a quick checklist of telltale signs:
- The Dreaded "No Internet" Error: This is the most obvious clue. Your browser throws up an error page, and you're staring at a digital brick wall.
- The Missing WiFi Icon: The little WiFi bars in your system tray have vanished without a trace. Poof! Gone! Like magic (but not the good kind).
- "Limited Connectivity": The icon is there, but it’s accompanied by that dreaded yellow triangle with an exclamation point. This means you're connected to the network, but you can't access the internet. It's like being invited to a party, but the door's locked.
- Slow as Molasses: Websites load at a glacial pace. You click, you wait, you sigh dramatically. It's like your internet connection is moving through peanut butter.
If you're experiencing any of these horrors, then you're in the right place. But don’t worry. We’re getting you unstuck!
2. Before You Panic: The Obvious Checks
Okay, before we launch into the complex stuff, the first thing you should do is the digital equivalent of jiggling the handle to see if the door is locked. Let's run through some quick, easy solutions:
- Restart Your Laptop: This is the IT equivalent of "turning it off and on again." Seriously, it works way more often than you think. It’s like giving your laptop a fresh start.
- Check Your Router: Is your router even on? Are the lights blinking? Is it plugged in? Don't laugh; it happens to the best of us. I’ve spent an hour troubleshooting only to realize the power cord was loose. Facepalm!
- Airplane Mode: Make sure Airplane Mode isn't accidentally enabled. It's the digital equivalent of shutting off all the lights. Easy to miss!
- Other Devices? Are other devices (phone, tablet, etc.) connected to your WiFi? If not, the issue might be with your internet provider.
If none of these simple fixes work, then we need to dig a little deeper.
3. The Secret Weapon: The Network Troubleshooter!
Windows (and even Macs, to a certain extent) actually has a built-in network troubleshooter. Think of it as a digital doctor for your WiFi woes.
Here’s how to access it:
- Windows: Right-click on the WiFi icon in your system tray (the bottom right of your screen). Choose “Troubleshoot problems.” Let Windows do its magic.
- Mac: Go to System Preferences > Network. Select your WiFi connection and click "Assist Me". Follow the on-screen prompts.
The troubleshooter will scan for common problems and try to fix them automatically. It's like having a tech expert on speed dial!
4. Drivers: The Invisible Culprits
Okay, let’s get a little techy. Drivers are the software that allows your laptop to communicate with the WiFi adapter. Think of them as the translators. Sometimes, these translators get lost in translation. Driver issues are a surprisingly common cause of WiFi problems.
How to check and update your drivers:
- Windows: Right-click the Start button and select "Device Manager." Expand "Network adapters." Right-click on your WiFi adapter (it will typically be something like "Wireless Network Adapter" or something similar). Choose “Update driver.” You can choose to search automatically for updated driver software.
- Mac: Macs generally handle drivers automatically, but you can check for software updates through System Preferences > Software Update.
Updating drivers is like giving your laptop a fresh vocabulary to understand the digital world.
5. Airplane Mode Again? Double-Check The Switch!
We touched on this, but let’s make sure. Accidentally setting Airplane mode on might be the root cause of your problem. Often this happens from an accidental key press or a misclick.
6. The Router Reboot: A Digital Reset Button
Sometimes, the problem isn’t your laptop; it's the router. It's like the brain of your home network. It can get overloaded with data, making it a little… slow. Rebooting your router is like hitting the reset button on your brain, providing a fresh start.
How to reboot your router:
- Unplug the router from the power outlet.
- Wait about 30 seconds.
- Plug it back in.
- Wait for the router to fully reboot (the lights should stabilize).
Give it a few minutes, and then check your laptop. Hopefully, your WiFi will come back to life!
7. Channel Surfing: Finding the Sweet Spot
Routers broadcast on different channels. Sometimes, your router is on a channel that's too crowded, like the most popular ice cream shop on a hot summer day. This can cause interference and slow down your connection.
How to change your WiFi channel (this requires accessing your router's settings, usually through a web browser):
- Open a web browser and type in your router's IP address (usually 192.168.1.1 or 192.168.0.1; check your router's manual if necessary).
- Enter your router's username and password (you may need to look at the bottom of your router for a default username and password).
- Find the WiFi settings and look for the "Channel" option.
- Try different channels (1, 6, and 11 are often good choices).
- Save the settings and test your connection.
8. The Password Paradox: Re-Enter Your WiFi Password
It's a simple step, but so important! Sometimes, the WiFi password on your laptop gets corrupted or somehow changes (okay, probably not, but it’s worth checking).
Try connecting to a different WiFi network, or forget and reconnect to your current one. We’ve all had that moment of feeling lost and confused when the password doesn't work.
9. Hardware Hacks: The Physical Inspection
Alright, let's get physical. While rare, it's possible that your WiFi adapter itself is having issues. We’re venturing deep!
Here's what you can check:
- Internal Adapter: If you’re comfortable doing so (and have the right tools), you could open your laptop (carefully!) and check that the WiFi adapter is properly seated in its slot. Warning: This can void your warranty. And if you aren’t comfortable with this, don’t do it!
- External Adapter: If you have a USB WiFi adapter, try plugging it into a different USB port. The original port could be faulty.
10. The Nuclear Option: Resetting Your Network Settings
If all else fails, you can try resetting your network settings.
- Windows: Go to Settings > Network & Internet > Network reset. This will reset all your network adapters and settings to their default values. Warning: You'll need to re-enter your WiFi password afterward.
- Mac: This procedure involves a bit more manual effort, including deleting network preferences files. Search “Mac reset network settings” for detailed instructions, or seek expert assistance.
This is a last resort, but sometimes, it's the only way to clear out all the digital cobwebs.
11. Is Your WiFi Adapter Dying?
Sadly, WiFi adapters do have a lifespan. They’re like lightbulbs, eventually they just burn out. If you’ve tried everything else, and still no luck, the problem could be a faulty adapter.
- External Adapter Test: If you have a USB WiFi adapter, try using it to see if you can connect to the internet. If it works, then your internal adapter may be the issue. Consider investing in a new adapter.
- Professional Help: If you're not comfortable replacing the adapter yourself, it's time to take your laptop to a computer repair shop.
12. The Conspiracy Angle: Interference!
Sometimes, it's not your laptop or router at all. Interference from other devices can cause WiFi problems. Think of it as the "noise" in the airwaves.
Here's what to check:
- Microwave ovens: Microwaves are notorious
Cara Memperbaiki Perubahan Upgrade Kartu Wifi Laptop Wireless Local Area Network WLAN Di Laptop Apa Pun

By HealMyTech Cara Memperbaiki Perubahan Upgrade Kartu Wifi Laptop Wireless Local Area Network WLAN Di Laptop Apa Pun by HealMyTech
Cara Memperbaiki Masalah Wifi di Dell XPS 15 Semua Model Dengan Kartu Pembunuh

By Tyler Miller Cara Memperbaiki Masalah Wifi di Dell XPS 15 Semua Model Dengan Kartu Pembunuh by Tyler Miller
Cara mengganti Kartu Wifi Laptop Acer Chromebook CB3. Perbaiki, Instal, Perbaiki C730 NSK-RB0SQ

By LaptopRepairHelp Cara mengganti Kartu Wifi Laptop Acer Chromebook CB3. Perbaiki, Instal, Perbaiki C730 NSK-RB0SQ by LaptopRepairHelp
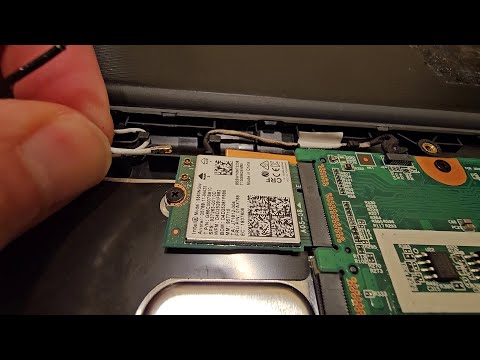
Title: How to remove and reattach WiFi antenna cables
Channel: James Has Answers
How to remove and reattach WiFi antenna cables by James Has Answers
Laptop Wifi Hotspot
Laptop WiFi Dead? This SHOCKING Trick Will FIX It!
It’s a scenario that can strike fear into the heart of any laptop user: the dreaded WiFi disconnection. One minute you're browsing, streaming, or working, and the next, your connection has vanished, leaving you staring at the dreaded "no internet access" message. Frustration mounts quickly, and the urge to hurl your laptop across the room might be tempting. But before you succumb to the urge, take a deep breath. In most cases, the solution to a dead WiFi connection is far simpler than you might imagine. We're going to explore several troubleshooting steps, often overlooked, that can swiftly revive your wireless internet and get you back online.
Identifying the Culprit: Pinpointing the Source of Your WiFi Woes
Before launching into a flurry of technical fixes, it’s crucial to understand the nature of the problem. Is the issue limited to your laptop, or are other devices in your home experiencing the same connectivity difficulties? If your smartphone, tablet, or other computers are also unable to connect to the internet, the problem likely lies with your internet service provider (ISP), your modem, or your router. However, if only your laptop is affected, the issue is localized, and the troubleshooting process will be much more focused.
Begin by checking the easily overlooked indicators. Is the WiFi switch on your laptop (often a physical switch or a function key combination) enabled? Verify that it hasn't been accidentally disabled. Next, examine the WiFi icon in your system tray (lower right-hand corner of your screen). Does it show a red "X," a yellow exclamation point, or a series of bars indicating a connection? Each of these symbols provides valuable clues about the nature of the problem.
The Unsung Heroes: Rebooting Your Router and Modem
One of the most overlooked, yet often most effective, solutions is the simple power cycle. Think of your router and modem as your WiFi's central nervous system. Like any other electronic device, they can occasionally experience glitches or temporary malfunctions. Rebooting them is like giving them a fresh start.
Here's how to do it: Unplug both your modem and your router from their power sources. Wait at least 60 seconds – this duration allows any residual power to dissipate completely, ensuring a full reset. After waiting, plug your modem back in first and wait for it to fully power on and establish a connection (this can take a few minutes, indicated by the lights on the modem). Once the modem is online, plug your router back in and allow it to boot up completely. Then, try reconnecting your laptop to your WiFi network. This simple step resolves a surprising number of connectivity issues.
Digging Deeper: Troubleshooting Laptop Hardware and Software
If a simple reboot doesn't solve the problem, it's time to delve deeper into your laptop's settings. This involves checking the device manager, verifying network adapter drivers, and other configurations.
Checking Your Network Adapter in the Device Manager
The device manager is the command center for your laptop's hardware. It allows you to check the status of your network adapter and diagnose potential hardware or driver problems.
- Accessing the Device Manager: Type "Device Manager" into the Windows search bar and open the application.
- Navigating to Network Adapters: In the Device Manager window, expand the "Network adapters" section. You should see a list of your laptop’s network adapters, including your WiFi adapter (often labeled with terms like "Wireless Network Adapter" or "Wi-Fi Adapter").
- Identifying Errors: Look for any yellow exclamation points or red crosses next to your WiFi adapter. These symbols indicate a problem. If you see one, right-click on the adapter and select “Properties.” The “Device status” section on the “General” tab will provide further information about the error.
- Updating or Reinstalling Drivers: Potential solutions include updating the driver (right-click on the adapter and choose “Update driver") or uninstalling and reinstalling it. To reinstall, right-click on the adapter, select "Uninstall device," and then restart your laptop. Windows will attempt to automatically reinstall the driver upon restart.
Verifying Your Wireless Network Adapter is Enabled
Sometimes, the WiFi adapter gets accidentally disabled within the Device Manager. Ensure that your wireless network adapter is properly enabled:
- Right-click on the network adapter in the Device Manager.
- If the adapter is disabled, the option "Enable device" will appear. Select it to enable the adapter.
Inspecting Your WiFi Adapter's Power Management Settings
Windows power management settings can sometimes interfere with your WiFi adapter's functionality. Ensuring this doesn't impact your connection is often helpful.
- In the Device Manager, right-click on your WiFi adapter and select "Properties."
- Go to the "Power Management" tab.
- Uncheck the option "Allow the computer to turn off this device to save power." This prevents Windows from disabling your WiFi adapter to conserve battery life.
Exploring Network and Sharing Center Settings
Once we move beyond Device Manager, we can further explore network settings. The "Network and Sharing Center" provides detailed information about your network connections and allows you to make various configurations.
Accessing the Network and Sharing Center
- Right-click on the WiFi icon in your system tray and select "Open Network & Internet settings."
- Click on "Network and Sharing Center."
Troubleshooting Network Problems
The Network and Sharing Center offers a built-in troubleshooter that can automatically diagnose and attempt to fix common network problems.
- In the Network and Sharing Center, click on "Troubleshoot problems."
- Follow the on-screen prompts to run the troubleshooter. It will check for problems such as incorrect network settings, corrupted network adapters, or internet connectivity issues.
Configuring Network Settings
- Check IP Address: Within the Network and Sharing Center, select "Change adapter settings". Right-click on your WiFi adapter and select "Status". Click on "Details". Verify that your laptop has a valid IP address, subnet mask, default gateway, and DNS server addresses. If these are missing, the problem might be with the DHCP service on your router or an incorrect network configuration.
- Renew IP Address: If your IP address is not valid, open the Command Prompt as an administrator. Type
ipconfig /releaseand press Enter, then typeipconfig /renewand press Enter. This process will attempt to renew your IP address.
Fighting Interference: Minimizing Wireless Signal Obstacles
WiFi signals, like all radio waves, are susceptible to interference. Physical obstacles and other nearby devices can hinder their performance. Understanding and addressing these sources of interference are crucial for optimal WiFi performance.
Physical Obstructions:
- Walls and Obstacles: Solid walls, especially those containing metal studs or insulation, can significantly weaken WiFi signals. Move your laptop closer to your router or, if possible, relocate your router to a more central location in your home.
- Distance: The further away your laptop is from your router, the weaker the signal will become. Test the connection from multiple locations to identify areas with the strongest signal.
- Microwave Ovens: Microwave ovens generate radio waves that operate on the same frequency as many WiFi networks (2.4 GHz). Avoid using your microwave when heavy WiFi use is required.
Avoiding Interference:
- Other Electronic Devices: Other electronic devices, such as Bluetooth devices, cordless phones, and other WiFi routers, can interfere with your WiFi signal. Minimize the number of devices operating on the same frequencies.
- Channel Selection: Check your router's settings to make sure you are using the most stable and least crowded channel. You can use a WiFi analyzer app (available for smartphones and laptops) to scan your surrounding area and identify the least congested channel.
- Router Placement: Place your router in an elevated, central location, away from walls, metal objects, and other sources of interference.
Software Solutions
Sometimes, the issue isn’t related to hardware but rather software-based. This can include the operating system or other conflicting programs.
Checking for Windows Updates
Outdated operating systems can lead to inconsistencies with network adapters.
- Update Your Operating System: In the Windows search bar, type "Windows Update settings" and open the application. Click "Check for updates" and install any available updates, including optional driver updates.
Performing a System Restore
If the WiFi problem began recently, consider performing a system restore to revert your laptop to a previous state when the WiFi was working correctly.
- Access System Restore: Open the search bar and type "Create a restore point." Click on "System Restore" in the System Properties window.
- Select a Restore Point: Choose a restore point that was created before the WiFi problem started. Follow the on-screen instructions to complete the restore process.
Disable VPN or Proxy Servers
VPNs and proxy servers can occasionally interfere with your WiFi connection.
- Disable VPN: If you are using a VPN, temporarily disable it to see if it resolves the connectivity issue.
- Check Proxy Settings: In the Network & Internet settings, select "Proxy." Disable any proxy settings or check the "Automatically detect settings" option to ensure proxy settings are configured correctly.
The Final Resort: Hardware Considerations and Professional Help
If you’ve exhausted all the troubleshooting steps mentioned above and your laptop's WiFi remains stubbornly dead, the problem might be hardware-related.
