how to fix wifi adapter on lenovo laptop

Title: How to Fix Wi-Fi is Not Connecting to Lenovo Laptops Problem in Windows 1087 2025
Channel: FIXsage
How to Fix Wi-Fi is Not Connecting to Lenovo Laptops Problem in Windows 1087 2025 by FIXsage
how to fix wifi adapter on lenovo laptop, lenovo laptop wifi adapter not working, wireless adapter not working on lenovo laptop, how do i fix my wifi adapter on my laptop, lenovo wifi adapter not working
Lenovo WiFi Nightmare? FIX It NOW! (Easy Steps)
Lenovo WiFi Woes? Conquer Your Connection Concerns Today!
Have you ever wrestled with a sluggish Lenovo laptop, perpetually battling a frustratingly weak WiFi signal? You're certainly not alone. Numerous Lenovo users encounter WiFi connectivity issues, often leading to productivity roadblocks and general online exasperation. That's why we're here. Let's troubleshoot together. We'll vanquish those wireless woes and get you back online swiftly. Prepare to bid farewell to buffering and hello to seamless streaming and browsing.
Decoding the WiFi Debacle: Identifying the Culprits
Before we embark on a digital rescue mission, we must establish the potential causes of your WiFi difficulties. It's important to understand that WiFi problems are complex. Many factors can interfere with your Lenovo's wireless performance. Perhaps your router is overloaded or positioned poorly. It could be outdated drivers or interference from other electronic devices. Maybe your operating system needs a refresh. Therefore, we must systematically explore the options. We'll approach this step-by-step to find the optimal solution.
Step 1: Restarting the Obvious – The Router Reset
Let's begin with the simplest, yet often most effective, fix: restarting your router. Sometimes, a simple reboot can do wonders. Turn off your router and your modem. Wait for about 30 seconds. Then, turn your modem back on first. Let it fully boot up. After that, power on your router. Allow the router to reconnect with your internet service. This process clears temporary glitches and restores optimal performance. Consequently, check your Lenovo's WiFi connection. Is it working better now?
Step 2: Driver Drama? Updating Your Wireless Adapters
Outdated network drivers often contribute to WiFi woes. Therefore, we must ensure they are up to date. Locate your device manager. This is often accessible through the Windows search bar. Find the "Network Adapters" section. Right-click on your wireless adapter (it might be labeled "Intel Wireless" or similar). Select "Update driver." Choose "Search automatically for drivers." Windows will search for and install any available updates. Following this step, restart your laptop. Test your WiFi connection again. Hopefully, things will improve.
Step 3: Location, Location, Location: Router Placement Matters
Your router's location significantly impacts its signal strength. Remember that walls, especially those made of concrete or brick, can weaken the signal. Metal objects and other electronic devices can also cause interference. Ideally, position your router in a central, open location. Elevate it off the floor, preferably on a shelf or desk. Try moving the router away from other electronics. Consider the optimal placement for your router to provide the best possible coverage. Subsequently, assess your WiFi performance.
Step 4: Interference Interception: Minimizing Wireless Clutter
WiFi signals share the airwaves. This means they can clash. Other devices emitting radio frequencies can interfere with your signal. Microwaves, Bluetooth devices, and cordless phones can all contribute to the problem. Thus, try to distance your Lenovo from these devices. Switch your router to a less congested channel if possible. Most routers offer a channel selection option within their settings. Experiment with different channels to find the one that offers the best performance. Then, test your connection speed.
Step 5: Network Diagnostics: Unveiling Hidden Issues
Windows has built-in network diagnostic tools. These tools can help pinpoint specific problems. Access these tools via the Windows settings. Simply type "Network troubleshooter" into the search bar. Follow the prompts to diagnose any issues. The troubleshooter may suggest solutions. After this process, follow any recommendations. Examine your WiFi connectivity once more.
Step 6: Power Management Paradox: Balancing Performance with Power Savings
Your Lenovo laptop's power management settings might inadvertently affect your WiFi performance. Sometimes, power-saving features will limit the wireless adapter. Access your power settings through the control panel. Specifically, check your wireless adapter's power management settings. Ensure that the adapter is not allowed to be turned off to save power. Also, review the advanced power settings. Make sure the maximum performance is enabled for your wireless adapter. Afterward, reboot your system.
Step 7: Firewall Frustrations: Investigating Security Settings
Sometimes, your firewall might inadvertently block your WiFi connection. Check your firewall settings. Make sure your WiFi network is allowed to communicate. You may need to add exceptions for specific programs. Review your security software. Examine its settings. Then, test your connection once again.
Step 8: System Update Symphony: Ensuring Up-to-Date Software
Outdated software can sometimes cause WiFi issues. Ensure your Lenovo laptop has the latest Windows updates installed. Check for updates through the settings menu. These updates often include driver enhancements and bug fixes. Additionally, update any relevant software.
Step 9: Resetting Network Settings (Last Resort)
As a final resort, consider resetting your network settings. This action will revert your network configuration to its default state. Access the network settings through the control panel. Then, find the reset option. This will erase any custom settings you’ve created. Keep in mind that you'll need to re-enter your WiFi password. Following the reset, test your WiFi connection again.
Final Thoughts: Reclaiming Your Connection
If despite these steps, your WiFi issues persist, it might be time to contact Lenovo support or consider hardware issues. However, most users will experience a significant improvement by following these easy steps. Implementing these fixes should dramatically improve your Lenovo's WiFi performance. Therefore, you can now enjoy a seamless and reliable internet experience. Remember that a little troubleshooting can go a long way. Happy browsing!
Unlock Your Phone's WiFi Hotspot: The Secret Laptop Trick!Lenovo WiFi Nightmare? FIX It NOW! (Easy Steps)
Hey tech buddies! Let's be real, we've all been there. You're ready to binge-watch your favorite show, hop on that video call, or just browse cat GIFs (no judgment here!). Then, BAM! The dreaded spinning wheel, the buffering icon of doom, or the complete and utter silence from your WiFi. If you're rocking a Lenovo laptop, you might be experiencing a Lenovo WiFi nightmare. Don't sweat it! We're here to rip apart the problem and get you back online in a jiffy. Think of this as your WiFi SOS signal and we're the tech rescue team. Let's dive in!
1. The WiFi Woes: Spotting the Problem Child
Before we start throwing fixes at the wall, let's figure out where the wall is. Is your Lenovo laptop connected to the WiFi but the internet is crawling like a snail in molasses? Or, is the WiFi even visible to your trusty Lenovo? The first step is diagnosis. Take a deep breath, and let's troubleshoot together. It's like being a detective, but instead of a magnifying glass, we're using a control panel.
2. Reboot, Reboot, Reboot! (Yes, Really!)
Okay, I know what you're thinking: "Reboot? Seriously?" But trust me, this is often the magic bullet. Think of your laptop like a grumpy teenager after a long day. A simple reboot can clear out the cobwebs and reset everything. Restart your Lenovo. Then, restart your router and modem. Give everything a minute or two to fully boot up. This is the digital equivalent of a good night's sleep, and more often than not, it can work wonders.
3. The Driver Dilemma: Keeping Things Updated
Imagine your WiFi card as the engine of your connection. If the engine is running on old, outdated fuel, it’s going to sputter and cough. Drivers are the software instructions that allow your Lenovo to talk to your WiFi adapter. To fix this, Updating your WiFi drivers is crucial! We’ll walk you through it:
- Method 1: Windows Update: Head to your Windows settings (search "Windows Update" in the search bar). Click "Check for updates" and let Windows do its thing. It'll find and install any necessary driver updates.
- Method 2: Device Manager: Type "Device Manager" in the search bar. Expand “Network adapters.” Right-click your WiFi adapter (it'll probably say something like "Intel WiFi" or "Realtek WiFi"). Select "Update driver." Choose "Search automatically for drivers."
Following these steps will ensure that your Lenovo’s WiFi adapter is running as smoothly as possible.
4. Antenna Awkwardness: Position is Everything
Believe it or not, the physical placement of your laptop can significantly impact your WiFi. Just like trying to shout through a closed door, your WiFi signal needs a clear path. Try these adjustments:
- Proximity: Move your Lenovo closer to the router. Walls, microwaves, and even certain types of furniture can interfere with the signal.
- Angle: Try adjusting the angle of your laptop's screen. Sometimes a slight change can make a big difference.
- Elevation: Elevate your laptop. Placing it on a desk or counter can improve signal strength compared to using it on your lap.
Think of it like a game of peek-a-boo with your router – sometimes moving just a little can make all the difference!
5. Router Rendezvous: Ensuring Connectivity
Your router is the gatekeeper of your internet connection. If it's not functioning properly, your Lenovo will be left in the digital dark. Here's what to consider:
- Restart: Unplug your router and modem for 30 seconds. Plug them back in and wait for them to fully boot up.
- Distance: Keep your router away from other electronic devices that could cause interference.
- Firmware: Make sure your router's firmware is up-to-date. You can typically find instructions on how to update it on your router manufacturer's website.
A happy router equals a happy Lenovo. It’s as simple as that!
6. Channel Chaos: Finding the WiFi Sweet Spot
Your router broadcasts its WiFi signal on a specific channel, like a radio station. If your neighbors' routers are using the same channel, it's like trying to have a conversation in a crowded room. You can change your router's channel to avoid interference. Here's how:
- Access your router's settings: You'll typically do this by typing your router's IP address (usually 192.168.1.1 or 192.168.0.1) into your web browser. You'll need your router's username and password to log in.
- Find the "Wireless" or "WiFi" settings.
- Look for the "Channel" setting. Experiment with different channels (1, 6, and 11 are often good starting points as they overlap less).
This is like finding the quietest table in the library for your Lenovo.
7. Security Snafus: Checking Your Password
Sometimes, the simplest things are the biggest culprits. Double-check that you're entering the correct WiFi password on your Lenovo. It's easy to mistype, and even a single wrong character will prevent you from connecting.
8. Network Troubleshooter: Letting Windows Do the Work
Windows has a built-in troubleshooter that can often identify and fix common WiFi problems. Right-click on the WiFi icon in your system tray (the little bars in the bottom right corner of your screen). Select "Troubleshoot problems." Follow the on-screen instructions. It's like having a tech support guru right at your fingertips.
9. Airplane Mode Absurdities: Ensuring No Interference
Make sure Airplane Mode is turned off! This is a small detail, but it can easily ruin your connectivity. Find the Airplane Mode icon (usually in the system tray or in your quick settings) and check that it's disabled.
10. Malware Mayhem: Scanning for Threats
Sometimes, malware can interfere with your network connection. Run a full scan with your antivirus software to make sure your Lenovo is clean. It's like giving your computer a wellness checkup.
11. Power Plan Problems: Adjusting Your Settings
Your power plan settings can sometimes affect your WiFi performance. Especially if you're on battery saver mode. Go to "Power & Sleep settings" in your Windows settings and adjust the power plan to "Balanced" or "High Performance." This ensures your Lenovo is giving your WiFi adapter the juice it needs.
12. Reinstalling the WiFi Driver: A Fresh Start
If all else fails, you can try reinstalling your WiFi driver. This is a more drastic measure, but it can often resolve stubborn issues.
- Go to Device Manager (as described in Section 3).
- Right-click on your WiFi adapter and select "Uninstall device."
- Restart your Lenovo. Windows will usually reinstall the driver automatically. If not, you can download the latest driver from Lenovo's support website.
It will be similar to a computer heart transplant.
13. Factory Reset as a Last Resort (Use With Caution!)
If nothing else works, a factory reset is an extreme solution. This will erase everything on your Lenovo, so back up your important files first! Find the factory reset option in your Windows settings. It’s like hitting the reset button on your entire system. Consider this your emergency exit.
14. Checking for Hardware Issues
While less common, it's possible the WiFi card in your Lenovo has a hardware problem. If you've tried everything else, it might be time to contact Lenovo support or take your laptop to a repair shop. Don’t be shy to request for a hardware check to Lenovo Support or a repair shop.
15. The Ultimate Test & Final Thoughts
Once you've gone through all these steps, try connecting to different WiFi networks (like your phone's hotspot) to see if the problem is specific to your home network. If other networks work, the issue is likely with your router or your home internet connection.
So, there you have it! We’ve covered a comprehensive look at troubleshooting Lenovo WiFi problems. Hopefully, one (or several!) of these solutions will get your Lenovo back online. Remember, tech problems can be frustrating, but don't give up! We’ve all been there, and usually, there's a fix. Now go forth and conquer those connectivity issues! And remember, if all else fails, reach out to Lenovo support or a qualified technician. Good luck, and happy surfing!
FAQs
Q1: My Lenovo says "No Internet, Secured." What does this mean?
This means your Lenovo is connected to your WiFi network, but it can't access the internet. The problem could be with your router, your internet connection, or your DNS settings. Try restarting your router and modem. Check your internet service provider for any outages.
Q2: Why is my Lenovo WiFi so slow?
Slow WiFi can be caused by various factors: distance from the router, interference from other devices, outdated drivers, a congested WiFi channel, or a slow internet plan. Also make sure you have the
**DELL WiFi Nightmare? This FIX Will Shock You!**USB wifi adapter not working windows 10 Desktop and Laptop

By IT Magics USB wifi adapter not working windows 10 Desktop and Laptop by IT Magics
How To Fix Wireless Adapter Missing In Windows 10 Get WiFi Adapter Back
By Sandeep Singh How To Fix Wireless Adapter Missing In Windows 10 Get WiFi Adapter Back by Sandeep Singh
Lenovo laptop wifi enable

By A2 Solution Lenovo laptop wifi enable by A2 Solution
Title: How to Fix Missing Network Adapters on Windows Enable WiFi Network Adapter from BIOS Settings
Channel: WebbyFan
How to Fix Missing Network Adapters on Windows Enable WiFi Network Adapter from BIOS Settings by WebbyFan
Wifi Not Found
Lenovo WiFi Nightmare? FIX It NOW! (Easy Steps)
The frustration of a spotty, unreliable WiFi connection is a universal experience, and for Lenovo users, it can often feel like a persistent, unwelcome guest. Perhaps your connection is perpetually dropping, the speeds are agonizingly slow, or your device simply refuses to connect at all. The good news is that these issues are often resolvable with a systematic approach. This comprehensive guide offers a clear roadmap to diagnose and conquer your Lenovo WiFi woes and reclaim your seamless internet experience.
Diagnosing the Lenovo WiFi Dilemma: Pinpointing the Source
Before launching into solutions, we must first understand the nature of the problem. Is this a blanket issue, affecting all devices, or is it specific to your Lenovo laptop or desktop? The answers to these questions will steer us toward the most effective solutions. Start by checking these preliminary areas:
- Other Devices: Does your smartphone, tablet, or another laptop experience these same WiFi difficulties? If so, the problem likely resides with your router or internet service.
- Physical Proximity: Are you situated close to your router? WiFi signal strength diminishes with distance and obstructions like walls. Try moving closer to the router temporarily to see if the connection improves.
- Operating System: Are you using the latest version of your operating system? Outdated software can sometimes create compatibility problems.
- Recent Hardware Changes: Have you recently upgraded your router, purchased a new network adapter, or altered your home network setup? These changes can sometimes introduce unforeseen conflicts.
Once these initial checks are complete, you can proceed with more specific troubleshooting.
Step-by-Step Solutions: Conquer Lenovo WiFi Issues
Now let's delve into the most common culprits and their corresponding fixes. Each step is designed to be straightforward, equipping you with the knowledge to resolve your Lenovo WiFi struggles quickly.
1. The Power Cycle Prescription: Rebooting the Router and Modem
This is frequently the first, and often most effective, solution. Routers and modems, like any piece of technology, can sometimes encounter temporary glitches. A power cycle provides a clean slate.
- Unplug: Disconnect the power cables from your router and modem.
- Wait: Allow at least 60 seconds. This allows the devices to fully discharge their capacitors.
- Plug In: First, plug in your modem and allow it to fully power up and connect to your internet service provider (ISP). This typically takes a few minutes.
- Router Reboot: Once the modem is active, plug in your router. Allow it to boot up completely before attempting to connect your Lenovo device.
- Test: Attempt to connect to your WiFi network and assess the performance.
2. Driver Dilemmas: Are Your Network Drivers Sabotaging Your Connection?
Outdated, corrupted, or improperly installed network drivers are a frequent cause of WiFi problems. Lenovo provides a simple way to diagnose and resolve driver issues.
- Access Device Manager: Press the Windows key + X simultaneously and select "Device Manager" from the menu.
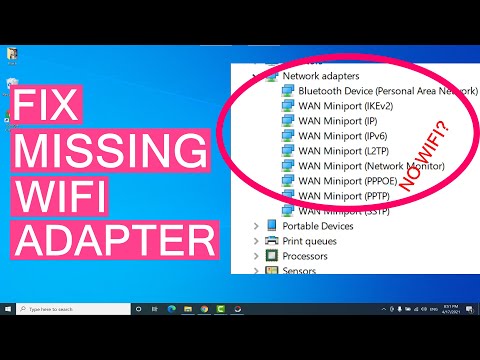
- Locate Network Adapters: Expand the "Network adapters" section. You will see the network adapters installed on your Lenovo device. This will include your WiFi adapter.
- Update Driver: Right-click on your WiFi adapter (it might be called something like "Intel Wireless-AC 9260" or "Realtek RTL8821CE Wireless LAN 802.11ac PCI-E NIC") and select "Update driver."
- Automatic Search: Choose "Search automatically for drivers." Windows will search for and install the latest drivers available.
- Manual Download (If Necessary): If the automatic search fails, visit the Lenovo support website. Enter your Lenovo model number to find the latest drivers for your WiFi adapter. Download and install the correct driver for the specific model of your laptop.
- Restart: After installing new drivers, restart your Lenovo device.
3. Network Adapter Configuration: Optimized Settings for Peak Performance
Sometimes, subtle tweaks to your network adapter's settings can yield significant improvements.
- Device Manager Access: Follow the steps in Section 2 to access Device Manager and locate your WiFi adapter.
- Properties: Right-click on your WiFi adapter and select "Properties."
- Advanced Tab: Click on the "Advanced" tab. This tab displays various settings that control the adapter's behavior.
- Key Settings Tweaks (Experiment):
- 802.11n/ac/ax Mode: If available, experiment with different options. Some routers may not be fully compatible with the latest standards.
- Wireless Mode: Set to the highest supported standard.
- Roaming Aggressiveness: Try adjusting this setting. Lower values may reduce roaming between access points in multi-AP environments.
- Transmit Power: Set to "Highest" for optimal signal strength.
- Save and Restart: Apply the new settings and restart your Lenovo device. Test your WiFi performance. It may be necessary to experiment with different configurations to find what works best with your specific router and environment.
4. Router Interference: Minimizing Wireless Congestion
Your WiFi signal is broadcast over radio frequencies, and these frequencies can clash with other devices.
- Channel Interference: Your router broadcasts on a specific WiFi channel. Other devices (microwaves, Bluetooth gadgets, nearby routers) can cause interference if they use the same channel.
- Router's Admin Page: Access your router's settings page by typing its IP address (often 192.168.1.1 or 192.168.0.1) into your web browser. You’ll likely need to enter your router’s username and password.
- Channel Selection: Locate the WiFi settings. Look for a "Channel" setting.
- Automatic or Manual: Option 1. Set the channel to "Auto." (Let the router self-optimize; the simplest method). Option 2. Manually change the channel.
- 2,4 GHz: Channels 1, 6, and 11 are frequently recommended as they are less prone to overlap with each other. Experiment with each to see which works best in your environment.
- 5GHz: the 5 GHz band offers significantly more channels, and is less prone to interference.
- Router Placement: Ensure your router is positioned in a central, open location. Avoid placing it inside cabinets or near metallic objects, which can obstruct the signal.
5. Security and Connectivity: Safeguarding Your Connection
A weak or improperly configured WiFi security setting can also create problems.
- Enable Security: Ensure your WiFi network is secured with a strong password. Avoid using outdated security protocols like WEP, which are easily compromised. WPA2 or WPA3 are preferable.
- Router's Wireless Settings: Access your router's admin page and check your WiFi password and security settings.
- Filter MAC Addresses (Advanced): Many routers allow you to filter connections based on the MAC address (unique identifier) of each device. This can add an extra layer of security. Enter the MAC address of your Lenovo device to allow it to connect.
6. The Hardware Hurdle: When to Consider Replacement Components
If you've exhausted all the above steps, the problem may stem from a faulty network adapter or other hardware issues.
- Internal Diagnosis: Carefully open your Lenovo laptop (if you are comfortable doing so) and physically inspect the network adapter. Look for any loose connections or signs of damage.
- External Adapter (Alternative): As a temporary (or even permanent) fix, you can purchase a USB WiFi adapter. This bypasses your internal adapter. Test it to confirm if your existing adapter truly is faulty.
- Contact Lenovo Support: If the problem persists, it could be a hardware defect. Reach out to Lenovo's support team for further diagnosis and warranty options.
7. Software Conflicts: Addressing Potential Application Intrusions
Certain software installed on your Lenovo device can, in rare cases, interfere with your WiFi connection.
- Firewall Check: Ensure your firewall (Windows Firewall or third-party) is not blocking access.
- Antivirus Interference: Temporarily disable your antivirus software and test the WiFi connection. If it improves, you may need to adjust the antivirus settings to prevent it from interfering with network operations.
- VPNs and Proxy Servers: Disable any active VPNs or proxy servers. These can sometimes reroute your internet traffic and cause problems.
8. Resetting Network Settings (Advanced Option)
As a last resort, you can try resetting your network settings in Windows. This will remove and reinstall all network adapters and reset network configurations to their defaults.
- Windows Settings: Open the Settings app (Windows key + I).
- Network & Internet: Click on "Network & Internet."
- Network Reset: Scroll down and select "Network reset."
- Confirm and Restart: Read the warning carefully, then select "Reset now" and confirm. Your computer will shut down. Upon restart, your network settings will be restored. You will need to re-enter your WiFi password for each network you connect to.
Conclusion: Reclaiming Your Lenovo WiFi Comfort
By methodically working through these steps, you can often diagnose and resolve the WiFi issues plaguing your Lenovo device. From simple reboots to more advanced configuration tweaks, the pathway to a stable and reliable connection
