como crear una red wifi desde mi laptop windows 7

Title: Curso de Windows 7 - 30 - Conectarse a una red Wi-Fi
Channel: Pablo Martinez
Curso de Windows 7 - 30 - Conectarse a una red Wi-Fi by Pablo Martinez
Secret Trick: Turn Your Windows 7 Laptop into a WiFi Hotspot in 60 Seconds!
Unleash Your Inner Tech Wizard: Transform Your Windows 7 Laptop into a WiFi Hotspot in Minutes!
Ever found yourself staring at a dead-zone, yearning for a Wi-Fi signal? We all have. It's frustrating, isn't it? But what if I told you there’s a simple solution, a secret weapon, right in your pocket… or rather, your laptop? You can turn your Windows 7 laptop into a WiFi hotspot. You can share your internet connection without any extra hardware. This is easier than you think. Let's dive into the process.
Tapping into the Hidden Potential: Setting the Stage
Before we begin, let's clarify something. We are talking about Windows 7. Ensure your laptop possesses a working internet connection. This could be through a wired Ethernet connection or a built-in Wi-Fi receiver. Next, locate your laptop's network adapter. This is crucial for sharing your internet. Ensure your laptop’s drivers are updated. It's beneficial for optimal performance. Now, grab a cup of your favorite beverage. You're ready to proceed.
The Magic Formula: Creating Your Virtual Hotspot
The trick lies in utilizing the "Hosted Network" feature. It resides within Windows 7. Don't worry, it's not as complex as it sounds. First, open the Command Prompt. You'll find it by simply typing "cmd" into the Start menu's search bar. Right-click the "Command Prompt" result and select "Run as administrator." This is essential. It allows us to bypass any access restrictions. Next, type the following command into the command prompt: netsh wlan set hostednetwork mode=allow ssid="YourHotspotName" key="YourPassword" Replace "YourHotspotName" with the desired name for your hotspot. Choose a password, substituting it for "YourPassword". Keep your password safe and secure. Hit Enter.
Activating the Gateway: Powering Up Your Hotspot
After successfully executing the previous command, you've created the groundwork. Nonetheless, we must enable the hotspot. In the same Command Prompt window, enter the following command: netsh wlan start hostednetwork. Press Enter again. You will see a confirmation message. This confirms your hosted network has started. Now, you're almost done.
Sharing the Wealth: Configuring Internet Sharing
However, we're not finished yet. You must share your primary internet connection. Return to the "Network and Sharing Center." You can access it via the Control Panel. Click "Change adapter settings" on the left. Locate your primary internet connection. It is usually your Ethernet connection or the active Wi-Fi adapter. Right-click on the connection, selecting "Properties." Click the "Sharing" tab. Check the box that says "Allow other network users to connect through this computer's Internet connection." Select the name of the "Hosted Network" adapter. This is the virtual adapter you created. Click "OK." Now, your hotspot is ready to connect devices.
Troubleshooting Common Hiccups: Smoothing the Path
Sometimes, things don't go as planned. That's okay. It happens. Let's address a few common issues. Firstly, double-check your commands for typos. A single missing character can cause problems. If your hotspot doesn't appear, ensure your network adapter drivers are updated. Sometimes, a simple driver update makes a world of difference. The Windows Firewall may be blocking the connection. You can resolve this by creating exceptions. Consider temporarily disabling the firewall for testing purposes. Remember to re-enable it afterward for security. Rebooting your laptop can also resolve some issues. This provides a fresh start.
Beyond the Basics: Refining Your Hotspot Experience
Beyond the basic setup, consider some additional optimizations. Choose a strong password for your hotspot. This is crucial for security. Remember to always use a different password for each occasion to increase security. Limit the number of devices connected simultaneously. This can help maintain speed and stability. Monitor your data usage. Sharing your connection can consume your data allowance. Explore third-party hotspot management software. These offer added features and control.
The Power of Connectivity: Embracing the Freedom
In short, you’ve now transformed your Windows 7 laptop into a functional Wi-Fi hotspot. This allows instant connectivity for all your devices. Enjoy the freedom of sharing your internet. You’re no longer tethered to a single connection point. This is incredibly useful when traveling or in areas with limited Wi-Fi access. This easy trick puts you in control of your internet connection. So go forth, connect, and conquer the digital world!
Toshiba Laptop WiFi Nightmare Solved! (Easy Fix Inside)Secret Trick: Turn Your Windows 7 Laptop into a WiFi Hotspot in 60 Seconds!
Hey there, fellow tech enthusiasts! Ever been in a situation where you're craving that sweet, sweet internet connection, but a Wi-Fi network is nowhere to be found? Maybe you're stuck on a long train ride, camping off the grid, or simply want to share your laptop's internet with your phone or tablet. Well, we've all been there! But guess what? We've got a secret, a little trick up our sleeve that can transform your trusty Windows 7 laptop into a personal Wi-Fi hotspot in, well, almost a minute! Ready to learn how? Let's dive in!
1. The Wi-Fi Wilderness Conquered: Why This Trick Matters
Think of it like this: You're a digital explorer, and your data plan is your map. But sometimes, your map lets you down. You need to connect your other devices to the internet, and public Wi-Fi is as elusive as a unicorn. Enter the secret weapon: your Windows 7 laptop, ready to become your own personal Wi-Fi oasis. This isn't about complicated software or technical jargon that'll make your head spin. It's about a straightforward, user-friendly method that works like a charm. Ready to be amazed?
2. "Hosted Network" Explained: Demystifying the Magic
Before we jump into the steps, let's quickly understand the concept. We'll be using Windows 7's built-in "Hosted Network" feature. Think of it as a virtual router, living right inside your laptop. It takes your existing internet connection (through Ethernet cable, another Wi-Fi network, or even a USB tether from your phone) and broadcasts it as a new Wi-Fi signal. Easy peasy, right? It's like taking a single hose and splitting it to water multiple plants.
3. Prepping Your Arsenal: What You'll Need
Fortunately, the essentials are incredibly simple:
- A Windows 7 Laptop: This is the star of the show!
- An Internet Connection: Be it through an Ethernet cable, a pre-existing Wi-Fi connection, or a mobile broadband connection (like a 4G/5G USB dongle.)
- A Little Patience: We're shooting for 60 seconds, but give yourself a little breathing room!
- Optional: A Device to Connect to Your Hotspot: Like your phone, tablet, or another laptop.
4. The 60-Second Setup: Unleashing the Power
Alright, here's the fun part! Follow these simple steps, and you’ll be the Wi-Fi wizard in no time:
Open the Command Prompt (as Administrator): Click the Windows "Start" button, type
cmdin the search bar, and right-click on "Command Prompt." Choose "Run as administrator." This is crucial; otherwise, the magic won't happen. Think of it as putting on your superhero cape.The Magic Commands: We're going to type a few commands into the Command Prompt. Don't worry; it's easier than it sounds. Type the following commands, pressing Enter after each one:
netsh wlan set hostednetwork mode=allow ssid="YourHotspotName" key="YourPassword"YourHotspotName: Replace this with the name you want to give your Wi-Fi hotspot (e.g., "MyAwesomeHotspot"). Keep it simple and memorable!YourPassword: Replace this with a strong password to secure your Wi-Fi network. Think of it like the lock on your treasure chest.
netsh wlan start hostednetwork
Share Your Internet Connection: This is the final step.
- Open the "Network and Sharing Center" (You can find it in the Control Panel).
- Click on "Change adapter settings" in the left-hand menu.
- You'll see a list of network connections. Identify the connection that's currently providing your internet (e.g., your Ethernet connection or your primary Wi-Fi connection).
- Right-click on that connection and select "Properties."
- Go to the "Sharing" tab.
- Check the box that says "Allow other network users to connect through this computer's Internet connection."
- From the "Home networking connection" dropdown, select "Microsoft Hosted Network Virtual Adapter" (or something similar).
- Click "OK."
And that's it! You've done it!
5. Troubleshooting Troubles: What to Do If Things Go Wrong
Sometimes, things don't go perfectly, and that's okay. Here are a few common issues and how to fix them:
- "The Hosted Network Couldn't Be Started": Make sure you ran the Command Prompt as an administrator. Double-check your spelling of the commands.
- No Internet Connection on Connected Devices: Ensure you've shared your internet connection in the "Network Connections" properties (see step 3). Verify the password you entered is correct.
- The Wi-Fi Network Isn't Visible: Some laptops may need a driver update for their wireless adapter. Consult your manufacturer's website or search online for your laptop model and "Wi-Fi driver update."
6. Security First: Protecting Your New Hotspot
Just like you'd lock your front door, you need to secure your Wi-Fi hotspot. Make sure you've chosen a strong password (using a mix of letters, numbers, and symbols) when you set up the network. Avoid easily guessable passwords like your name or birthdate. Regularly rotate your password for enhanced security too.
7. Speed Check: How Fast is Your Hotspot?
The speed of your hotspot depends entirely on the speed of your original internet connection. If you're getting 50 Mbps download speeds, your hotspot will likely offer something similar (minus a small reduction due to the sharing process). Try running an online speed test on the devices you've connected to the hotspot to see the speed.
8. Laptop Lifespan: Batteries and Heat
Turning your laptop into a hotspot will drain the battery faster than if you just browse, so you'll probably want to plug your laptop into a power outlet if you plan to use the hotspot for an extended period. Also, be mindful of your laptop's temperature. Excessive heat can affect performance, so make sure your laptop is well-ventilated.
9. Beyond Windows 7: Does It Work Elsewhere?
Unfortunately, this specific method is primarily for Windows 7. Modern operating systems like Windows 10 and 11 have built-in hotspot features, often accessible through the system settings. But the core concept – sharing your existing internet connection – remains the same.
10. The Mobile Alternative: Phone Hotspots
If your phone plan includes a data allowance, you can also create a Wi-Fi hotspot directly from your phone. This is a quick and easy option, particularly when you're on the go. The steps vary depending on your phone's operating system (Android or iOS), but you'll usually find the hotspot settings in your phone's "Settings" or "Connections" menu.
11. Data Debrief: Knowing Your Usage
Be mindful of your data usage when using your laptop as a hotspot, particularly if you're tethering from a limited data plan. Streaming videos, downloading large files, and online gaming can consume a significant amount of data. Keep an eye on your data usage to avoid any unexpected overage charges.
12. The Ethical Angle: Sharing Responsibly
Remember to consider the terms of service of your internet service provider (ISP) and any data limits you may have. Sharing your internet without proper authorization could violate the terms of service. Furthermore, avoid sharing your hotspot with unknown users so that they don't abuse your internet.
13. Reversing the Magic: Shutting Down Your Hotspot
When you're done using your Wi-Fi hotspot, you'll want to turn it off to conserve battery life and ensure security. The process is simple:
Open the Command Prompt (as Administrator – again!).
Type the following command and press Enter:
netsh wlan stop hostednetwork
And just like that, your hotspot is gone!
14. Speed Optimization: Tweaking Performance
While the shared internet speed depends on your source connection, there are a few things you can do for performance:
- Minimize Interference: Keep your laptop away from other electronic devices that could interfere with the WiFi signal.
- Channel Selection: Some routers (like your laptop's virtual router) allow you to change the WiFi channel. Experiment with different channels if your connection is slow on one channel to see if another improves performance.
15. Embrace the Freedom: Connect and Conquer!
You've done it! You now have a quick and easy way to create a Wi-Fi hotspot on your Windows 7 laptop. Whether it's for emergencies, travel, or just because, this secret trick grants you the freedom to connect wherever you are. Go forth, conquer the digital wilderness, and share your connection!
Closing Thoughts:
So there you have it! Turning your Windows 7 laptop into a Wi-Fi
Turn Your Laptop Into a WiFi Hotspot: The Ultimate Guide (Secret Trick Inside!)COMO COMPARTIR INTERNET DESDE MI PC WIN7

By Servicios Multiples COMO COMPARTIR INTERNET DESDE MI PC WIN7 by Servicios Multiples
Windows 7 no detecta wifi

By Jorgue Robert Windows 7 no detecta wifi by Jorgue Robert
como crear una red WIFI en canaima windows 7

By eimar YAMAHA como crear una red WIFI en canaima windows 7 by eimar YAMAHA
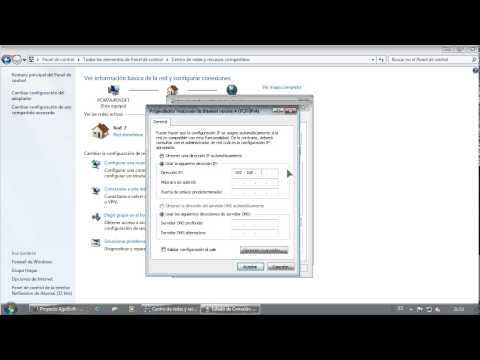
Title: Configurar red y conexin a Internet en Windows 7 en PC de casa
Channel: Proyecto AjpdSoft
Configurar red y conexin a Internet en Windows 7 en PC de casa by Proyecto AjpdSoft
Wifi On Laptop Phone
Secret Trick: Effortlessly Transform Your Windows 7 Laptop into a WiFi Hotspot in Under a Minute!
We've all been there. You're stranded, miles from a reliable internet connection, perhaps on a train, at a remote café, or maybe your home Wi-Fi is momentarily down. Your phone, your tablet, perhaps even a friend's device is begging for access. But fear not! Your trusty Windows 7 laptop, with a few simple tweaks, can become your personal WiFi oasis, providing a secure and speedy internet connection for all your devices. Forget complex software installations and convoluted configuration manuals. We are about to unleash a straightforward method to conjure a WiFi hotspot in, quite literally, under a minute. Prepare to be amazed.
Unveiling the Magical Wireless Hosted Network: The Foundation of Your Hotspot
The secret lies in the Wireless Hosted Network feature, a capability built directly into the heart of Windows 7. This powerful, yet often overlooked, function allows your laptop's built-in wireless adapter to broadcast an independent WiFi signal, essentially creating a mini-router. This method is far more convenient than relying on external software. It's elegant, integrated, and remarkably efficient. We'll harness this innate ability to set up your hotspot.
Step-by-Step: Crafting Your Instant WiFi Hub
Let’s dive right into the process. Don't worry, it's far easier than it seems. Just follow these precise steps, and you'll be sharing your internet connection in a flash.
Step 1: The Sacred Command Prompt - Your Gateway to Configuration
Open the Command Prompt. You can find it by searching "cmd" in the Start Menu or by navigating to "All Programs" > "Accessories." Right-click on "Command Prompt" and select "Run as administrator." This is crucial. This elevated privilege gives us the permission needed to manipulate your network settings.
Step 2: The Enchanting Command - Unveiling the Hosted Network
Now, type the following command meticulously into the Command Prompt window and press Enter:
netsh wlan set hostednetwork mode=allow ssid=YourHotspotName key=YourPassword
Replace “YourHotspotName” with the desired name for your WiFi hotspot. This is what your devices will see when they're scanning for networks. Choose something memorable or, for added security, something cryptic. Then, replace “YourPassword” with a strong, secure password, at least eight characters long, combining upper and lowercase letters, numbers, and symbols. This password will protect your hotspot from unauthorized access.
Step 3: The Incantation - Activating the Hosted Network
Next, we’ll begin and finalize the setup. Type the following command and press Enter:
netsh wlan start hostednetwork
You should see a confirmation message stating that the hosted network has started. If you encounter an error, ensure that the services are running (explained below) and verify your syntax, paying careful attention to spaces.
Step 4: Sharing Your Internet Connection - The Final Link
The hotspot is now active, but your other devices still can't access the internet. We need to instruct Windows 7 to share its existing internet connection.
Open the "Network and Sharing Center." You can find this by right-clicking on the network icon in your system tray (usually located near the clock) and selecting "Open Network and Sharing Center."
Click on "Change adapter settings" in the left-hand pane. This will open a window displaying your network adapters, specifically your active Ethernet or Wi-Fi connection that already has internet access, and the "Microsoft Hosted Network Virtual Adapter."
Right-click on the adapter with internet access (e.g., your Ethernet connection or your primary Wi-Fi adapter) and select "Properties."
Click on the "Sharing" tab.
Check the box that says "Allow other network users to connect through this computer's internet connection."
In the "Home networking connection" dropdown, select the "Microsoft Hosted Network Virtual Adapter."
Click "OK" and close all the windows.
That's it! Your Windows 7 laptop now functions as a fully operational WiFi hotspot, ready to share your internet connection with any compatible device.
Troubleshooting and Refinement: Ensuring Seamless Performance
Although the process is simple, some potential issues might arise. Here’s how to address them:
Problem: The "Hosted Network" Fails to Start
There are a few reasons why the hosted network might not start:
- Driver Issues: Ensure your wireless network adapter drivers are up-to-date. Visit the manufacturer's website (e.g., Intel, Broadcom, Realtek) and download the latest drivers for your specific adapter and Windows 7 version.
- Enable the Wireless LAN Service: Sometimes, the Wireless LAN AutoConfig service is disabled. To verify and enable it:
- Press the Windows key + R, type
services.mscand press Enter. - Find "WLAN AutoConfig" in the services list.
- Right-click on it and select "Properties."
- Set the "Startup type" to "Automatic."
- Click "Apply," then "Start," and then "OK."
- Press the Windows key + R, type
- Firewall Interference: Your firewall software (including Windows Firewall and any third-party firewall) might be blocking the hosted network. Allow the hosted network adapter traffic through your firewall's settings.
Problem: Limited Connectivity or No Internet Access on Connected Devices
If devices connect to your hotspot but can’t browse the internet, consider the following:
- Sharing Settings: Double-check that you have correctly enabled internet connection sharing as described in Step 4.
- IP Address Conflict: Rarely, an IP address conflict can prevent internet access. To fix this:
- Go to the "Network and Sharing Center" > "Change adapter settings."
- Right-click on the "Microsoft Hosted Network Virtual Adapter" and select "Properties."
- Select "Internet Protocol Version 4 (TCP/IPv4)" and click "Properties."
- Ensure "Obtain an IP address automatically" and "Obtain DNS server address automatically" are selected.
- DNS Problems: Your DNS settings on your primary internet connection might have an issue. Consider switching your DNS servers. For instance, you can add the Google public DNS: 8.8.8.8 and 8.8.4.4
- Wireless Adapter Power Management: In rare cases, your wireless adapter's power management settings might be interfering.
- In the Device Manager (search for "Device Manager" in the Start Menu), expand "Network adapters."
- Right-click on your wireless adapter and select "Properties."
- Go to the "Power Management" tab and uncheck "Allow the computer to turn off this device to save power."
Security Best Practices: Safeguarding Your WiFi Hotspot
While this method is effective, always prioritize security:
- Strong Passwords: Use a robust password for your hotspot, crucial for preventing unauthorized access.
- Monitor Connected Devices: Regularly check which devices are connected to your hotspot.
- Disable When Unused: Turn off the hosted network when you're not using it by typing
netsh wlan stop hostednetworkin the Command Prompt. This reduces the potential attack surface. - Consider Encryption: WPA2-PSK (or WPA3-PSK if supported by your devices) is the recommended encryption method for your hotspot. It provides better security than older protocols. The method described here inherently implements WPA2-PSK.
Beyond the Basics: Advanced Customization (Optional)
For those seeking further control, consider these advanced options:
- Changing the SSID: You can modify the SSID (network name) at any time using the
netsh wlan set hostednetwork ssid=YourNewHotspotNamecommand. - Changing the Password: To alter the password, simply re-run the command from Step 2 with your new desired password.
- Persistent Hotspot: By default, the hosted network remains active until you stop it. To ensure it automatically starts when your laptop boots, create a scheduled task using the Task Scheduler (search “Task Scheduler” in the Start Menu) that runs the
netsh wlan start hostednetworkcommand.
Conclusion: Your Personal WiFi Powerhouse
There you have it! In a matter of seconds, you've transformed your Windows 7 laptop into a fully functional Wi-Fi hotspot. This simple, yet powerful, technique empowers you to connect all your devices, share your internet connection, and stay productive or entertained wherever you go. No need for costly hardware or complicated third-party software. Embrace the simplicity and convenience, and unlock the hidden potential of your Windows 7 laptop today! Enjoy your newfound freedom and never worry about being disconnected again!
