laptop wifi hotspot free software

Title: Top 5 Free WiFi Hotspot Software For Windows Top Free WiFi Hotspot App to Create a Wi-Fi Hotspot
Channel: TheRRRashid
Top 5 Free WiFi Hotspot Software For Windows Top Free WiFi Hotspot App to Create a Wi-Fi Hotspot by TheRRRashid
laptop to mobile hotspot software free download, wifi hotspot for laptop software free download
Unlock FREE Laptop WiFi Hotspot: No Software Needed!
Turn Your Laptop into a Wireless Haven: No-Cost WiFi Hotspot Creation!
Imagine this: You're stranded. Your phone's data is dwindling. The need for internet access is critical. Public WiFi is nowhere in sight. Don't fret. Your laptop holds the key to an instant, software-free WiFi hotspot. This article unfolds a straightforward method. Now, let's dive in.
Bypassing the Download: The Magic of Built-In Tools
Forget the clunky, often unreliable software. Windows and macOS offer an elegant solution. They provide native functionality for WiFi hotspot creation. This eliminates the need for potentially problematic third-party applications. Therefore, setting up your laptop as a hotspot becomes surprisingly seamless. This built-in power is remarkably efficient. Consequently, access to the internet is just moments away.
Windows' Secret Weapon: The Command Prompt Power Play
For Windows users, the Command Prompt unveils its hidden potential. It's a powerful tool, indeed. First, you must run the Command Prompt as administrator. Enter the following command.
netsh wlan set hostednetwork mode=allow ssid=YourNetworkName key=YourPassword
Replace "YourNetworkName" with the desired name for your hotspot. Then, choose a strong password for security. Ensure this password is easy to remember but hard to guess.
Next, enter the command :
netsh wlan start hostednetwork
This starts the hosted network. This is only the beginning, though. Finally, the internet connection needs sharing. Navigate to "Network Connections" in the "Control Panel." Locate your primary internet connection. It usually says "Ethernet" or "WiFi." Right-click on it. Select "Properties." Now, click the "Sharing" tab. Check the box that says "Allow other network users to connect through this computer’s Internet connection." From the dropdown menu, select your new hotspot name. That's it. You are officially a hotspot.
macOS's Intuitive Approach: Sharing Internet Made Easy
macOS provides a user-friendly route. Navigate to "System Preferences." Click on "Sharing." Select "Internet Sharing" from the sidebar. Choose "Share your connection from" using your active internet source. Check the box next to "Wi-Fi." Click "Wi-Fi Options…" here, you can choose a network name and password. This creates your secure hotspot. Finally, check the “Internet Sharing” box to enable the hotspot. Hence, your Mac is now a wireless access point.
Troubleshooting Common Issues: Smooth Sailing for Your Hotspot
Sometimes, things may not go perfectly. If you encounter problems, don’t be discouraged. Let's address the most common stumbling blocks. First, verify your internet connection is active. Second, double-check your entered commands or settings. The smallest typo can cause a malfunction. Another common issue involves the network adapter. Ensure your computer's WiFi adapter is enabled. If it’s disabled, your hotspot won't broadcast. Also, consider interference. Other devices can interfere with your WiFi signal. Try moving closer to your laptop to improve the connection. If all else fails, restart your computer. Frequently, this resolves minor glitches.
Security First: Protecting Your Wireless Network
Creating a secure hotspot is paramount. Use a strong, complex password. Avoid easily guessable words or phrases. Change your password periodically. Enable WPA2 or WPA3 encryption. These offer the strongest security protocols. Regularly update your operating system. Updates often include security patches. These patches can protect against potential vulnerabilities. Educate users about online safety. Advise them on the importance of safe browsing practices. Don't overlook the importance of security.
Beyond the Basics: Advanced Customization
Once comfortable with your hotspot, explore more advanced customization. Customize the network name to something easily recognizable. Consider the channel your hotspot uses. Try changing it to a less congested channel. This can improve speed and stability. Limit the number of connected devices. This is helpful to conserve your laptop's resources. If you're a Linux user, consult your distribution’s documentation. Linux also offers versatile options for hotspot creation. There are many ways to customize your network. The Bottom Line: Empowering Your Connectivity
There you have it. You can create a free WiFi hotspot. Without any additional software. Use your laptop as a versatile connectivity solution. You can share your internet with all your devices. It’s convenient, effective, and cost-free. Therefore, you can be connected, wherever you are. So, embrace the freedom. Enjoy the power of a portable WiFi network.
Laptop WiFi Dead? This ONE Trick Will Fix It FAST!Unlock FREE Laptop WiFi Hotspot: No Software Needed!
Hey everyone! Ever been in a bind, desperate for internet, and cursing your limited data plan or the absence of a reliable Wi-Fi connection? We’ve all been there. Stuck in a coffee shop with terrible Wi-Fi, at a friend's place with a flaky connection, or needing to quickly share your internet with a device? Fear not! We're about to unlock a simple, elegant solution to create a free laptop Wi-Fi hotspot, without downloading any clunky software. Think of it as your laptop transforming into a digital Swiss Army Knife. Ready to dive in? Let's do this!
1. The Wi-Fi Hotspot Dilemma: A Universal Problem
Let's be honest; reliable internet access is practically a human right in this day and age. We rely on it for work, entertainment, staying connected, and even just, you know, not feeling completely out of the loop. But sometimes, that connection feels as elusive as a unicorn. Public Wi-Fi can be unreliable, your data plan can drain faster than you can say "cat video," and those software-based hotspots? Well, they can feel as heavy and complicated as a Russian novel. We feel your pain. This is why learning to create a built-in laptop hotspot is so crucial.
2. Windows: Your Secret Weapon for Free WiFi
Good news, Windows users! Your operating system already packs the capability to create a Wi-Fi hotspot. It's a hidden gem, readily available, and surprisingly easy to use. Think of it as a built-in feature, like the air conditioning in your car. You don’t need to buy a separate gadget; it's already there, waiting to be utilized.
3. Accessing the Hidden Hotspot Feature: A Simple Path Forward
The process is delightfully straightforward, even for those who aren't tech wizards. Bear with me, and I'll walk you through it.
4. Step-by-Step Guide: Sharing Your Internet Gracefully
Here's the practical rundown.
- Step 1: Opening Settings: First, navigate to your Windows settings. Usually, hitting the Windows key and the "I" key simultaneously gets you there, or simply type "settings" into the Windows search bar.
- Step 2: Network & Internet: Click on "Network & Internet." This is where all things connection-related reside.
- Step 3: Mobile Hotspot: Select "Mobile Hotspot" from the options listed on the left-hand side. You're close!
- Step 4: Sharing Your Connection: You'll see a section allowing you to share your internet connection. Select which connection you wish to share, whether it's from your Ethernet (if you're connected via cable) or your Wi-Fi (if you’re currently connected to another Wi-Fi network).
- Step 5: Edit Details: Before you switch it on, click "Edit." This allows you to personalize your hotspot's name (SSID) and password, just like you'd customize your home Wi-Fi. Choose something memorable but secure!
- Step 6: Toggle It On! Finally, turn "Mobile Hotspot" to "On." And just like that, you've created your own personal Wi-Fi hotspot!
5. Mac Users: Accessing Your Hotspot Through System Preferences
Mac users, don't feel left out! You too hold the keys to wireless sharing. The steps are slightly different, but equally easy.
6. Mac Steps: Accessing Internet Sharing
- Step 1: Open System Preferences: Click on the Apple menu in the top-left corner of your screen and select "System Preferences."
- Step 2: Select Sharing: Click on "Sharing."
- Step 3: Select Internet Sharing: In the Sharing window, select "Internet Sharing" from the list.
- Step 4: Configure Internet Sharing: Under "Share your connection from," choose your internet source (e.g., Wi-Fi, Ethernet). Then, select the devices you want to share your connection with (e.g., using Wi-Fi).
- Step 5: Wi-Fi Options: Click "Wi-Fi Options…" to choose a network name, create a password, and select a security type.
- Step 6: Enable Internet Sharing: Check the box next to "Internet Sharing" to enable the hotspot. A confirmation prompt will appear, confirm by selecting "Start."
7. Troubleshooting Common Hotspot Issues
Sometimes, things don't go as smoothly as we'd like. Here are a few potential snags and how to fix them.
- "The Hotspot Won't Turn On!": Double-check your internet connection on your laptop. If your computer isn't connected to the internet, it can't share it! Also, ensure your network adapter drivers are up-to-date.
- "Other Devices Can't Connect": Verify your password. It's easy to make typos! Also, make sure your hotspot isn't blocking any devices (check your device limits in the Windows settings).
- "Slow Speeds": The number of connected devices will affect speed. The more devices, the slower the connection. Also, make sure your primary internet connection is adequate.
8. Security Considerations: Protecting Your Digital Castle
Creating a hotspot means you're sharing your internet with others, so security is key.
9. Setting Up A Strong Password!
This is the fundamental line of defense. Don't use a simple or easily guessable password. Think of it as the drawbridge to your digital castle.
10. Limiting Connected Devices: The Gatekeepers
Control the number of devices that can connect to your hotspot. This helps with security and prevents excessive bandwidth usage.
11. Bandwidth Management: The Traffic Control Center
If you're concerned about data usage, especially when using a mobile data connection, consider setting data limits on your hotspot. This can prevent unwanted charges and ensure a fair distribution of bandwidth.
12. Battery Life: The Power Supply!
Creating a hotspot can drain your laptop's battery. Plug your laptop into a power source whenever possible, especially when you're sharing your connection for an extended period. It's like fueling up your car before a long journey.
13. Benefits of a Free Laptop Hotspot: Unlocking a World of Freedom
The perks are considerable. Think of the flexibility!
14. Anytime, Anywhere Connectivity
You have Wi-Fi wherever you have your laptop. No more Wi-Fi deserts!
15. Cost Savings: Unleashing Your Wallet!
Free hotspot means saving money on extra data plans or paying for public Wi-Fi. You can be your own connectivity provider!
Closing Thoughts: Your Gateway to Internet Freedom!
And there you have it! You've now armed yourself with the knowledge to effortlessly create a free Wi-Fi hotspot using your laptop, without needing any software. It's like having a portable Wi-Fi router, ready whenever and wherever you need it. Remember to prioritize security and manage your bandwidth wisely. So, the next time you're in a Wi-Fi pinch, you'll be the hero of the hour, sharing the internet goodness with those around you. Go forth, connect, and embrace the freedom!
Frequently Asked Questions
1. Is using my laptop as a hotspot safe?
Absolutely! As long as you use a strong password, limit the number of connected devices, and keep your software and drivers up-to-date, it's a safe and secure way to share your internet.
2. Does this work with any Windows or Mac laptop?
Yes, as long as your laptop has a Wi-Fi adapter, this method should work.
3. Will my laptop run slower when it's acting as a hotspot?
Yes, slightly. Sharing your internet connection consumes processing power and bandwidth, so your laptop might run a tad slower, especially with multiple devices connected.
4. How do I see which devices are connected to my hotspot?
In Windows, you can typically see connected devices within the Mobile Hotspot settings. On a Mac, you can often find this information within the Internet Sharing settings or in the Wi-Fi menu.
5. Can I use a hotspot if I am using a public Wi-Fi?
Yes, if you are connected to a public Wi-Fi then you can share it as a hostspot, but it's crucial to observe all the security parameters and consider that it might violate the provider terms of service and expose your data to risks.
- Principal Keywords: Free Laptop WiFi, No Software
- SEO Headline: Free Laptop WiFi Hotspot: No Software Setup Needed!
- Pathway: Free WiFi
- Meta Summary: Unlock free Laptop WiFi hotspot with no software! Simple steps for Windows & Mac. Share internet easily. Secure setup & FAQs.
- Image Alt Text: Laptop creating a free WiFi hotspot, showing a user sharing the internet without additional software.
Laptop sebagai Hotspot WiFi 2025 Panduan Lengkap

By ReviewQuasar Laptop sebagai Hotspot WiFi 2025 Panduan Lengkap by ReviewQuasar
Cara Mencetak Jarak Jauh Melalui Jaringan atau Internet
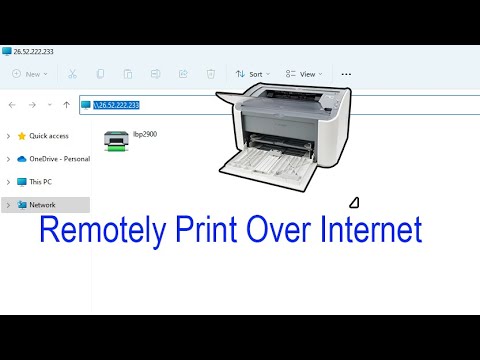
By NETVN82 Cara Mencetak Jarak Jauh Melalui Jaringan atau Internet by NETVN82
MyHotspot Tool for managing your public WIFI HotSpot in cafes, shools, hotels, or gaming cafe

By MyPublicWiFi True Software MyHotspot Tool for managing your public WIFI HotSpot in cafes, shools, hotels, or gaming cafe by MyPublicWiFi True Software

Title: Cara Membuat Laptop Jadi Hotspot WiFi Di Windows 10 11
Channel: GAPTEK AMATIR
Cara Membuat Laptop Jadi Hotspot WiFi Di Windows 10 11 by GAPTEK AMATIR
Wifi Not Found
Unlock FREE Laptop WiFi Hotspot: No Software Required!
In an increasingly connected world, the ability to share your internet connection from your laptop can be a true lifeline, especially when a reliable Wi-Fi network is unavailable. Imagine this: you’re working remotely, traveling, or simply in a location with limited internet access. Instead of being tethered to a frustratingly slow or nonexistent connection, your laptop can become a powerful, software-free WiFi hotspot. This guide unveils the surprisingly simple process of creating a wireless hotspot directly from your laptop, without involving any third-party software. Prepare to unlock seamless connectivity, empowering you to connect multiple devices to the internet, all from the comfort of your portable computer.
Understanding the Power of a Built-In Laptop Hotspot
The advantages are numerous. Think of it as turning your laptop into a personal mobile network. With a laptop-created hotspot, you can:
- Connect multiple devices: Share your internet connection with your smartphone, tablet, another laptop, or even gaming consoles.
- Enjoy a secure connection: Create a password-protected network, ensuring only authorized devices can access your internet.
- Avoid unnecessary software: Eliminate the clutter and potential security risks associated with third-party hotspot applications.
- Conserve your mobile data: In areas with free Wi-Fi, but a need to connect multiple devices, or when you want to share your home internet connection to a friend or family member, utilize your laptop as a hotspot.
- Personalize your network: Choose a custom network name (SSID) and password to reflect your identity.
The Windows 10/11 Built-In Mobile Hotspot: Your Gateway to Seamless Sharing
Modern Windows operating systems, starting with Windows 10 and continuing with Windows 11, offer a built-in Mobile Hotspot feature. This functionality streamlines the process of sharing your internet connection using your laptop's Wi-Fi card. We will delve into the exact steps to activate and configure this feature.
Step-by-Step Guide: Creating Your Software-Free Laptop Hotspot
The following instructions apply to both Windows 10 and Windows 11, with minor visual differences. We will provide the details for both operating systems.
For Windows 10 Users:
- Access the Settings App: Click the Start button and then select the "Settings" gear icon.
- Navigate to Network & Internet: Within the Settings app, click on the "Network & Internet" category.
- Choose Mobile Hotspot: In the left-hand panel, locate and click on "Mobile hotspot." This will open the Mobile hotspot settings panel.
- Enable the Hotspot: Toggle the "Share my internet connection with other devices" switch to "On." The switch will turn blue to indicate it is enabled.
- Configure Your Network:
- Choose Internet Connection to Share From: Select "Share my internet connection from" to select the internet connection you would like to share. This will depend on the internet connection you are currently using. This could be from your Ethernet cable, Wi-Fi or mobile data.
- Edit Network Name and Password: Click "Edit" to customize your hotspot's network name (SSID) and password. Choose a strong password to secure your network. Make a note of these credentials, as you will need them to connect other devices.
- Connect Other Devices: On your other devices, search for available Wi-Fi networks and select the network name you created. Enter the password to connect.
For Windows 11 Users:
- Access the Settings App: Click the Start button and then select the "Settings" gear icon.
- Navigate to Network & Internet: Within the Settings app, click on the "Network & Internet" category.
- Choose Mobile Hotspot: In the right-hand panel, click on the "Mobile hotspot" option.
- Enable the Hotspot: Toggle the "Mobile hotspot" switch to "On." The switch will turn blue to indicate it is enabled.
- Configure Your Network:
- Share my internet connection from: Select "Share my internet connection from" to select the internet connection you would like to share. This will depend on the internet connection you are currently using. This could be from your Ethernet cable, Wi-Fi or mobile data.
- Edit Network Name and Password: Click "Edit" to customize your hotspot's network name (SSID) and password. Choose a strong password to secure your network. Make a note of these credentials, as you will need them to connect other devices.
- Connect Other Devices: On your other devices, search for available Wi-Fi networks and select the network name you created. Enter the password to connect.
Troubleshooting Common Hotspot Problems
While the process is generally straightforward, you may encounter some issues. Here's a quick guide to resolving them:
- Hotspot Not Appearing on Other Devices:
- Check your Wi-Fi adapter: Ensure your laptop's Wi-Fi adapter is enabled.
- Restart your laptop: Sometimes, a simple restart resolves connectivity glitches.
- Check your device's Wi-Fi settings: Make sure Wi-Fi is enabled on the device you are trying to connect.
- Distance: Ensure the connecting device is within a reasonable range of the hotspot.
- Devices Can't Connect to the Hotspot:
- Incorrect Password: Double-check that you are entering the correct password.
- Check Network Adapter Drivers: Outdated or corrupted network adapter drivers can cause connection issues. Update them through Device Manager (search for "Device Manager" in the Windows search bar).
- Antivirus/Firewall Interference: Your antivirus software or Windows Firewall might be blocking the connection. Temporarily disable them (but remember to re-enable them after testing).
- Slow Internet Speed:
- Internet Connection: The speed of your hotspot depends on the speed of your laptop's existing internet connection.
- Number of Connected Devices: The more devices connected, the slower the speed will be, as bandwidth is divided.
- Distance: The further the devices are from the laptop, the slower the speed.
- Interference: Physical obstructions (walls, furniture) or interference from other electronic devices can reduce speed.
- Hotspot Disconnecting:
- Power saving mode: Make sure that your laptop is not in power-saving mode.
- Network adapter power save setting: The wireless adapter may be set to save power, which turns it off after some time.
Optimizing Your Hotspot for Performance and Security
To maximize the effectiveness of your laptop hotspot, consider these tips:
- Strong Password: Always use a strong, unique password for your hotspot to prevent unauthorized access. A combination of upper and lowercase letters, numbers, and symbols.
- Network Name (SSID): Choose a descriptive yet not overly revealing network name. Avoid using any personal information.
- Security Protocols: The Windows built-in mobile hotspot uses Wi-Fi Protected Access 2 (WPA2) to protect your network (the latest version Wi-Fi Protected Access 3 (WPA3) is supported by some devices).
- Monitor Connected Devices: Keep an eye on the devices connected to your hotspot. You can often see a list in the Mobile Hotspot settings. Unidentified devices could indicate unauthorized access.
- Manage Bandwidth: If you have a limited data plan, be mindful of data usage on connected devices. Consider setting data limits or restricting certain types of online activities.
- Keep Your Laptop Updated: Regular system updates often include important security patches that can protect your hotspot from vulnerabilities.
Beyond the Basics: Advanced Hotspot Usage
Beyond the fundamental setup, there are a few advanced techniques you can employ:
- Using a Wired Connection: If your laptop has an Ethernet connection, you can share that internet connection via the hotspot. This can provide a more stable and potentially faster connection compared to sharing a Wi-Fi connection. In your Mobile Hotspot settings, select the Ethernet connection as the source.
- Extend Wi-Fi Range: While a laptop's Wi-Fi signal might be limited, you can potentially extend the range by using your laptop as a temporary relay for other devices. The signal from the laptop is then picked up by another device, and that device acts as the source for a new personal hotspot further on.
- Check Data Usage: Monitor your laptop's and connected devices' data usage to avoid exceeding data caps. Windows has built-in usage trackers that can provide information.
- Troubleshooting Network Issues: Sometimes, a device won't connect, or there is limited or no connectivity. Troubleshooting your device's drivers is always the first step.
- Personalize Device Connections: If connecting multiple devices, you can assign static IP, to prioritize connections by device.
Enjoying Your Software-Free Connection
With the simple steps outlined above, you can easily transform your laptop into a portable Wi-Fi access point. This software-free solution grants you freedom and flexibility, especially in locations with limited or no Wi-Fi access. Armed with this knowledge, you can connect multiple devices to the internet allowing you to work, play, and communicate seamlessly wherever you are. So, the next time you find yourself in a connectivity
