how to connect iphone to itunes on laptop without wifi

Title: How To Fix iPhone Not Showing Up On iTunes - Full Guide
Channel: GuideRealm
How To Fix iPhone Not Showing Up On iTunes - Full Guide by GuideRealm
iPhone to iTunes: No Wi-Fi? No Problem! (Secret Trick Inside!)
Transferring Tunes: Ditch the Wi-Fi, Conquer iTunes!
Remember those days? The frustration of desperately needing to sync your iPhone, only to find your Wi-Fi was stubbornly out of commission? Absolutely maddening! You're certainly not alone. It was a digital dance of despair. So, you'd resign yourself to a musical drought. But wait! There's a secret weapon. It lets you bypass those Wi-Fi woes. This is a trick that rescues your music. It ensures you are connected, no matter what. Let's dive in!
The Surprisingly Simple Secret: USB's Unexpected Power
The solution is wonderfully straightforward. It leverages that trusty USB cable. It's the very thing you use for charging. Believe it or not, it's also key to all this. Instead of relying solely on Wi-Fi, you utilize the direct connection. This allows you to sync music, podcasts, and more. Moreover, it happens directly at your Mac or PC. It's a simple, plug-and-play solution. Think of it as a digital lifeline. It's perfect when Wi-Fi takes an unexpected vacation.
Step-by-Step: Your Guide to Music Liberation
Ready to break free from Wi-Fi dependency? Here's your clear-cut guide. This is a process that unlocks your music, regardless of your internet connection.
Cable Connection is Crucial: First, grab your Lightning to USB cable. This is usually the cable that came with your iPhone. Now, plug it into your iPhone and your computer. Make sure both ends are firmly in place.
iTunes Awakening: Open iTunes on your computer. If you don't have it, download it. It is freely available from Apple. After launching iTunes, your iPhone should ideally appear within the iTunes interface. The app might take a moment to recognize your device.
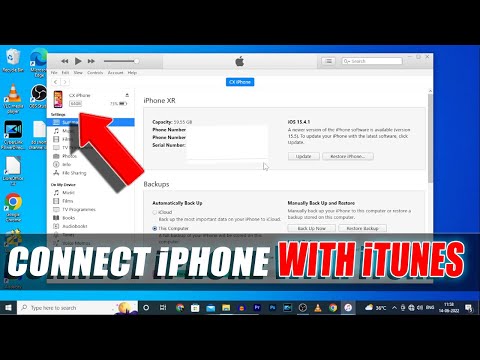
Device Selection: The Digital Nexus: Click on your iPhone icon. This is typically located near the top-left corner of the iTunes window. This step takes you to the device summary screen. This is where all the magic happens.
Sync Settings & Music Selection: Navigate to the "Music" tab within the device summary. Here, you'll find options for syncing your music. You can choose to sync your entire library or selected playlists. This is your chance to customize your music journey.
Sync Commencement: Select your preferred music sync options. Then, click the "Sync" button. This will begin the music transfer. You'll see a progress bar. It indicates the syncing status. Be patient; the initial sync might take some time.
Eject and Enjoy: Once the sync is complete, safely eject your iPhone from iTunes. Now disconnect the USB cable. You can now proudly enjoy your music offline. Revel in the freedom of having your tunes.
Troubleshooting Tactics: Conquering Sync Snags
Sometimes, things don't run seamlessly. So, what if you encounter a hiccup? Don't fret. Here are some troubleshooting tips. These will help you navigate common sync issues.
Software Updates: Ensure both your iPhone and iTunes are up-to-date. Outdated software is often a core culprit. Check for updates on both devices. Regularly updating both systems will ensure smooth operations.
Cable Inspection: A faulty cable can cause sync failures. Try using a different USB cable. This could solve the problem instantly. Occasionally, the issue rests in a seemingly innocuous component.
Restart Reboot: A simple restart of your iPhone and computer can resolve many problems. Sometimes, this is all that is needed. Restarting is a common, yet often effective, solution.
iTunes Authorization: Ensure your computer is authorized to play your Apple Music. If not, you're going to have problems. You can find this under the "Account" tab. It is at the top menu bar.
Check Storage: Make sure you have ample storage space. Check that your iPhone has sufficient storage space for the music. If not, delete any unwanted files.
Beyond the Basics: Advanced Syncing Strategies
Want to optimize your sync process? Here are a few extra tips. These will boost your music management further.
Playlist Power: Use playlists to organize your music. This means creating custom playlists in iTunes. You can then sync them directly to your iPhone. This keeps your music organized and easily navigable.
Smart Playlists: Explore smart playlists. iTunes offers this feature. These playlists automatically update based on criteria you set. It's a dynamic way to manage your collection.
Manually Manage Music: Instead of auto-syncing, you can manually manage your music. Select the "Manually manage music" option in iTunes. This gives you more control over your music selection.
The Grand Finale: Music Freedom, Unleashed
There you have it! You now possess the knowledge. You're ready to sync your iPhone to iTunes. You can do this without depending on a Wi-Fi connection. You can now manage your music library. This opens the door to musical independence. Embrace the freedom of direct USB syncing! It is so convenient. Never again will you be stranded without your tunes. So go forth! Enjoy your music.
Asus U56E WiFi Fix: Get Your Laptop Online FAST!iPhone to iTunes: No Wi-Fi? No Problem! (Secret Trick Inside!)
Ever tried to sync your iPhone with iTunes, only to be met with the dreaded “Can’t connect because Wi-Fi isn’t available” message? We've all been there, haven't we? Maybe you’re traveling, your internet is down, or you’re just plain old resistant to public Wi-Fi. But fear not, fellow Apple enthusiasts! We’re diving deep today into a super-secret, often-overlooked trick to sync your iPhone with iTunes, even when Wi-Fi throws a tantrum. Get ready to ditch the Wi-Fi woes and reclaim your music, podcasts, and that all-important photo of your cat in a ridiculously oversized hat!
1. The Frustrating Wi-Fi Wall: Why Is It So Important (Or Is It?)
Let’s be honest, Wi-Fi is practically a lifeline these days. But when it comes to syncing your iPhone with iTunes, it often feels like a digital gatekeeper. iTunes, in its earlier iterations, was heavily reliant on a stable Wi-Fi connection for wireless syncing. This reliance was a bit of a pain, particularly for those of us who value offline convenience. It's like being told you can only enjoy your favorite book if you're standing in a specific library with perfect lighting. Talk about limiting!
2. The Old School Way: The Mighty USB Cable and Why It’s Still King
Before the days of effortless wireless syncing, there was the trusty USB cable. Remember those? The good old days, when you’d plug your iPhone directly into your computer, wait a few minutes, and boom – sync complete. The USB cable might seem a bit… old-fashioned compared to today's wireless wonders. But here’s the kicker: it’s still the most reliable method, especially when Wi-Fi goes AWOL. Think of it as the sturdy, dependable friend who’s always there for you, rain or shine (or lack of Wi-Fi).
3. The Secret Weapon: Direct USB Syncing (The Magic Unveiled)
Here’s the secret, friends: you can sync your iPhone with iTunes directly via a USB cable, regardless of Wi-Fi availability. It's not some hidden setting, or a software workaround; it's built right into the system. This method is a lot easier than you might think. Simply plug your iPhone into your computer using the appropriate USB-C to Lightning or USB to Lightning cable. Open iTunes (or the newer Finder app on macOS Catalina and later), and your iPhone should appear as a device.
4. Preparation is Key: Getting Your iPhone and iTunes Ready
Before you connect anything, make sure you’ve got the prerequisites:
- Your iPhone: Fully charged (or close to it!).
- A USB cable: The cable that came with your iPhone works perfectly.
- Your computer: A Mac or PC with iTunes installed (or Finder on newer Macs).
- iTunes: Make sure you have the latest version of iTunes installed. Keeping a current version eliminates potential problems linked to outdated software.
- Drivers: Make sure your computer has the correct drivers installed for your iPhone. MacOS usually handles this automatically. Windows users may need to update or install the necessary drivers through iTunes or Windows Update.
5. Step-by-Step: The USB Syncing Procedure
Okay, ready to get syncing? Follow these simple steps:
- Connect Your iPhone: Plug the USB cable into your iPhone and your computer. You might get a prompt on your iPhone asking you to trust the computer. Make sure you tap "Trust".
- Open iTunes (or Finder): Launch iTunes on your PC or the Finder on your Mac. Your iPhone should appear as a device icon in the top left corner (in iTunes) or in the sidebar (in Finder).
- Select Your iPhone: Click on your device icon. This will take you to the device summary screen.
- Choose Your Sync Options: On the summary screen, you'll see various options to sync your music, movies, podcasts, photos, and more. Select the content you want to sync.
- Sync Your Content: Click the "Sync" button (usually located at the bottom) to initiate the sync process.
- Wait Patiently: The sync process can take a little while, especially if you're syncing a lot of files. Relax, maybe make a cup of tea, and let it do its thing.
- Disconnect Safely: Once the sync is complete, click the "eject" button next to your device icon and safely unplug your iPhone.
6. Troubleshooting Troubles: Dealing with Common Syncing Headaches
Sometimes, even following the steps perfectly can lead to hiccups. Here are a few common troubleshooting tips:
- iPhone Not Showing Up? Make sure the USB cable is working properly and try a different USB port on your computer. Also, ensure your iPhone is unlocked and that you’ve chosen to “Trust This Computer.”
- Syncing Stuck? Sometimes, a simple restart of your iPhone and computer can fix problems.
- iTunes/Finder Crashes? Close and reopen iTunes or the Finder. If the problem persists, try updating the software.
- Syncing Errors? Check if your iPhone has enough storage space for the content you're trying to sync.
7. Unleash the Power: Control Your Content, Without Wi-Fi
Using the USB method gives you total control. You're not beholden to the whims of Wi-Fi networks. It's like having your own personal media library, accessible anytime, anywhere. This is especially useful for:
- Uploading large music libraries
- Syncing your photo library
- Keeping podcasts or audiobooks ready for offline listening
- Backing up your iphone: The usb connection makes backups easier and faster!
8. The Modern Twist: Using Finder on macOS (If You're a Mac Person)
If you're a Mac user running macOS Catalina or later, you won’t even need iTunes. Apple has integrated device management directly into the Finder. The process is almost identical to using iTunes. When you plug in your iPhone, it will appear in the sidebar of the Finder. Select your iPhone, choose the content you wish to sync, and follow the same steps as above. It's incredibly simple!
9. Why USB Syncing Is Still Relevant in a Wireless World
Even with the convenience of wireless syncing, USB syncing remains relevant for a few compelling reasons:
- Speed: USB syncing is generally faster than wireless syncing, especially for large transfers.
- Reliability: USB is more reliable, particularly in unstable Wi-Fi environments.
- Data Security: A direct connection is sometimes more secure than a wireless connection, particularly when it comes to sensitive content.
- Battery Life: With USB syncing, you can charge your iPhone and sync it simultaneously.
10. Avoiding the Wireless Syncing Hassle (Unless You Really Want It)
While wireless syncing is convenient, it's not always the best choice. Are you really willing to sacrifice your Wi-Fi network when you can do it faster, and more reliably. The USB method offers a simple and reliable alternative.
11. Beyond Syncing: Other Things You Can Do with a USB Connection
The USB connection isn't just for syncing; it also opens up a host of other possibilities:
- Charging Your iPhone: This is the obvious one, but important.
- Backing Up Your iPhone: You can initiate a backup directly through iTunes or Finder.
- Transferring Files: Transfer files directly to your iPhone using the File Sharing feature in iTunes or Finder (if supported by the app).
- Tethering: Some carriers allow you to use your iPhone as a mobile hotspot via USB tethering.
12. The Simplicity Factor: Keeping It User-Friendly
The USB method keeps things simple. No complicated setups. No cryptic error messages (most of the time!). Just a straightforward connection and a clear sync process. It’s the digital equivalent of a well-oiled machine.
13. A Word of Caution: Preventing Data Loss During Syncing
Before you begin, it's always wise to back up your iPhone. Syncing can sometimes lead to data loss if there are interruptions (like a power outage) or software glitches. A backup ensures you can restore your data if anything goes wrong.
14. The Future of Syncing: Where is Apple Heading?
As technology evolves, Apple is constantly refining its syncing process. We can expect to see even more streamlined options in the future. However, the direct USB connection will likely remain a reliable fallback, providing a consistent bridge between your iPhone and your computer.
15. Embrace the Freedom: Ditch the Wi-Fi Dependency
You now have the power to sync your iPhone with iTunes (or Finder) without relying on Wi-Fi. Embrace the freedom, the convenience, and the peace of mind that comes with knowing you’re in control of your data. The USB cable is your friend!
In conclusion, friends, syncing your iPhone with iTunes (or Finder) doesn’t have to be a Wi-Fi-dependent
Unlock Your Laptop's WiFi Password: The Secret Method!How to Unlock Unavailable iPad without Passcode or iTunes Remove Forgotten iPad Password2022

By Digiber How to Unlock Unavailable iPad without Passcode or iTunes Remove Forgotten iPad Password2022 by Digiber
How to unlock a disabled iPhone without iTunes Tagalog

By ChrisRandomTech How to unlock a disabled iPhone without iTunes Tagalog by ChrisRandomTech
How to Connect iPhone to iTunes on Windows PC 2022
By daily doubts How to Connect iPhone to iTunes on Windows PC 2022 by daily doubts
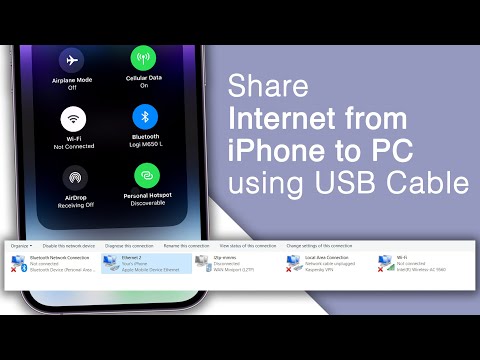
Title: How to Share iPhone Internet Connection with PC via USB Cable
Channel: Jigxor Tutorials
How to Share iPhone Internet Connection with PC via USB Cable by Jigxor Tutorials
Laptop Working
iPhone to iTunes: Seamless Syncing Without Wi-Fi - A Comprehensive Guide
We understand the frustration. You're grappling with a mountain of songs, videos, or precious photos, and the dreaded "Wi-Fi unavailable" message throws a wrench into your plans. You want to transfer files from your iPhone to iTunes, but the traditional Wi-Fi sync method is letting you down. Fear not, because we've uncovered a secret and refined a straightforward method that will enable smooth iPhone to iTunes syncing, even when you're off the grid.
The Lightning Cable: Your Unsung Hero
Forget complicated network setups. The solution is refreshingly simple: your trusty Lightning cable. This humble piece of technology, often relegated to the role of a charger, is the gateway to direct, wired communication between your iPhone and your computer running iTunes.
Step-by-Step: Mastering Wired Syncing
The Connection: Initiate the process by connecting your iPhone to your computer using the Lightning cable. Ensure the cable is firmly plugged into both devices.
iTunes Acknowledgment: Launch iTunes (or the latest version, which might be in the Music app on newer versions of macOS) on your computer. With your iPhone connected, iTunes should automatically detect your device. If it doesn't, double-check the cable connection and ensure your iPhone is unlocked. Sometimes, depending on your computer settings, a prompt may appear on your iPhone asking if you "Trust This Computer." Tap "Trust" to proceed.
Device Selection: Within iTunes, locate the small iPhone icon that appears in the top left corner. This signifies that your device is recognized. Click this icon.
The Summary Tab: Your Control Center: This section provides a comprehensive overview of your iPhone's information, including available storage, software version, and serial number. However, the critical settings for syncing are found here.
Manual Management: The Key to Direct Transfer: Navigate to the 'Options' section. Locate the checkbox labeled "Manually manage music and videos." Select this option. By enabling manual management, you prevent iTunes from automatically attempting to sync your entire library every time you connect your device. This provides granular control over the transfer process, which is essential when Wi-Fi is unavailable.
The Syncing Playlists, Music, Videos, and Photos: After selecting the check box, follow the further steps below, for each of the types of files you need to transfer.
- Music: Click on the 'Music' tab. From here, you'll see options for syncing your entire music library or selected playlists and artists. To sync specific tracks, choose "Sync Music" and then select "Selected playlists, artists, albums, and genres." Tick the boxes next to the items you wish to transfer.
- Videos: Go to the 'Movies' or 'TV Shows' tab. Syncing of videos can be achieved through a similar process. Select the option to sync specific videos, and choose your desired content.
- Photos: Select the 'Photos' tab. Choose 'Sync Photos' from the 'Photos from:' drop down menu. Then select the photo source folder you would like to sync to your device. Make sure you do not sync to a folder, that is on the device itself.
Initiating the Sync: Once you've chosen the files you wish to transfer, look for the "Apply" or "Sync" button at the bottom right corner of the iTunes window. Click this button to initiate the transfer process. The duration of the sync will vary depending on the amount of data being transferred and the speed of your computer's USB port.
Ejecting Safely: When the sync is complete, it is essential to eject your iPhone properly. In iTunes, click the eject icon (it looks like a small sideways triangle) next to your iPhone's icon. Then, unplug the Lightning cable.
Troubleshooting Common Issues
Even with a straightforward method, occasional issues may arise. Here are some common problems and their solutions:
- iPhone Not Recognized: Ensure that both the Lightning cable and the USB port of your computer are functioning correctly. Try using a different USB port or a different cable to rule out hardware issues. Restart both your iPhone and your computer. Check your iTunes software, ensure the software is updated.
- Syncing Delays: Verify that the Lightning cable is securely connected to both devices. If the transfer is taking an extended period, consider optimizing the file formats.
- Lost Content: Before you begin syncing, it's wise to back up your iPhone. This helps safeguard your files. If you accidentally delete something during syncing, you'll be able to restore it.
- Insufficient Storage: iTunes will often notify you if your iPhone's storage is full. Delete excess content or free up storage space on your iPhone before attempting to sync.
Expanding Your Capabilities: Beyond Music and Videos
While primarily used for media like music, movies, and TV shows, iTunes allows other types of data syncing too. You can also sync the following items from your iPhone to your computer:
- Podcasts: If you subscribe, these can be synced with the same options as music, videos, or photos..
- Books: Similar to music and videos, you can synchronize your library of books between your iPhone and iTunes.
- Contacts and Calendars: These can be synced depending on your settings and accounts.
The Secret Ingredient: Avoiding the Pitfalls
The critical secret to seamless offline syncing lies in the manual management setting within iTunes. Without this, iTunes may try to automatically sync your entire library, potentially consuming precious time and bandwidth even if Wi-Fi is not available. Explicitly selecting what you want to transfer is crucial to avoid frustration.
Optimizing Your Workflow
Consider these additional tips to maximize your iPhone to iTunes syncing experience:
- Organize Your Library: Maintain a well-organized iTunes library on your computer. Utilize playlists, tags, and album art to streamline the transfer process.
- Use High-Quality Cables: Invest in a genuine or certified Lightning cable for optimal performance and reliability. Low-quality cables can sometimes cause connectivity issues.
- Update Regularly: Keep both your iPhone's iOS and your iTunes software up to date. Software updates often include bug fixes and performance improvements.
- Backup Regularly: Back up your iPhone to your computer or iCloud on a regular basis. This protects your data from unexpected loss.
Conclusion: Mastering the Offline Transfer
The ability to sync your iPhone to iTunes without Wi-Fi is a crucial skill for any Apple user. By utilizing the Lightning cable and mastering the manual sync method, you can ensure that your music, videos, photos, and other content transfers smoothly, regardless of your network access. So, embrace the freedom of offline syncing, and enjoy the peace of mind that comes with knowing your data is always accessible.
