how to connect wifi in lenovo laptop windows 8.1

Title: How to Connect to WiFi on Windows 8
Channel: HOWTECH
How to Connect to WiFi on Windows 8 by HOWTECH
how to connect wifi in lenovo laptop windows 8, how do you connect to wifi on a lenovo laptop
Lenovo WiFi Nightmare? Solved! (Windows 8.1 Fix Inside)
Lenovo WiFi Woes Vanquished: Your Windows 8.1 Solution
Have you ever waged war against a stubbornly silent Lenovo laptop? Are you staring down a frustrating WiFi connection that refuses to cooperate? Fear not, weary traveler, because victory is at hand. This article is your ultimate guide to conquering the Lenovo WiFi gremlins, especially when battling Windows 8.1. We’ll navigate the tricky terrain of wireless connectivity to restore your sanity.
The Unyielding WiFi Fortress: Recognizing the Problem
It's a common scenario. You're ready to work, stream, or connect, but your Lenovo refuses. The WiFi icon displays a sad little "X," or maybe it’s just stubbornly searching. The connection might be intermittent and unreliable. Before diving into solutions, recognize the enemy clearly. Does your device detect any available networks? Are you sure your router is functioning correctly? Many issues stem from simple oversights. The aim is a solid, stable WiFi connection. A poor connection will limit your productivity.
Troubleshooting Tango: First Steps to Freedom
Before we get to the Windows 8.1 specific solutions, let's engage in some basic troubleshooting. Firstly, reboot your Lenovo. It sounds elementary, yet it often works wonders. Then, reboot your router and modem; sometimes, that’s all that is needed. Next, physically check your WiFi switch. It could be accidentally disabled. Additionally, examine your airplane mode setting. It's easy to activate it accidentally.
Windows 8.1 Warfare: The Drivers' Dilemma
Windows 8.1, while a classic, can sometimes be a bit… temperamental. Often, outdated or corrupted network drivers are the culprits behind WiFi woes. Therefore, we need to check for the right drivers. Here’s how to diagnose and maybe solve your problem.
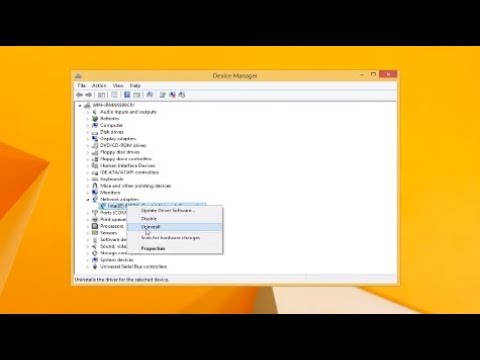
First, access the Device Manager. You can search for it in the Windows search bar. Locate your “Network adapters” category. Expand it; you should see your WiFi adapter listed. Right-click your WiFi adapter. Then, choose "Update driver software." Select “Search automatically for updated driver software.” Windows will hunt for the best drivers. If it finds and installs them, rejoice! Then, hopefully, the WiFi connection should now perform as expected.
Manual Driver Mayhem: A Last Resort?
If the automatic update fails, don’t despair. As an alternative, you can attempt a more hands-on approach. First, you will need to uninstall the existing driver. Right-click on your WiFi adapter in Device Manager and select "Uninstall." Important: Check the box that says "Delete the driver software for this device." Then, restart your laptop. Windows should now attempt to automatically reinstall the driver. However, if it doesn’t, we need another plan.
Go to Lenovo's support website. Search for your specific Lenovo model and download the latest WiFi drivers. Be sure you download the drivers explicitly for Windows 8.1. Install the drivers. Restart your laptop again. This manual installation frequently resolves connectivity issues. Because drivers are crucial, always double-check the model number of your device.
Power Management Problems: A Hidden Culprit
Often, power management settings can impact WiFi performance. Windows 8.1 might be over-optimizing your connection. To check and adjust this, go back to Device Manager. Right-click on your WiFi adapter. Select "Properties." Go to the "Power Management" tab. Uncheck the box that says "Allow the computer to turn off this device to save power." Click "OK." The setting change can significantly boost WiFi reliability.
Network Reset Rescue: A Nuclear Option
Sometimes, drastic action is necessary. Windows 8.1 includes a network reset feature. This will effectively wipe away all your network settings. Beware, this means you’ll need to re-enter your WiFi password. To access this, go to the search bar. Search for “Network reset.” Follow the prompts. Restart your Lenovo. Then, reconnect to your WiFi network.
Firewall Fortification: Permitting the Flow
Windows Firewall can sometimes block essential network traffic. Therefore, make sure your WiFi connection is allowed. Open the Windows Firewall settings. Ensure that your network adapter has the correct permissions. Otherwise, you might be unintentionally blocking access.
Beyond the Basics: Advanced Considerations
Besides the core fixes, consider a few advanced aspects. Check your router firmware. Ensure it's up-to-date. Outdated firmware can lead to compatibility issues. Moreover, consider your physical environment. Walls, appliances, and other devices can interfere with your WiFi signal. Finally, remember to keep your antivirus software updated.
Victory Awaits: Maintaining a Winning Arsenal
By employing these strategies, you’ll be exceptionally well-equipped. You'll now have the tools to tame that Lenovo WiFi beast. Remember that troubleshooting is often a process of elimination. Therefore, be patient and methodical. Eventually, you will conquer the connection chaos. With a bit of persistence, your Lenovo will soon be happily surfing, streaming, and connecting. Now go forth and reclaim your WiFi!
Unlock Your Laptop's Wi-Fi Hotspot: The Secret Trick You NEED!Lenovo WiFi Nightmare? Solved! (Windows 8.1 Fix Inside)
Hey there, fellow tech travelers! Ever felt like you're wrestling a grumpy octopus when trying to connect your Lenovo laptop to Wi-Fi? We've all been there. The spinning wheel of doom, the dreaded "limited connectivity" message, the sheer frustration of being cut off from the digital world. It's enough to make you want to hurl your laptop across the room (don't do that, though – we can fix this!). Today, we're diving headfirst into the Lenovo WiFi abyss, and I'm going to share a solution that worked wonders for me, especially if you're clinging to the good ol' Windows 8.1!
1. The WiFi Woes: A Lenovo Story
Let's face it, Lenovo laptops are generally pretty solid. We appreciate their durability and the features they offer. But, the WiFi connection? Sometimes, it's like trying to herd cats. It can be baffling, frustrating, and at times, downright infuriating. We're talking about scenarios where you're sitting right next to your router, yet your laptop is convinced it's stranded in the Sahara Desert, unable to find a signal. Sound familiar?
2. Diagnosing the Digital Disease: What's Actually Going Wrong?
Before we start throwing solutions at the problem, it's crucial to understand what we're up against. Is it a hardware issue, a software glitch, or something else entirely? Here are a few common culprits:
- Outdated Drivers: This is the sneaky villain of many WiFi dramas. Your network adapter, the critical component that allows your laptop to "talk" to your router, might be running on old, outdated software.
- Faulty Network Settings: Sometimes, the issue lies within your laptop's network configurations. Misconfigured settings can block your connection without you even realizing it.
- The Router's Revenge: Let's not automatically blame Lenovo! Your router itself might be acting up. Reset it, check the firmware, and ensure it's broadcasting correctly. (I’ve had to do this more times than I care to admit!)
- Interference Interference: Other devices (microwaves, wireless phones, even your neighbor's rogue router) can cause signal interference, making your connection unstable.
3. The Windows 8.1 Connection Conundrum: A Targeted Approach
Now, here's where things get specifically interesting for those of us navigating the Windows 8.1 landscape. Although it might be an older operating system, it still has a significant user base. Because of that, we will focus a fix for Windows 8.1.
4. The Magic Bullet: Driver Updates and a Little Patience. (The Fix!)
The single most effective solution, in my experience, for solving the Lenovo WiFi nightmare on Windows 8.1 involves updating your network adapter drivers. Here's a step-by-step guide, which takes about 10 minutes:
- Access the Device Manager: Right-click on the Start menu button (the Windows logo in the bottom left corner) and select "Device Manager."
- Expand "Network Adapters": In the Device Manager window, click the little arrow next to "Network adapters" to expand it.
- Identify Your Wireless Adapter: You'll see a list of network adapters. Look for the one related to your wireless network (it will usually have "Wireless," "WiFi," or something similar in its name, like "Intel Wireless-AC" or "Qualcomm Atheros Wireless Network Adapter").
- Update the Driver: Right-click on your wireless adapter and select "Update driver". There are two methods: search automatically for drivers or you can manually install them from a file if you have one downloaded.
- Restart Your Laptop: Once the driver update is complete, restart your laptop.
5. Unlocking the Network Adapter's Potential: Tweaking For Better Performance
Sometimes, updating the drivers isn't enough. Fine-tuning your network adapter's settings can make a world of difference.
- Go Back to Device Manager: As above.
- Navigate to your wireless adapter, right click and go to Properties.
- Go to the Advanced tab: Here you can find numerous customizable options. While the options can change depending on your adapter, here are some setting to try:
- Wireless Mode: Generally, setting it to "802.11g" or "802.11n" is great options.
- 802.11n Channel Width: Experiment between "20 Mhz" or "Auto."
- Roam Sensitivity: Set to "Medium".
- Restart Your Laptop: to implement the change.
6. Double-Checking Your Router Settings: A Crucial Step
While we're fixing things on the laptop side, let's give your router a quick once-over. Make sure it's broadcasting on a channel that isn't overcrowded (use a Wi-Fi analyzer app on your smartphone or laptop to check this). Resetting your router to factory settings isn't required, but a good step to perform if problems persist.
7. Power Saving: A Silent WiFi Killer?
Windows has power-saving features that can sometimes throttle your network adapter. To check this:
- Return to Device Manager and Find your wireless adapter.
- Go to "Properties" then select the "Power Management" tab.
- Uncheck "Allow the computer to turn off this device to save power." This prevents your laptop from turning off your network adapter to conserve battery.
8. Anti-Virus Interference: A Potential Culprit
Believe it or not, your anti-virus software can sometimes interfere with your WiFi connection. Try temporarily disabling your antivirus program to see if it resolves the issue. If it does, you may need to adjust your antivirus settings to allow your network traffic.
9. Windows Troubleshooter: A Quick First Aid
Windows comes with a built-in network troubleshooter that can often identify and fix common connection problems.
- Right-click on the Wi-Fi icon in your system tray (the little icon in the bottom-right corner of your screen).
- Select "Troubleshoot problems." Windows will then attempt to diagnose and fix any WiFi issues.
10. Static IP Address: Might Help
Sometimes, assigning a static IP address to your laptop can improve connectivity, especially if your network has DHCP issues. You’ll need to look at your router settings for its default gateway, and then enter them manually in your laptop's network adapter settings.
11. The Power Cycle Protocol: A Reboot for the Digital Era
This may seem obvious, but its surprisingly efective. Turn off your router and laptop, wait about 30 to 60 seconds, and turn them both back on. The router might need a few minutes to come online completely.
12. Checking Physical Connections: It Could Be That Simple!
If you're also experiencing problems with the internal WiFi card, make sure the physical connection is correct. This is a task for a tech, if you aren't familiar with your laptop's inner workings.
13. When All Else Fails: Seeking Professional Help
If you've tried all of the above and you're still struggling, it might be time to call in the experts. A computer technician can perform a more in-depth analysis of your laptop's hardware and software configuration.
14. Prevention is key: How to Avoid Future WiFi Headaches
Once you get things working, take steps to prevent future issues:
- Regularly Update Drivers: Make it a habit to check for driver updates, especially for your network adapter.
- Keep Windows Updated: Ensure you have the latest Windows updates installed.
- Secure Your Network: Use a strong password for your Wi-Fi network to prevent unauthorized access.
- Run Regular Scans: Keep your antivirus software updated, and perform regular scans to detect and remove malware that can interfere with your network connection.
15. Success! Your Lenovo WiFi is now Rocking! (Hopefully)
Hopefully, these troubleshooting steps have helped you conquer your Lenovo WiFi woes! Remember, technology can be a bit like a puzzle – sometimes, you just need to try a few combinations to find the right fit.
Closing:
We all want to be connected, and a stable Wi-Fi connection is no longer a luxury, it's a necessity. By taking a systematic approach to troubleshooting and employing the techniques we've discussed, you should be well on your way to a frustration-free online experience. And if all else fails, remember to breathe, grab a cup of coffee, and start again. That's the beauty of learning!
FAQs:
1. My driver update didn't work. What now?
- Try downloading the drivers manually from the Lenovo support website. Enter your laptop's model number to get the correct drivers for your device.
2. My WiFi is connected, but the internet is slow. What's wrong?
- Check your internet speed using an online speed test. If it's slow, the problem might be with your internet service provider, not necessarily your laptop. You may need to test it another device on
How to Fix Wi-Fi is Not Connecting to Lenovo Laptops Problem in Windows 1087 2025

By FIXsage How to Fix Wi-Fi is Not Connecting to Lenovo Laptops Problem in Windows 1087 2025 by FIXsage
Windows 8.1 - No Internet Connection Available
By MDTechVideos Windows 8.1 - No Internet Connection Available by MDTechVideos
Windows 8 - How to turn on WiFi

By HowTo Windows 8 - How to turn on WiFi by HowTo

Title: Cara mengaktifkan wifi di windows 8
Channel: AW Tutorial
Cara mengaktifkan wifi di windows 8 by AW Tutorial
Wifi Not Found
Lenovo WiFi Nightmare? Solved! (Windows 8.1 Fix Inside)
The digital world hinges on seamless connectivity. When your Lenovo laptop, a vessel designed for productivity and entertainment, suddenly throws up a WiFi roadblock, frustration mounts. Dropped signals, agonizingly slow speeds, and the dreaded "no internet access" message can quickly derail your day. Thankfully, the majority of these frustrating WiFi issues can be rectified with a methodical approach, particularly when dealing with the Windows 8.1 operating system. This comprehensive guide offers a definitive solution to banish the Lenovo WiFi nightmare and restore your online experience to its former glory.
Understanding the Root of the Lenovo WiFi Woes
Before plunging into solutions, comprehending the potential culprits behind your Lenovo WiFi problems is crucial. While the specifics vary from model to model, the underlying causes often converge.
- Driver Conflicts: Outdated, corrupted, or incompatible wireless network adapter drivers are common offenders. Windows 8.1, despite being a reliable ecosystem, isn't immune to driver-related glitches.
- Network Adapter Settings: Incorrectly configured settings within your network adapter, such as power-saving modes or channel selection, can significantly impede WiFi performance.
- Router Compatibility: Your router, the gateway connecting you to the internet, may have compatibility issues with your Lenovo laptop's wireless adapter, leading to communication breakdowns.
- Interference: Wireless signals are susceptible to interference from other electronic devices, walls, and even physical obstructions.
- Operating System Instability: Occasional system errors, software conflicts, and even malware can disrupt the smooth functioning of your WiFi connection.
Step-by-Step: Diagnosing and Resolving Lenovo WiFi Issues in Windows 8.1
The following steps provide a structured troubleshooting approach, guiding you towards a stable and reliable wireless connection on your Lenovo laptop running Windows 8.1.
1. The Driver Dilemma: Updating and Reinstalling Your Wireless Adapter Driver
This is often the pivotal step. Outdated or corrupted drivers are prime suspects.
- Device Manager Access: Right-click the Start button (lower-left corner) and select "Device Manager." This is your central hub for hardware management.
- Network Adapters Expansion: In Device Manager, locate and expand the "Network adapters" category. You'll see a list of your network adapters, including your wireless adapter (e.g., "Intel Wireless-AC 7260").
- Driver Update: Right-click your wireless adapter and choose "Update driver." Select "Search automatically for updated driver software." Windows will search for and install the latest driver if available.
- Manual Driver Download (Recommended): If the automated update fails, visit the Lenovo support website. Enter your laptop's model number to find the drivers specifically designed for your machine. Download the latest driver for your wireless adapter and then install it manually through Device Manager.
- Driver Reinstallation: If updating doesn't work, uninstall the driver: Right-click your wireless adapter and select "Uninstall device." In the confirmation pop-up, check the box that says "Delete the driver software for this device." Restart your Lenovo laptop; Windows will attempt to reinstall the driver automatically. If not, manually install the driver you downloaded from the Lenovo website.
2. Power Management: Fine-Tuning the Wireless Adapter's Energy Settings
Windows 8.1's default power management settings sometimes hamper wireless performance.
- Accessing Adapter Properties: In Device Manager (as described above), find your wireless adapter, right-click it, and select "Properties."
- Power Management Tab: Go to the "Power Management" tab.
- Disable "Allow the computer to turn off this device to save power": Uncheck this box. This prevents Windows from intermittently disabling your adapter to conserve battery life, which can cause instability.
- Reboot: Restart your Lenovo laptop after making the change for the settings to take effect.
3. Adapter Configuration: Optimising Advanced Settings
Deeper within the adapter's settings, a few tweaks can lead to substantial performance gains.
- Advanced Tab: In the wireless adapter's "Properties" window (Device Manager), click on the "Advanced" tab.
- Key Settings Adjustments (Vary by Adapter): Carefully examine the listed settings. Pay specific attention to settings such as:
- 802.11n Channel Width: Set this to "Auto" or "20/40 MHz" for optimal compatibility and performance.
- Roaming Aggressiveness: Experiment with the "Medium" or "Low" settings. Higher aggressiveness can lead to more frequent connection drops.
- Wireless Mode: Ensure this is set to the highest supported standard (e.g., 802.11ac, 802.11n).
- Applying Changes: Click "OK" or "Apply" to implement the changes. Restart your Lenovo laptop afterward.
4. Router Reconsideration: Checking for Compatibility Issues
Your router is the bridge to the internet, and it requires attention.
- Router Firmware Update: Access your router's configuration page (typically by typing its IP address in your web browser – usually 192.168.1.1 or 192.168.0.1) and check for firmware updates. Outdated firmware can lead to compatibility problems.
- Channel Selection: In the router's settings, explore different wireless channels. Some channels might be less congested than others in your area. Use a WiFi analyzer app on your smartphone (or another device) to identify the least crowded channel.
- Security Protocol: Ensure your router is using WPA2-PSK or WPA3-PSK encryption for robust security and optimal performance. Avoid using older, less secure protocols like WEP.
- Router Reboot: Reboot your router to clear temporary data and reset its connection.
- Dual-Band Considerations: If your router supports both 2.4 GHz and 5 GHz bands, explore the 5 GHz band for potentially faster speeds and less congestion, provided your Lenovo laptop's wireless adapter supports it.
5. Network Troubleshooting: Utilising Windows 8.1's Built-In Tools
Windows 8.1 provides integrated tools to diagnose and repair network connection issues.
- Network Troubleshooter: Right-click the network icon in your system tray (bottom-right corner) and select "Troubleshoot problems." Windows will automatically diagnose and attempt to fix common network problems.
- Command Prompt Commands: Open the Command Prompt (search for "cmd" and run it as administrator). Execute the following commands in sequence, pressing Enter after each one:
ipconfig /releaseipconfig /renewipconfig /flushdnsThese commands will release your current IP address, obtain a new one, and clear your DNS cache, potentially resolving connectivity issues.
6. System Stability: Scanning for and Removing Potential Issues
A stable operating system is crucial for a reliable WiFi experience.
- Virus and Malware Scan: Run a full system scan using your antivirus software to eliminate any malware that might be interfering with network processes.
- System File Checker (SFC): Open the Command Prompt as administrator and type
sfc /scannow. This command scans and repairs corrupted system files, which can sometimes cause network problems. - Disk Defragmentation: Periodically defragment your hard drive (if it's an HDD). Fragmented hard drives can slow down system performance, which might indirectly affect network connectivity.
- Clean Boot: Perform a clean boot to identify if any third-party software is interfering with your WiFi connection (search for "msconfig" and disable non-essential startup items; restart your Lenovo).
7. Physical Environment: Minimizing Interference
Wireless signals are easily hampered by environmental factors.
- Distance and Obstacles: Ensure your Lenovo laptop is within a reasonable distance of your router. Minimize obstructions, such as thick walls, metal objects, and appliances that could be emitting radio frequency interference.
- Placement of Router: Experiment with the location of your router. Elevate it off the floor and away from other electronic devices.
- Microwave and Bluetooth Interference: Avoid using your microwave or Bluetooth devices (speakers, headphones) during critical WiFi use. These devices often operate on the same frequency as your WiFi and can cause disruptions.
Advanced Troubleshooting Techniques (If Basic Steps Fail)
If the standard troubleshooting steps don't resolve the Lenovo WiFi issue, these advanced techniques can prove helpful:
- Network Reset: In Windows 8.1, navigate to "Settings" > "Network and Internet" > "Network Reset." This will reset your network settings to their default state, which can resolve persistent connection problems. Note: This will erase any custom network settings you've made.
- BIOS Update: Check for BIOS updates for your Lenovo laptop on the Lenovo support website. Outdated BIOS can sometimes be responsible for hardware conflicts.
- Hardware Diagnostic Test: Run a hardware diagnostic test specifically for your wireless adapter using the Lenovo diagnostics tools (available from the Lenovo support website). This can help rule out hardware failure.
- External Wireless Adapter (as a Last Resort): If all else fails, consider purchasing an external USB wireless adapter as a workaround. This provides a separate network adapter and helps isolate the problem.
Final Thoughts – Achieving WiFi Nirvana
Con
