compartir wifi desde mi laptop con cmd
Title: Compartir internet WIFI con CMD, sin programas...
Channel: Diego1994
Compartir internet WIFI con CMD, sin programas... by Diego1994
Unlock Your Laptop's WiFi Hotspot in SECONDS with CMD!
Unleash Your Laptop's Secret Weapon: Instant WiFi Hotspot Access with CMD!
Are you tired of juggling multiple devices and limited Wi-Fi connections? Because, let's face it, we all have been there. Imagine a world where creating a personal hotspot is as simple as typing a few commands. This is exactly what we are talking about today. Get ready to transform your laptop into a powerful Wi-Fi hotspot with the help of the Command Prompt (CMD). Forget those complicated software installations. This is about pure, unadulterated efficiency.
The CMD Advantage: A Gateway to Seamless Connectivity
Firstly, let's understand the allure of the Command Prompt. CMD, the unsung hero of Windows, offers unparalleled control over your system. It's also the key to unlocking your laptop's built-in hotspot functionality. In essence, it bypasses the usual graphical interfaces. This, in turn, grants you faster and more direct access. Moreover, using CMD gives you advantages in speed and customization. This is precisely what makes it such a valuable tool. In addition, you don't need third-party applications to make it work.
Creating Your WiFi Hotspot: Step-by-Step Guide
Now, let's dive into the nitty-gritty and get your hotspot up and running. To start, open the Command Prompt as an administrator. You can search for "cmd" in the Windows search bar, then right-click and select "Run as administrator."
Next, you'll need to use the netsh command. This is your primary tool for configuring the hotspot. However, let's clarify the commands.
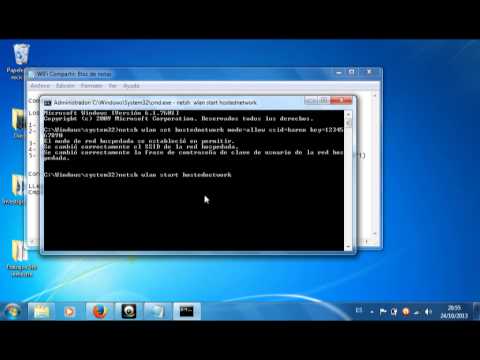
- Setting up the Hosted Network: Type
netsh wlan set hostednetwork mode=allow ssid="YourHotspotName" key="YourPassword"and press Enter. Replace "YourHotspotName" with whatever name you desire for your hotspot. Furthermore, choose a strong password, replacing "YourPassword." - Starting the Hosted Network: Execute
netsh wlan start hostednetworkand press Enter. That's it; your hotspot is starting. - Sharing Your Internet Connection: The last step involves sharing your existing internet connection. Navigate to "Network Connections" in the Control Panel (search for "Network Connections"). Right-click on your active internet connection (usually Wi-Fi or Ethernet) and select "Properties." Go to the "Sharing" tab and enable the "Allow other network users to connect through this computer’s Internet connection" option. Select your hosted network from the dropdown menu. Click "OK."
Troubleshooting Common Hurdles: Keeping Things Smooth
Despite its ease, you might encounter a few hiccups. Therefore, a basic understanding of troubleshooting is essential. Firstly, ensure your network adapter supports hosted networks. You can check this by typing netsh wlan show drivers in CMD. Look for "Hosted network supported: Yes." If it says "No," you'll potentially need to update your wireless adapter drivers. Subsequently, firewall restrictions may also be an issue. The solution is to check your firewall settings. Furthermore, make sure that the connection is, in fact, shared.
Customizing Your Hotspot: Advanced Options
For those who seek greater control, CMD offers advanced customization. For instance, you can modify the hotspot's security settings. You can change the encryption type via CMD. Likewise, you can set a time limit for connection. Further exploration of netsh wlan commands will unveil these advanced features. Consider exploring commands like netsh wlan set hostednetwork security and netsh wlan set hostednetwork maxusers.
Beyond the Basics: Practical Applications
The benefits are numerous, making this a versatile tool. Picture this: sharing your internet connection with a phone, tablet, or another laptop. Also, consider using it for guests. The process becomes extremely useful in a pinch. This is especially true when traveling. You can easily extend your Wi-Fi range. Your laptop becomes a portable hub, ready for whatever the day throws at you. And that is why it is so beneficial.
The Power is Yours: Embrace the CMD Hotspot
In closing, the ability to create a Wi-Fi hotspot in seconds is within your grasp. CMD provides the power and precision to make it happen. The benefits you gain can be enormous. So, why wait? Embrace the simplicity and efficiency of the Command Prompt. Unleash the full potential of your laptop and start sharing your internet connection with ease. Now you can unlock a new level of digital freedom.
HP Windows 8.1 WiFi Nightmare? FIX It NOW!Unlock Your Laptop's WiFi Hotspot in SECONDS with CMD!
Hey tech-savvy folks! Ever been in a pinch, needing to share your internet connection but didn't have a router handy? Or perhaps you're traveling and want to create a secure hotspot for all your devices? We've all been there! Forget complicated software or finicky settings. We're diving deep today, and I mean deep, into the surprisingly simple world of creating a WiFi hotspot straight from your laptop, using the power of the Command Prompt (CMD). Trust me, this isn't rocket science; it's more like a cleverly disguised superpower. We're talking about conjuring a WiFi hotspot in SECONDS. Are you ready to unleash this hidden potential? Let's get started!
1. The Hidden Power of Your Laptop (and the Magic of CMD)
Your laptop isn't just a pretty face; it's a versatile powerhouse packed with hidden gems. One of the most underrated is its ability to act as a WiFi hotspot, essentially turning it into a mobile router. With this knowledge, you can say "goodbye" to spotty hotel WiFi or limited data plans. And the magic key? The Command Prompt (CMD), a powerful tool that lets you communicate directly with your operating system. Think of it as a secret language that your laptop understands.
2. Before We Begin: Checking Compatibility (and Avoiding Heartbreak)
Hold your horses! Before we get our hands dirty, let's make sure your laptop is ready to embrace its inner hotspot. This is where we check for compatibility, ensuring your network adapter can indeed share its connection. It's like making sure your car can tow that trailer before hooking it up. Here's how to quickly check:
- Step 1: Open Command Prompt (CMD) as Administrator. Search for "cmd" in your Windows search bar, right-click on "Command Prompt," and select "Run as administrator." This is crucial.
- Step 2: Type The Command: In the CMD window, type
netsh wlan show driversand hit Enter. - Step 3: Check Hosted Network Support: Look for the line that says "Hosted network supported : Yes." If it says "Yes," congratulations! You're in the club. If it says "No," unfortunately, your network adapter isn't compatible. Time for Plan B, which might involve a USB WiFi adapter.
3. Setting Up Your Hotspot: The Simple CMD Commands
Now for the fun part! We'll use a series of simple commands to create your WiFi hotspot. It's like following a recipe, but instead of a delicious cake, we're creating a WiFi hotspot.
- Step 1: Enable Hosted Network: In CMD (still running as Administrator), type
netsh wlan set hostednetwork mode=allow ssid="YourHotspotName" key="YourPassword"and press Enter.YourHotspotName: Choose a name for your hotspot (e.g., "MyLaptopHotspot"). Keep it something you'll recognize.YourPassword: Set a strong password (at least 8 characters). This keeps your connection secure.
- Step 2: Start the Hosted Network: Type
netsh wlan start hostednetworkand press Enter. This activates your newly created hotspot.
4. Sharing Your Internet Connection: Bridging the Gap
Your hotspot is created, but it's not sharing the internet yet. Think of it like building a bridge but not connecting it to the other side. We need to tell your laptop to share its internet connection.
- Step 1: Open Network Connections: Press the Windows key + R, type
ncpa.cpl, and press Enter. This opens the "Network Connections" window. - Step 2: Find Your Internet Connection: Identify the network connection your laptop currently uses to access the internet (e.g., "Wi-Fi" or "Ethernet").
- Step 3: Share the Connection: Right-click on your internet connection, and select "Properties."
- Step 4: Go to the Sharing Tab: Click the "Sharing" tab.
- Step 5: Enable Sharing: Check the box next to "Allow other network users to connect through this computer's Internet connection."
- Step 6: Select Your Hosted Network: In the "Home networking connection" dropdown, select the network adapter associated with your hotspot (it'll usually have a name similar to the one you chose for your hotspot).
- Step 7: Click OK: Save your changes.
5. Troubleshooting Common Hiccups (Because Life Isn't Always Smooth)
Sometimes, things don't go perfectly. Don't worry! It's like when you're baking and the cake doesn't rise. Here are a few common issues and how to address them:
- "The hosted network couldn't be started": Double-check you ran CMD as an administrator, and verify your network adapter supports hosted networks (see Section 2).
- Devices can't connect: Ensure you entered the correct password, and your firewall isn't blocking the connection. Try temporarily disabling your firewall.
- No Internet Access: Double-check that you've correctly shared your internet connection (see Section 4). Also, ensure your laptop itself has an active internet connection.
6. Disabling Your Hotspot: Closing the Loop
When you're done using your hotspot, you'll want to disable it to save battery and prevent accidental use. It's simple to stop or disable.
- To Stop the Hotspot: In CMD (as Administrator), type
netsh wlan stop hostednetworkand press Enter. - To Disable the Hosted Network (and prevent it from starting automatically): Type
netsh wlan set hostednetwork mode=disallowand press Enter.
7. Turning Your Laptop Into a Mobile Router
This process is more than just a tech trick; it's a paradigm shift. You transform your laptop from a simple device into a mobile router, capable of providing internet access wherever you go. Like a Swiss Army knife, your laptop gains a new feature: the power to connect others.
8. Security First: Protecting Your Hotspot and Data
Remember that your hotspot is a pathway, and you are controlling the traffic. This means security must be paramount.
- Strong Passwords: Always use a strong, unique password for your hotspot. Don't reuse passwords from other accounts.
- Keep Your Software Updated: Ensure your operating system and network drivers are up to date. Updates often include security patches.
- Monitor Connected Devices: Regularly check which devices are connected to your hotspot. If you see anything suspicious, disconnect those devices immediately.
- Understand Encryption: When you configure your hotspot, it automatically uses WPA2 encryption (or better), which is a good start.
9. WiFi Hotspot: The Ultimate Travel Companion
Picture this: You're in a hotel room with spotty WiFi, or you're on a road trip. Your laptop, by using this technique, becomes the ultimate travel companion. It helps you stay connected, share your internet with your devices, and get much more done.
10. Beyond the Basics: Advanced Customization
CMD offers advanced customization options. You can configure the maximum number of devices allowed to connect to your hotspot, set a specific IP address range, and much more. You could even consider it the ultimate customization, making your hotspot truly yours.
11. Command Prompt: The Techie's Best Friend
Command Prompt isn't only for creating hotspots. It's a powerful tool for managing your computer, troubleshooting problems, and automating tasks. It is like having a personal virtual assistant.
12. Real-World Applications: Who Benefits?
Who can benefit from these hidden abilities?
- Travelers: Travelers, of course! Share your internet to stream movies, work remotely, and stay connected.
- Students: Students can team up to share the internet in groups for research and projects.
- Remote Workers: Remote workers can stay connected and handle video calls, email, and more on the go.
- Anyone with Limited Internet Access: Anyone can share the internet connection of one device.
13. The Benefits of Using Your Laptop As A Hotspot
You'll enjoy flexibility, extra functionality, and save money! Avoid extra fees by creating a hotspot.
14. Is Using a Laptop Hotspot Safe?
Yes, the process is safe, provided you follow security procedures. You can create a secure connection using password protection.
15. The Power of Simplicity: Why CMD Wins
The beauty of this method is its simplicity. No need for third-party software, which can be bloated, slow, and potentially contain malware.
Conclusion
We've journeyed through the magic of CMD, revealing how to unlock your laptop's WiFi hotspot in seconds. You've learned the steps, the troubleshooting tips, and the amazing benefits. Now, go forth and create your own mobile hotspot! Embrace the power within your laptop, and unlock a new level of connectivity. It's as simple as typing a few commands – a few keystrokes that unleash a world of possibilities. Remember, knowledge is power, and now you have
Dell Laptop WiFi Card: The SHOCKING Fix That Works INSTANTLY!. crear una zona Wi Fi con cmd

By Soluciones en 2 minutos . crear una zona Wi Fi con cmd by Soluciones en 2 minutos
CREA UN ROUTER VIRTUAL wifi virtual COMPARTE INTERNET WIFI CMD SIN PROGRAMAS PROGRAMA 2021
By briefrenzo CREA UN ROUTER VIRTUAL wifi virtual COMPARTE INTERNET WIFI CMD SIN PROGRAMAS PROGRAMA 2021 by briefrenzo
Crear un punto de acceso wifi en un equipo con Windows 7

By TECNOpeda Crear un punto de acceso wifi en un equipo con Windows 7 by TECNOpeda

Title: Como Compartir Wifi con CMD
Channel: D Myeers
Como Compartir Wifi con CMD by D Myeers
Laptop Wifi Connect
Unlock Your Laptop's WiFi Hotspot: A Swift Guide with Command Prompt
Are you tired of clunky, slow third-party applications or the frustrating limitations of generic hotspot features? Do you crave a simple, reliable method to share your laptop's internet connection without the hassle? Then, prepare to elevate your connectivity game. We are about to unveil a streamlined, efficient, and, most importantly, fast method to transform your laptop into a WiFi hotspot, all accomplished with the power of the Command Prompt. Forget convoluted processes and endless settings menus; we're diving into the elegant simplicity of the command line.
Why Command Prompt? Efficiency Unleashed
The Command Prompt, often overlooked, is a powerhouse of control within the Windows operating system. It's a direct line to the core functionalities, bypassing the graphical user interface's layers of abstraction. This direct access translates to two key advantages: speed and precision. Creating and managing a WiFi hotspot through the Command Prompt is significantly faster than navigating through settings menus. Furthermore, it grants granular control, allowing for tailored configurations impossible in standard settings. We eliminate resource-draining background processes common with external software. This means more bandwidth channeled into your connected devices, leading to a superior overall experience.
Initiating the WiFi Hotspot: The Foundation
The first step in establishing your WiFi hotspot involves enabling the Hosted Network adapter. This is the virtual network interface that will broadcast your connection. Launch the Command Prompt as an administrator. You can do this by searching for "cmd" in the Windows search bar, right-clicking the "Command Prompt" application, and selecting "Run as administrator." Now, input the following command, pressing Enter after:
netsh wlan set hostednetwork mode=allow ssid="YourHotspotName" key="YourStrongPassword"
Replace "YourHotspotName" with your desired hotspot name (e.g., "MyLaptopWiFi") and "YourStrongPassword" with a password that is at least eight characters long and includes a combination of uppercase and lowercase letters, numbers, and symbols. This command does two crucial things: It activates the Hosted Network mode (allowing your laptop to act as a server for a hotspot) and defines the Service Set Identifier (SSID, or the name your devices will see) and the security key (the password). Think of this as the blueprints for your digital haven, setting the boundaries and the access code.
Activating the Hotspot: The Broadcast Begins
With the foundation laid, it's time to ignite the broadcast. In the same Command Prompt window, execute this command:
netsh wlan start hostednetwork
This single command initiates the Hosted Network and starts the wireless network. Your laptop is now broadcasting its SSID, ready to accept connections. You should see a confirmation message in the Command Prompt. This message serves as the signal, confirming everything is functioning as anticipated.
Sharing Your Internet Connection: Tying It All Together
While the hotspot is now broadcasting, it isn't yet sharing your internet connection. This final step involves bridging your active internet connection to the newly created Hosted Network. To do this, we must access the Network Connections settings.
- Press the Windows key and the "R" key simultaneously to bring up the Run dialog box.
- Type
ncpa.cpland press Enter. This opens the Network Connections window.
In the Network Connections window, you will see a list of your network adapters. Identify the adapter that is currently connected to the internet (e.g., Ethernet, Wi-Fi). Then, identify the adapter that corresponds to the Hosted Network you just created (it will often be labeled like "Wireless Network Connection 2" or something similar).
- Right-click the adapter connected to the internet and select "Properties."
- Click the "Sharing" tab.
- Check the box that says "Allow other network users to connect through this computer's Internet connection."
- In the "Home networking connection" drop-down menu, select the Hosted Network adapter you identified earlier.
- Click "OK."
This configuration acts as the pipeline, ensuring that the internet connection flows from your primary connection to the WiFi hotspot, allowing other devices to access the internet.
Troubleshooting Common Issues: Immediate Solutions
Even with these straightforward steps, occasional issues may arise. Here are some common problems and their solutions to assist you.
"The hosted network couldn't be started." This typically indicates a problem with the wireless adapter, such as drivers. Ensure your wireless adapter drivers are up-to-date. Check the manufacturer's website for the latest drivers. Restart your laptop after installing new drivers.
Devices can connect but have no internet access. Verify that you’ve correctly enabled the "Sharing" on your primary internet connection as described in the "Sharing Your Internet Connection" section. Double-check that you selected the correct connection for the Hosted Network. Ensure your firewall isn't blocking the connection.
Hotspot disappears after reboot. By default, the hosted network does not automatically start. You can set it to start automatically by creating a scheduled task. Open Task Scheduler (search for it in the Windows search bar). Create a new basic task. Name the task (e.g., "Start WiFi Hotspot"). Set the trigger to "When I log on." Set the action to "Start a program". Enter
netshas the program/script. Addwlan start hostednetworkin the "Add arguments" field.Incorrect Password/SSID. To modify your password or SSID, you must first stop the hosted network using:
netsh wlan stop hostednetworkfollowed bynetsh wlan set hostednetwork mode=allow ssid="NewHotspotName" key="NewStrongPassword"and finallynetsh wlan start hostednetwork.
Advanced Customization: Tailoring Your Experience
Beyond the basics, the Command Prompt provides options for advanced customization, allowing you to fine-tune your hotspot experience.
View Hosted Network Status: To view the status, including the SSID, authentication type, and the number of connected clients, use:
netsh wlan show hostednetworkin the Command Prompt.Change the Maximum Clients: By default, Windows allows up to eight devices to connect to your hotspot. You can adjust this, though it’s generally not recommended. (In-depth knowledge of network administration is recommended before making changes.)
Disable the Hotspot Permanently: If you would like to disable the functionality, input this:
netsh wlan set hostednetwork mode=disallow. This will disable the hosted network and effectively remove the hotspot ability from your adapter.
Security Best Practices: Safeguarding Your Connection
While the Command Prompt method offers a streamlined approach, security should always be a paramount consideration.
Use a Strong Password: Never use a weak password. Your key needs to be complex to prevent unauthorized access.
Regularly Change Your Password: Periodic password changes enhance security, especially in public environments.
Monitor Connected Devices: Periodically check who is connected to your hotspot. If you see any unfamiliar devices, it might be a sign of unauthorized access. Review how to monitor the devices in your network.
Enable Windows Firewall: Ensure your Windows Firewall is enabled. The Windows Firewall is essential for protecting the network from unsolicited connection attempts.
Beyond the Basics: Expanding Your Knowledge
The Command Prompt provides a vast array of functionalities that extend far beyond the creation of a simple hotspot. Utilize online resources for further learning. Explore the power of scripting to automate tasks. Mastering these tools will provide the skills necessary for enhanced network control and network security.
Conclusion: Master Your Connectivity
By leveraging the Command Prompt, you've unlocked the power to create a fast, efficient, and customized WiFi hotspot. This method surpasses the inefficiencies of generic or third-party applications. You're not just creating a hotspot; you're taking control of your connection. Embrace this newfound command line expertise, and enjoy seamless, secure, and lightning-fast wireless connectivity, all at your fingertips.
