laptop vista wifi hotspot

Title: vista Laptop As wifi hotspot
Channel: deadlyheart4u
vista Laptop As wifi hotspot by deadlyheart4u
Laptop Vista WiFi Hotspot: The Ultimate Guide to Turning Your Old Laptop into a Wireless Powerhouse!
Unleash Wireless Freedom: Reviving Your Old Laptop as a WiFi Hotspot!
Have you ever gazed at your outdated laptop, gathering dust in a corner, and wondered what it could still achieve? Well, prepare for a revelation! You can actually breathe new life into that forgotten machine. It can transform into a powerful WiFi hotspot. This guide will show you how to utilize your old laptop. We'll turn it into a wireless powerhouse.
Dusting Off an Old Friend: The Vista Revival
Before we plunge into the technical depths, let's acknowledge the potential. Your seemingly obsolete Vista laptop still holds value. Believe it or not, it can still perform some impressive feats. Indeed, converting it into a WiFi hotspot is one of the most practical. It's a project that is both rewarding and surprisingly straightforward. First things first, ensure your old laptop has a working wireless card. It is extremely critical for the whole operation.
Setting the Stage: Essential Preparations
Getting started requires a few key preparations. First and foremost, plug your laptop directly into your internet source. You will need an Ethernet cable to connect. This is typically your modem or router. Secondly, ensure your laptop has a stable internet connection. This is a must for sharing a connection! Consequently, it can act as the foundation. Ensure you have the administrative privileges on the Vista system. This allows you to make necessary changes.
The Vista Hotspot Setup: A Step-by-Step Guide
Now, let's dive into the core steps. The process is more manageable than you might think.
Access the Network and Sharing Center: Navigate to your Windows Vista Control Panel. Find the "Network and Sharing Center". You might have to search for this in the start menu.
Setting up the Connection: Under “Network and Sharing Center,” look for "Set up a connection or network." Click on this option.
Choosing the Right Connection: Several options will appear. Select "Set up a wireless ad hoc network". Click on the "Next" button.
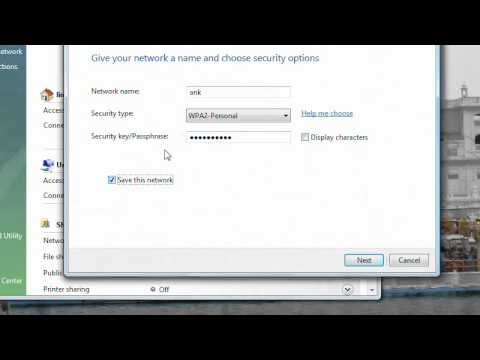
Configuring Your Hotspot: In the next window, give your hotspot a name. This is how other devices will recognize it. Pick a strong password to secure your network. Then, choose "WPA2-Personal" for security. This is the most secure option available.
Sharing Your Internet Connection: Now, it's time to share your connection. Select your active internet connection, which you've connected via Ethernet. Enable "Allow other network users to connect through this computer's Internet connection." Click "OK."
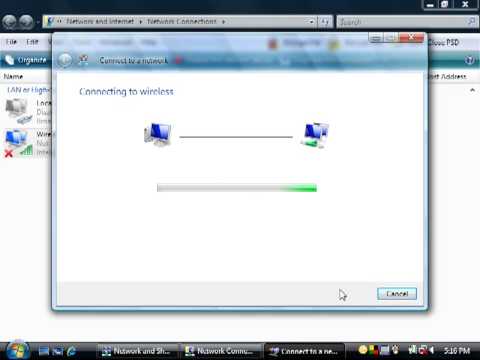
Start the Network: Once done, click "Close," and your ad hoc network is created. You can now connect devices.
Fine-Tuning Your Wireless Network: Beyond the Basics
Your hotspot is now up and running! However, there is more you can do to optimize it. For starters, consider the location of your laptop. Place it in a central location to maximize signal strength. Additionally, ensure your laptop's drivers are up to date. This can improve performance and reliability. To do this, search for “Device Manager” in the start menu. Then, find your network adapter and update the drivers.
Troubleshooting Common Problems
Encountering issues? It's perfectly normal. Let's troubleshoot some common problems.
Connectivity Issues: First, check the password. Make sure you are entering it correctly. Also, verify that your wireless card is enabled. Double-check that your other devices' WiFi is turned on.
Slow Speeds: If experiencing slow speeds, try restarting both your laptop and the connecting devices. Also, consider the number of devices connected simultaneously. This can impact speed. If still slow, check the internet speed on your main computer.
Security Concerns: Ensure you've used a strong password. Change the password periodically for added security. Consider using a firewall to further protect your network.
Expanding Your Wireless Reach: Additional Tips
After setting up your hotspot, you're not limited to the basics. Consider these extra tips:
Signal Boosters: If the range is limited, consider using a WiFi range extender. This can amplify the signal.
Software Alternatives: While Vista's built-in features work well, explore third-party software. Some offer more advanced features and customization options.
Power Management: Consider the power settings on your laptop. Configure it to remain on, even when the lid is closed.
Embrace the Wireless Revolution: Your Old Laptop's New Purpose
So, there you have it! You have successfully transformed your old Vista laptop into a WiFi hotspot. It is a testament to its enduring capabilities. You are now capable of sharing your internet connection. Furthermore, you've reclaimed a piece of technology. Embrace the freedom. Enjoy the convenience that a wireless network brings!
Laptop Vista WiFi Hotspot: The Ultimate Guide to Turning Your Old Laptop into a Wireless Powerhouse!
Hey there, fellow tech enthusiasts! Remember that old laptop gathering dust in the closet? The one you thought was destined for the digital graveyard? Well, hold on to your hats because we’re about to resurrect it, transforming it into a super-powered WiFi hotspot – a wireless powerhouse in its own right! Yes, you read that right. Forget expensive new routers, let’s breathe new life into that trusty (but possibly creaky) old Vista laptop. We’re diving deep into how to make your laptop a WiFi hotspot, breathing fresh air into your network.
1. Ditching the Dust: Why Your Vista Laptop Can Still Shine
Let's be honest, Vista might not be the flashiest operating system around anymore. It's like that reliable old car that gets you where you need to go, even if it doesn't have all the bells and whistles of the latest models. The beauty of this project is that a Vista laptop, even a slightly outdated one, has the core components needed to turn your home into a wireless haven. Think of it as a secondary router, a backup, or even a dedicated hotspot for specific tasks.
2. Before We Begin: What You’ll Need to Get Started
Before we dive into the magical world of hotspot creation, let's gather our supplies. Don't worry, the list is short and sweet:
- Your Vista Laptop: Obviously! Make sure it has a working Wi-Fi adapter.
- An Active Internet Connection: This is crucial. You'll need a wired Ethernet connection (from your modem) or an existing Wi-Fi connection to share.
- Ethernet Cable (Optional): For a more stable, reliable connection.
- Patience: Things don't always go perfectly the first time, but trust me, it's worth it!
3. Navigating the Vista Maze: Finding the Right Route
Windows Vista, while perhaps a touch clunkier than its successors, still held the basic functionality. What we need to do is to find the right route to set up your WiFi hotspot. You aren’t going to be doing anything scary like coding a whole new piece of software.
4. The "Hosted Network" Method: Your Primary Weapon
Vista, thankfully, provided us with a native feature to achieve this. Think of it as its built-in WiFi sharing tool, tucked away in the network settings.
To get started, go to:
- Start Menu > Control Panel > Network and Internet > Network and Sharing Center
- On the left-hand side, click on "Manage wireless networks."
- Right-click the network interface you wish to use for the connection.
- Enable Internet Connection Sharing
This method requires some command-line wizardry, but don't fret, it's not as daunting as it sounds. We're going to use the Command Prompt to create and manage our hosted network.
5. Unleashing the Command Prompt: Your Technical Sidekick
The Command Prompt is your gateway to unleashing Vista's hidden WiFi hotspot potential. Think of it as a secret portal into the core of the system. Here's how to get started:
Open Command Prompt as Administrator: Search for "cmd" in the Start Menu, right-click on "Command Prompt," and select "Run as administrator." This is crucial!
Type the following commands, hitting Enter after each one.
netsh wlan set hostednetwork mode=allow ssid=YourHotspotName key=YourPassword- Replace "YourHotspotName" with the name you want for your hotspot (e.g., "MyVistaHotspot").
- Replace "YourPassword" with a password you'll remember. This is essential for security!
netsh wlan start hostednetwork
6. Configuring Your Internet Connection for Sharing
Now that we've created the hotspot, we need to tell Vista to share your internet connection. This is where things get a little bit complex, but it's essential.
Follow these steps:
- Go back to Network and Sharing Center
- Click on "Change adapter settings."
- Right-click on the network connection that's connected to the internet (usually your Ethernet connection or Wi-Fi, depending on how your laptop connects to the internet)
- Select "Properties".
- Go to the "Sharing" tab.
- Check the box that says "Allow other network users to connect through this computer's internet connection."
- Select the "Wireless Network Connection" (this the one you set up earlier) from the dropdown menu under "Home networking connection."
- Click "OK."
7. Troubleshooting Time: Smoothing Out the Bumps
Even the most seasoned tech wizards hit snags. Here are some common issues and their fixes:
- "The hosted network couldn't be started": Double-check that you ran the Command Prompt as an administrator. Also, ensure your Wi-Fi adapter is enabled in the Device Manager.
- No internet connection on connected devices: Make sure Internet Connection Sharing is enabled, as described above. Also, check your firewall settings to make sure they're not blocking the connection.
- Slow speeds: The original Vista laptop might be the problem. The age of your machine might cause some slowness.
8. Security First: Protecting Your New Wireless Haven
Just like securing your main home router, securing your Vista hotspot is critical.
- Strong Password: Use a strong, unique password for your hotspot. Avoid easily guessable words or phrases, and make it at least 12 characters long.
- WPA2-PSK Encryption: Ensure your hotspot uses WPA2-PSK encryption. This provides a good level of security.
- Monitor Connected Devices: Keep an eye on which devices are connected to your hotspot. Remove any unknown or suspicious devices.
9. Beyond the Basics: Advanced Customization
Ready to flex those tech muscles? Here are some advanced tweaks:
- Change the SSID: Customize your hotspot name in the command line.
- Limit Bandwidth: If you want to be extra secure when many users are connected.
10. Real-World Applications: Where Your Hotspot Shines
So, what practical uses does your new hotspot have?
- Extend Your Wi-Fi Range: Got a weak signal in a certain part of your house? Place that laptop there!
- Guest Network: Create a separate Wi-Fi network for guests, keeping your main network secure.
- Troubleshooting: Need to connect a device for troubleshooting? This can be a useful tool to accomplish that goal.
11. The Benefits: Why Bother?
Why should you bother, you may ask? Well, there are many reasons:
- Cost-Effective: Save money on a dedicated router if you only need a temporary or secondary hotspot.
- Environmentally Friendly: Giving an old laptop a new lease on life reduces electronic waste.
- Educational Experience: Learn about networking and command-line tools.
- Convenience: Having a hotspot at your fingertips is always handy.
12. Potential Drawbacks: Knowing the Limitations
While this is a great solution, there are some potential drawbacks:
- Performance: The performance will depend on the laptop's hardware.
- Power Consumption: The laptop will need to be plugged in to provide a consistent connection.
- Limited Range: The Wi-Fi range might be shorter than a dedicated router.
- Security: The security configurations are more restricted in Vista.
13. Step-by-Step Guide: Bringing It All Together
Let's recap the steps:
- Prepare your laptop.
- Set up in the Network Sharing Center.
- Open the command prompt as an administrator.
- Configure your hosted network by using the commands.
- Enable Internet Connection Sharing.
- Troubleshooting as needed.
- Secure your network by applying strong passwords.
14. Tips and Tricks: Fine-Tuning Your Setup
Here are a few extra tips:
- Update Drivers: Make sure your Wi-Fi adapter drivers are up to date.
- Positioning: Place your Vista laptop in a central location for optimal coverage.
- Experiment: Test different configurations to see what works best for you.
15. The Future of Hotspots: Staying Connected in a Wireless World
The world is becoming increasingly connected. From smart homes to online gaming, we rely on wireless connectivity more than ever. Having a reliable Wi-Fi hotspot is now a necessity, and finding a way to repurpose older technology is a smart move.
16. Final Thoughts
So, there you have it! We've successfully transformed your old Vista laptop into a wireless powerhouse. It's like giving it a new heart and lungs! Now, you can enjoy the convenience and flexibility of a dedicated hotspot, extending your network and staying connected on your terms. Get out there and start sharing that internet!
FAQs
1. Can I use any Vista laptop to create a hotspot?
As long as your laptop has a working Wi-Fi adapter
Make your laptop a HotSpot VISTA

By MarkusHelps Make your laptop a HotSpot VISTA by MarkusHelps
Bagaimana menghubungkan Windows Vista ke jaringan nirkabel Anda
By NetComm Bagaimana menghubungkan Windows Vista ke jaringan nirkabel Anda by NetComm
Windows Vista Bagaimana cara menyambung ke Internet

By How-To Guide Windows Vista Bagaimana cara menyambung ke Internet by How-To Guide
Title: Turn your windows vista into wifi hotpsot
Channel: Ankit bhatia
Turn your windows vista into wifi hotpsot by Ankit bhatia
Laptop Vista WiFi Hotspot: Unleash Wireless Freedom from Your Legacy Device!
We often find ourselves with older laptops gathering dust, relics of a bygone technological era. But what if we told you that these seemingly obsolete machines held the key to unlocking convenient wireless functionality? Instead of relegating your trusty Vista-era laptop to the annals of digital history, we're here to show you how it can be resurrected as a powerful WiFi hotspot, extending your wireless reach and offering a surprising array of benefits. Prepare to transform your old laptop into a wireless powerhouse.
Understanding the Power of a Laptop Hotspot
Before diving into the how-to, let's explore the advantages of creating a WiFi hotspot from your laptop. Think about it: you can share your existing internet connection (whether it’s from an Ethernet cable, another WiFi network, or even a mobile broadband adapter) with multiple devices simultaneously. This is incredibly useful in various scenarios, from bolstering the WiFi signal in those pesky dead zones in your home or office to providing internet access for guests without revealing your network password. Furthermore, it allows you to connect devices that might not have native WiFi capabilities, like older game consoles or certain smart home devices.
Pre-requisites: Ensuring Your Laptop is Ready for Action
For your Vista laptop to succeed as a WiFi hotspot, a few key components are essential. Firstly, you'll need a laptop equipped with a functional wireless network card. Most laptops from the Vista era came with built-in WiFi adapters, but it’s worth double-checking that yours is enabled and functioning correctly. Ensure you have updated drivers by going to the device manager. Secondly, an active internet connection is paramount. This can come from a wired Ethernet connection, another functioning WiFi network, or a mobile broadband dongle. Finally, you'll need the right software tools – thankfully, these are built right into Windows Vista, making the entire setup process remarkably straightforward.
Step-by-Step Guide: Creating Your Vista WiFi Hotspot
Now, the moment you've been waiting for: the practical steps to configuring your laptop as a WiFi hotspot. This process leverages Vista's built-in capabilities, so no additional software downloads are strictly required. Navigate to the Network and Sharing Center. You can usually find this by clicking the network icon in your system tray (the icons in the lower-right corner of your screen) and selecting “Open Network and Sharing Center.”
- Creating an Ad-hoc Network: We will be making an Ad-hoc network to get the desired networking outcome.
- Click on "Set up a connection or network".
- Choose "Set up a wireless ad hoc (computer-to-computer) network" and click "Next".
- Enter a Network name, security type, and security key of your choosing. Set the security type to WPA2-Personal for a secure connection. Click next to create the network.
- Configuring Internet Connection Sharing:
- Go back to "Network and Sharing Center".
- Click on "Manage network connections".
- Right-click on the internet connection you’re using. (e.g., your Ethernet connection or existing WiFi connection) and select "Properties".
- Click the "Sharing" tab.
- Check the box that says "Allow other network users to connect through this computer's Internet connection."
- From the dropdown menu, select your hotspot connection and click "OK". The hotspot connection should be labeled with the name created earlier.
At this stage, your Vista laptop is now acting as a WiFi hotspot! Devices can connect to the network name you selected, using the security key you created.
Troubleshooting Common Issues and Optimizing Performance
While the setup is relatively simple, you may encounter certain hurdles. Knowing how to troubleshoot these issues is crucial for a seamless user experience.
- Connection Issues: Verify the network name and password entered on connecting devices match the settings configured on your laptop. Ensure that the devices are within the range of the Vista laptop’s Wi-Fi signal.
- Slow Speeds: The laptop should be placed in an open space to avoid the interference of other objects. Make sure the Vista laptop isn’t located far from the other devices. Performance can also be affected by the strength of your original internet connection.
- Security Concerns: Always use a strong password for your wireless network. Consider enabling a firewall on your Vista laptop to add an extra layer of security.
- Power Management: To ensure your hotspot functions reliably, configure your laptop to remain on when the lid is closed, and also set the power plan to avoid the display turning off to save battery life.
Advanced Customization: Taking Your Hotspot to the Next Level
Once you've mastered the basics, consider these advanced customization options.
- Wireless Network Name (SSID): Customize the network name to something memorable and relevant. This makes it easier to identify your hotspot on connecting devices.
- Channel Selection: Experiment with different WiFi channels to minimize interference from other wireless networks in your area. Use a WiFi analyzer tool to determine the best channel to use.
- MAC Address Filtering (Optional): For enhanced security, you can implement MAC address filtering, allowing only approved devices to connect to your hotspot.
- Software Options: If necessary, you could use third-party software for a more graphic user interface to simplify this process.
Beyond the Basics: Creative Uses for Your Vista Hotspot
The versatility of your Vista laptop hotspot extends far beyond simple internet sharing. Consider these innovative applications:
- Guest Network: Create a dedicated guest network for visitors, isolating their traffic from your primary network and enhancing security.
- Remote Access Server: Set up remote access to your home network, allowing you to access files and resources while you are away.
- File Sharing Hub: Transform your laptop into a central file-sharing hub, allowing you to share files and media with multiple devices on your network.
- Network Printer: Connect a printer to your Vista laptop and share it wirelessly with other devices.
Hardware Considerations: Maximizing Performance
While the software configuration is crucial, the hardware of your Vista laptop plays a significant role in its performance as a hotspot.
- Wireless Adapter: The inbuilt wireless adapter dictates your maximum speeds and range. If you find the range is limited, consider an external USB wireless adapter for stronger performance.
- Battery Life: As battery life decreases, the performance can decrease as well. Plug the laptop into a power outlet to maintain full performance and extend its lifespan. You could also consider replacing the laptop battery if necessary.
- Physical Placement: Place your Vista laptop in a central location to maximize the range of your hotspot. Avoid placing it behind walls or metal objects, which can interfere with the WiFi signal.
The Long-Term Value: Making the Most of Your Investment
Bringing your Vista laptop back to life as a WiFi hotspot is not just about extending the life of an old piece of hardware. It's a smart, cost-effective solution that can provide significant value. Whether you need to expand your home network, provide internet access to visitors, or simply add convenience to your daily life, your revitalized laptop will serve you faithfully for years to come. We often discard technology before its useful life is over. By giving your Vista laptop a new purpose, it prevents it from sitting and gathering dust.
Security Best Practices: Protecting Your Network
Security should be a top priority when setting up any wireless network. Keep these best practices in mind:
- Strong Passwords: Use a strong, unique password for your wireless network. This is the first line of defense against unauthorized access.
- Wireless Encryption: Always use WPA2-Personal as your security type.
- Firewall Protection: Enable the built-in firewall on your Vista laptop to block unwanted network traffic.
- Guest Network: Utilize a guest network for visitors to isolate them from your primary network.
- Regular Updates: Keep your Vista operating system and wireless drivers updated to address security vulnerabilities.
Conclusion: Embrace the Wireless Revolution with Your Vista Laptop
Your old Vista laptop has the potential to become a functional WiFi hotspot. With the right configuration, you can reclaim this device and expand your wireless connectivity. Embrace the opportunity to breathe new life into your legacy hardware and discover the convenience and flexibility of a personalized wireless network.
