best software to make my laptop a wifi hotspot
Title: 2024 Guide on 5 best Wi-Fi hotspot software for Windows
Channel: Windows Report
2024 Guide on 5 best Wi-Fi hotspot software for Windows by Windows Report
Laptop WiFi Hotspot: The Easiest Trick EVER!
Unlocking Instant Internet: Your Laptop as a WiFi Hotspot Champion!
Ever wished you could share your internet connection, turning your laptop into a personal WiFi haven? Well, guess what? You absolutely can! It's easier than you think, and the benefits are truly remarkable. This isn't just a ‘trick’; it's a digital superpower at your fingertips. Prepare to ditch the frustrating connection struggles and embrace instant access. Because you deserve seamless connectivity, wherever you are.
Why This Matters: Breaking Free From Connection Constraints
Let's face it. Spotty WiFi is a modern-day headache. Think about those times you're stranded without a reliable connection. Or when multiple devices are battling for bandwidth. Suddenly, your laptop becomes your connectivity command center. You become the hero of the hour. Indeed, this simple procedure removes the agonizing wait for a network. Now, you can confidently work or play. Think of it as a digital escape hatch, always ready for action. Furthermore, this newfound ability empowers you to stay connected.
Setting the Stage: Prepping Your Laptop for WiFi Domination
Before we dive in, let’s get you ready. But, these steps are straightforward. First, make sure your laptop has a working internet connection. This means either a wired Ethernet connection or an existing WiFi connection. Then, ensure your laptop's operating system is updated. This keeps everything running smoothly. After all, you want this process to be as painless as possible. Next, you will need a little patience. Moreover, the setup is quick and easy. The entire process typically takes just a few minutes.
Windows: Your Step-by-Step Guide to Hotspot Glory
For Windows users, the process is remarkably simple. Firstly, navigate to your "Settings" menu. You can find this by clicking the Start button, or by searching in the search bar. Next, select "Network & Internet." Click on "Mobile hotspot." Now, toggle the "Share my internet connection with other devices" switch to "On." You'll likely see a dropdown menu labelled "Share my internet connection from." Select the connection you are using, such as WiFi or Ethernet. You can customize your "Network name" and "Password" here. This is the name and password other devices will need to connect. Choose something memorable, but secure. And that is it! Your laptop is now broadcasting its own WiFi signal. Test it out by connecting another device.
macOS: Effortless Hotspot Creation, Apple Style
Mac users, this is your time to shine. The process is just as smooth. Begin by accessing "System Preferences." Then, click on "Sharing." In the left-hand sidebar, select "Internet Sharing." Moreover, in the "Share your connection from:" dropdown, select your internet source. This could be WiFi or Ethernet. Check the box next to "Internet Sharing." Under "To computers using," select "Wi-Fi." Click "Wi-Fi Options…" to create your network name and password. Set a strong password. Finally, click "OK," then check the box next to "Internet Sharing" to turn your hotspot on. Connect other devices to your newly established network. In this case, you have successfully transformed your Mac.
Troubleshooting: Common Hiccups and Quick Fixes
Sometimes, things don’t go exactly as planned. Don’t worry; small problems are common. If you can't find the hotspot settings, double-check your operating system. Make sure your drivers are updated. If other devices can't connect, confirm the password. Also, ensure that other devices are within range. Make sure your device is not running in airplane mode. It can interfere with connectivity. Finally, restart your laptop. That frequently fixes the issue. However, most of these problems are easily solvable.
Beyond the Basics: Advanced Tips for WiFi Wizards
Want to take your hotspot game to the next level? Consider these advanced tips. Regularly change your password. This increases security. Place your laptop in an open position. The signal strength is better this way. Limit the number of connected devices. This helps to maintain speed. You should also monitor your data usage. Streaming videos can consume a lot of data. Think about using a wired Ethernet connection. This offers a more stable initial connection. Furthermore, always be mindful of your data limits.
The Final Verdict: Embrace the Freedom of a Laptop Hotspot
In conclusion, creating a WiFi hotspot from your laptop is incredibly valuable. Indeed, it grants you consistent internet access. It does so without the chaos of public networks. You're now equipped for any situation. You have the knowledge to connect devices. From work to entertainment, you have all the tools. Go ahead, become the WiFi maestro you were born to be. It’s time to experience the freedom and convenience. Enjoy the endless possibilities of your newfound connectivity.
Laptop WiFi Hotspot: The Easiest Trick EVER!
Hey there, tech wizards and internet wanderers! Ever found yourself in a Wi-Fi desert, gasping for precious data like a fish out of water? Or maybe you've got a friend desperately clinging to your mobile hotspot, begging for just a little more bandwidth? Well, we’ve all been there. The struggle is real. But guess what? There's a ridiculously simple solution, so easy it feels like cheating, and it’s all thanks to your trusty laptop. Today, we're diving deep into how to turn your laptop into a Wi-Fi hotspot – the easiest trick ever – and we’ll sprinkle in some tips and tricks to make you a Wi-Fi superhero.
1. The Wi-Fi Hotspot Revelation: Unlocking Your Laptop’s Hidden Power
Think of your laptop like a Swiss Army knife of the digital world. You've got a keyboard, a screen, processing power… and a secret weapon: the ability to share your internet connection with the world (or at least, with your devices). Creating a Wi-Fi hotspot on your laptop is like unlocking a hidden superpower. It's not just a convenience; it's a lifesaver when you're on the go, in a pinch, or simply want to share your internet with someone who doesn’t have access. Imagine this: you're on a camping trip, miles from civilization, and your phone's data is dwindling. Boom! Your laptop to the rescue. Let’s get started!
2. Why Bother? The Brilliant Benefits of a Laptop Hotspot
Why would you even want to create a laptop hotspot? Great question! There are tons of amazing advantages:
- Shared Internet Access: This is the big one. Sharing your wired or wireless internet connection with your phone, tablet, or other devices is a snap.
- Data Saving: If you have a limited data plan on your phone, using your laptop's internet (especially if it's unlimited) can save you money and headaches. Think of it as a digital escape hatch from data overage fees.
- Emergency Backup: Stuck somewhere with no Wi-Fi? Your laptop hotspot can be a lifesaver in emergencies, allowing you to stay connected.
- Guest Access Control: You can easily share your internet with guests without revealing your network password (more on this later!).
- Boost Your Home Network: Sometimes, your Wi-Fi router's signal can be weak in certain areas of your house. Your laptop can act as a range extender, amplifying your signal.
3. The Simple Steps: How to Create Your Laptop Hotspot (Windows)
Don’t worry, this isn't brain surgery. Setting up a hotspot on your laptop is actually really straightforward on Windows. Here's the lowdown:
- Open Settings: Hit the Windows key and type "Settings" or click the gear icon.
- Go to Network & Internet: Click on "Network & Internet."
- Mobile Hotspot: Select "Mobile hotspot" from the left-hand menu.
- Turn it On: Toggle the "Share my Internet connection with other devices" switch to "On."
- Choose Your Source: Under "Share my Internet connection from," choose the connection you want to share (Wi-Fi or Ethernet).
- Edit Settings (Optional but Recommended): Click "Edit" to change your hotspot's name (SSID) and password. Choose a strong password!
- Connect Your Devices: On your other devices, search for the Wi-Fi network you created (the SSID) and enter the password. And voila! You're connected.
See? Told you it was easy.
4. Mac Magic: Creating a Hotspot on Your MacBook
Mac users, fear not! The process is just as simple, but it looks a little bit different:
- Open System Preferences: Click the Apple menu (top left) and choose "System Preferences."
- Click “Sharing”: This is where all the sharing settings live.
- Select “Internet Sharing”: You'll find it in the left sidebar.
- Choose What to Share: In the "Share your connection from" dropdown, select the internet connection you want to use (Wi-Fi or Ethernet).
- Choose How to Share It: Tick the box next to "Wi-Fi."
- Click “Wi-Fi Options…”: Here, you'll set up your network's name (SSID) and password. Again, pick a strong one!
- Start Sharing: Check the box next to "Internet Sharing" to enable your hotspot.
- Connect: On your other devices, search for the Wi-Fi network you created and enter the password. Boom! You're online.
5. Security First: Protecting Your Hotspot from Intruders
Creating a hotspot is easy peasy, but don’t forget about security! You wouldn't leave your front door unlocked, would you? Same goes for your hotspot.
- Strong Passwords are Key: Use a strong, unique password. Avoid easily guessable things like your birthday or "password123".
- Choose WPA2 or WPA3 Encryption: These are the most secure protocols.
- Limit the Number of Connected Devices: If possible, limit the number of devices that can connect to your hotspot.
- Keep Your Laptop Protected: Make sure your laptop has a firewall and antivirus software. Think of it as your digital bodyguard.
- Consider the "Guest Network" Option: Some routers offer a "Guest Network" feature that allows you to create a separate network with limited access. Handy for sharing your Wi-Fi without giving out your primary network password.
6. Troubleshooting Troubles: What to Do When Things Go Wrong
Sometimes, things don't go as planned. Don't panic! Here are a few common problems and how to fix them:
- Can't Connect: Double-check the password, make sure you chose the correct "Share my Internet connection from" source (steps 3 and 4), and ensure your laptop isn’t in Airplane mode.
- Slow Speeds: The speed of your hotspot is limited by the speed of your source connection. If you’re using a slow Wi-Fi connection, your hotspot will be slow. Consider switching to a wired connection or upgrading your internet plan. Also, make sure other devices aren't hogging all the bandwidth!
- Hotspot Not Showing Up: Make sure your Wi-Fi adapter is enabled and that your laptop's Wi-Fi radio is turned on.
- "No Internet Access": This often means your laptop isn't actually connected to the internet. Make sure your source connection (Wi-Fi or Ethernet) is working correctly.
7. Bandwidth Blitz: Managing Your Hotspot's Data Usage
Remember, your hotspot is using your internet connection. If you have a limited data plan, you'll want to keep an eye on your usage.
- Monitor Data Usage: Most operating systems (Windows and macOS) allow you to monitor how much data each device is using.
- Limit Data-Hungry Apps: Close any apps on your connected devices that are using a lot of data, like streaming services (Netflix, YouTube) or online games.
- Use Data Saver Mode: Enable data-saving modes on your devices and apps.
- Consider a Larger Data Plan: If you frequently use your hotspot, you might want to upgrade your mobile data plan or switch to a plan with unlimited data.
8. Wi-Fi Range Boosters: Extending Your Hotspot’s Reach
Your laptop's Wi-Fi signal isn't a laser beam. It has a range. Want to extend it?
- Location, Location, Location: Place your laptop in a central, open location. Avoid placing it near walls, metal objects, or other sources of interference.
- External Antennas (Sometimes): Some laptops have external antenna ports. You could theoretically connect an external antenna for a stronger signal. Check your laptop's documentation to see if this is an option.
- Use a Wi-Fi Repeater: If you need to cover a larger area, consider using a Wi-Fi repeater (also known as a range extender). These devices connect to your hotspot and rebroadcast the signal, extending its reach.
9. Sharing the Love (and the Internet): Allowing Guest Access
Need to share your internet with a friend or family member? The steps for that are pretty straightforward.
- Create a Separate Hotspot: The easiest way is to create a dedicated hotspot with a unique name and password. This way, you can control who has access to your internet and prevent them from accessing your other files or devices.
- Consider a "Guest Network" (Again): Some routers have this feature built-in, which provides a segregated network for guests.
- Be Mindful of Bandwidth: If you have a limited data plan, be mindful of how much data your guest is using.
10. Beyond the Basics: Advanced Hotspot Tricks
Want to level up your hotspot game? Here are a few extra tricks:
- Prioritize Devices: Some operating systems and router software allow you to prioritize
5 Best Wi Fi Hotspot Software For Windows

By Fix With Zubair 5 Best Wi Fi Hotspot Software For Windows by Fix With Zubair
Best FREE Wifi Hotspot Software Specially For WINDOWS 10
By kilObit Best FREE Wifi Hotspot Software Specially For WINDOWS 10 by kilObit
Make Your Laptop's Wifi Signal Faster On Windows 1087 Tutorial

By MDTechVideos Make Your Laptop's Wifi Signal Faster On Windows 1087 Tutorial by MDTechVideos

Title: Make Your Laptop's WiFi Signal Faster On Windows 111087
Channel: EasyTechGeek
Make Your Laptop's WiFi Signal Faster On Windows 111087 by EasyTechGeek
Laptop WiFi Hotspot: The Easiest Trick EVER!
Have you ever found yourself in a situation where you desperately needed internet access, but a reliable WiFi connection was nowhere to be found? Perhaps you're traveling, working remotely from a coffee shop with spotty service, or your home internet is temporarily down. In these moments of digital dependence, the ability to create a WiFi hotspot from your laptop becomes an invaluable lifeline. It transforms your laptop into a personal wireless router, allowing other devices – your phone, tablet, or another laptop – to connect to the internet using your laptop's existing internet connection. Trust me, it’s easier than baking a cake (and much more useful, in many situations).
Unlocking the Power: Understanding the Fundamentals
Before we dive into the "how-to," let's establish a firm grasp of the underlying concept. At its core, a laptop WiFi hotspot leverages your laptop's built-in WiFi adapter. Essentially, the adapter is repurposed. Instead of receiving a WiFi signal, it broadcasts one. The source of the internet connection can be anything from a wired Ethernet connection, a cellular data connection (through a mobile hotspot or USB tethering), or even another existing WiFi network. The laptop acts as a middleman, sharing its internet connection with other devices within range. This incredibly simple process unlocks a world of connectivity possibilities.
Windows 10/11: The Built-in Hotspot Feature
Microsoft, in its infinite wisdom, has simplified the process of creating a WiFi hotspot directly within the Windows operating system. This built-in feature eliminates the need for third-party software and offers a seamless, user-friendly experience. This feature is your best friend when you are working on the go.
Step-by-Step Guide: Creating Your Windows Hotspot
Access the Settings: Click on the Windows Start menu and select the "Settings" cogwheel icon. Alternatively, you can use the keyboard shortcut: Windows Key + I.
Navigate to Network & Internet: Within the Settings window, click on the "Network & Internet" option.
Mobile Hotspot: On the left-hand side, you'll find a list of options. Select "Mobile hotspot."
Enable the Hotspot: Toggle the "Share my Internet connection with other devices" switch to "On."
Customize Your Hotspot (Optional): Click on the "Edit" button. Here, you can modify your hotspot's name (SSID) and password. Choose a strong, unique password to protect your created network. It is really important.
Select Internet Source (Crucial): Scroll down and under the "Share my Internet connection from" dropdown, select the source of your internet connection. This could be "Wi-Fi" (if your laptop is connected to another WiFi network), "Ethernet" (if you have a wired connection), or "Wi-Fi 2" if you are using dual-band Wi-Fi, or "Cellular data" (if you are using your laptop's built-in cellular data). Make sure you select the correct source, otherwise, the hotspot will not work.
Connect Your Devices: Once the hotspot is enabled, other devices (phones, tablets, etc.) will be able to see your new WiFi network in their available network list. Select your network name, enter the password you created, and connect!
macOS: Utilizing Internet Sharing
Apple's macOS provides a similarly straightforward way to create a WiFi hotspot, albeit with a slightly different interface. While Windows focuses on a dedicated "Mobile Hotspot" section, macOS integrates this functionality within its Internet Sharing settings. You won’t realize how important this is until you’re stuck without a connection.
Setting up a Mac Hotspot: A Concise Guide
Open System Preferences: Click on the Apple icon in the top-left corner of your screen and select "System Preferences". On the newer macOS versions, this is called "System Settings".
Navigate to Sharing: Click on the "Sharing" icon.
Select Internet Sharing: In the left-hand panel, check the box next to "Internet Sharing."
Pick Your Connection Source: Under "Share your connection from," choose the internet connection source you want to use. As with Windows, this could be "Wi-Fi," "Ethernet," or even certain types of USB connections.
Choose How to Share: Under "To computers using," check the box next to "Wi-Fi." If you don't see "Wi-Fi," click on the dropdown menu and select it.
Configure Wi-Fi Options (Critical): Click the "Wi-Fi Options…" button. Here, you can customize your hotspot's name (Network Name/SSID) and set a password. Again, select a strong password.
Start Sharing: Click the "Start" button in the Internet Sharing panel. You'll be prompted to confirm. Click "Start" again.
Connect Your Devices: Scan for available WiFi networks from your other devices and connect.
Troubleshooting Common Hotspot Issues
Even with these easy steps, you might encounter a few bumps along the road. Don't worry; we've got you covered.
Hotspot Not Working? Check These Points:
- Internet Connection: Ensure your laptop itself has a working internet connection. No internet connection on the laptop means no broadcast internet connection for your other devices. Test the source.
- Incorrect Connection Source: Double-check that you’ve selected the correct internet connection source in the "Share my Internet connection from" (Windows) or "Share your connection from" (macOS) settings. This is the most common cause of failure.
- Firewall Interference: Your laptop's firewall may be blocking the hotspot connection. Temporarily disable your firewall or add an exception for the hotspot application.
- Driver Issues: Outdated or corrupted network adapter drivers can cause problems. Update your network adapter drivers through Device Manager (Windows) or by visiting your manufacturer's website.
- Device Compatibility: Ensure that the devices you're trying to connect to can support the WiFi standards that your hotspot is broadcasting. Most modern devices will be fine, but older devices might have trouble.
- Password Problems: Make sure you are entering the correct password. Case matters, so type it precisely as you set it up.
- Range Limitations: WiFi signals have a limited range. Make sure the devices you are trying to connect are within a reasonable distance of your laptop. Walls and other obstructions reduce range.
- Connection Throttling: Some internet service providers (ISPs) may implement data limits or throttle speed when tethering. Consider this if your hotspot is slow.
Mobile Hotspot Alternatives and Considerations
While a laptop hotspot is incredibly useful, it's not the only way to share your internet. Consider these alternatives.
Dedicated Mobile Hotspots:
If you use a hotspot frequently, a dedicated mobile hotspot device might be a better long-term solution. These devices are small, portable, and specifically designed for sharing cellular data. They often offer better performance and battery life than a laptop acting as a hotspot.
Smartphone Hotspot:
Most smartphones have built-in hotspot features. This is a convenient option, particularly if your phone has a robust data plan. The setup is usually straightforward, similar to the laptop process. However, your phone's battery life will drain quickly when acting as a hotspot.
Data Usage Awareness:
Be mindful of your data usage when using a hotspot, especially if you have a limited data plan. Streaming video, downloading large files, and other data-intensive activities can quickly consume your data allowance. Keep an eye on how much data is being used by your connected devices.
Securing Your Hotspot: Best Practices
Security is paramount. Protect your network from unauthorized access.
Strong Passwords:
Always use a strong, unique password for your hotspot. Avoid easily guessable passwords like birthdays or common words.
Network Name (SSID) Considerations:
While not a primary security measure, consider making your network name (SSID) less obvious. Avoid using personally identifiable information.
Encryption:
Ensure your hotspot is using WPA2 or WPA3 encryption for the strongest security. This encrypts the data transmitted over the network.
Monitor Connected Devices:
Regularly check which devices are connected to your hotspot and remove any unknown or unauthorized devices.
Going Beyond the Basics: Advanced Tips and Tricks
Once you're comfortable with the fundamentals, you can explore some advanced options.
Bandwidth Management (Windows):
Windows offers some bandwidth management options, which allows you to allocate bandwidth to different devices. This helps ensure that the most important devices get priority. However, the features are somewhat limited.
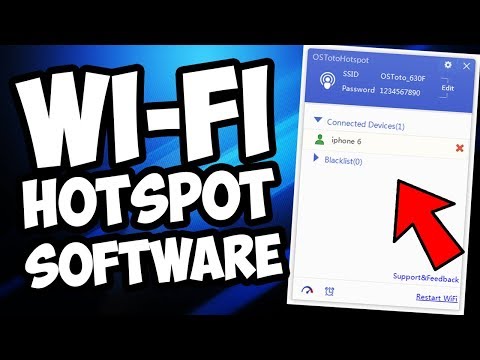
Third-Party Software:
While the built-in hotspot features in Windows and macOS are generally sufficient, third-party hotspot applications (often free) can offer more advanced features, such as user monitoring, bandwidth control options, and more robust security features. Research these carefully, ensuring they are reputable before installing.
Power Management:
When using your laptop as a hotspot, consider connecting it to a power source. Creating a hotspot drains your laptop's battery quickly.
This detailed guide should equip you to create a successful and secure WiFi hotspot from your laptop
