how to reset laptop wifi adapter

Title: Cara Mengatasi Adapter Wifi Yang Hilang di Windows 10 Pc atau laptop
Channel: WINTECH id
Cara Mengatasi Adapter Wifi Yang Hilang di Windows 10 Pc atau laptop by WINTECH id
how to reset laptop wifi adapter, how to restart laptop wifi adapter, how to reset my laptop wifi adapter, how to reset wireless adapter laptop, how to reset wifi adapter on lenovo laptop, how to reset wifi adapter on dell laptop, how to reset wifi adapter on hp laptop
Laptop WiFi Dead? Emergency Reset Fix!
Laptop WiFi Woes? A Speedy Emergency Reset to the Rescue!
Have you ever felt that sinking feeling? Your laptop, your lifeline to the digital world, stubbornly refuses to connect. The WiFi icon sits there, a mocking little symbol of digital isolation. But before you spiral into a panic about forgotten passwords or expensive tech repairs, take a deep breath. There's a good chance you can fix this, and quickly. So, put down the phone, and let’s get you back online.
Recognizing the WiFi SOS: Symptoms of a Wireless Emergency
Your laptop’s WiFi might be down for several reasons. Therefore, understanding the symptoms is paramount. Firstly, you may see the dreaded "no internet" message. You can't browse, stream, or even check emails. Secondly, the WiFi icon in your system tray might show a red “X” or a globe symbol. Those are telltale signs. Moreover, your device may simply refuse to detect any available networks. Each of these scenarios indicates a problem. In other words, take action before more severe issues arise.
Step 1: The Simple Reboot – Often Overlooked, Always Effective
Sometimes, the simplest solution is the best. You can solve most minor tech glitches with a restart. So, begin by completely shutting down your laptop. Wait a few minutes, and then power it back on. This simple reset can often clear temporary software hiccups. Consequently, it often restores your WiFi connection with minimal effort. If you are fortunate, you're already back online.
Step 2: Airplane Mode – Quick Toggle for a Rapid Reset
Still no luck? Try toggling Airplane Mode on and off. Locate the Airplane Mode button on your keyboard. It might be a dedicated key or a function key combination (like Fn + a key with an airplane icon). Press this key to activate Airplane Mode. Wait a few seconds, and then disable it. This briefly cuts off all wireless connections. As a result, it forces your laptop to re-establish its WiFi connection.
Step 3: Inspecting Your Network Adapter – Where the Magic Happens
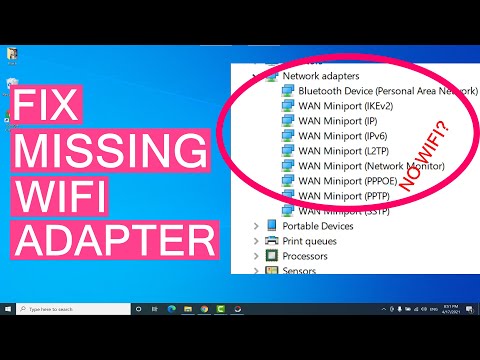
Your network adapter is like the receiver for your WiFi signal. So, you'll want to check its status. To do this, find the network icon in the system tray. Right-click it, and then select "Open Network & Internet settings" or similar language. In the settings panel, find the “Change adapter options” section. A window will open displaying your network adapters.
Now, look for your WiFi adapter. It should be labeled something like "Wi-Fi" or "Wireless Network Connection”. Is it enabled? If not, right-click on it and select “Enable”. If it is enabled but the connection is still wonky, try disabling and then re-enabling it. Specifically, this can often clear up minor conflicts. Afterwards, check if your WiFi now works.
Step 4: The Router Reset – Your Home Network's Central Command
If your laptop is still struggling, the problem might lie with your router. Luckily, a router reset is often a quick fix. Locate your router. You'll typically find a power button or a small reset button. First, try the power button. Turn off your router. Wait about a minute. Turn it back on.
After a couple of minutes, check your laptop’s WiFi. If the power cycle does not work, try a full reset. Carefully, you can press and hold the reset button, usually located on the back. Be cautious. Hold it for about 30 seconds. This will restore your router to its factory settings. You will likely need to re-enter your WiFi password. In the meantime, this can often resolve deeper connection issues.
Step 5: Driver Updates – Keeping Things Running Smoothly
Outdated network adapter drivers can cause problems. Therefore, updating them is often essential. You can usually update drivers through Windows Update. Go to your settings and look for "Update & Security". Select “Check for updates.” Windows will automatically search for and install any new drivers. In addition, you can update drivers manually. You may need to visit your laptop manufacturer’s website. Download the latest drivers for your specific model.
Step 6: Run the Network Troubleshooter – Let Windows Be Your Guide
Windows has a built-in network troubleshooter. You can use this tool to identify and fix common WiFi problems. Right-click the network icon. Then, select "Troubleshoot problems". Windows will scan your network. It will try to diagnose and fix any issues. After it completes the scan, it will suggest solutions. It might even automatically fix the problem for you.
Step 7: Consider Interference – Clearing the Airwaves
Wireless signals can get interference. Devices like microwaves, cordless phones, and even other routers use the same radio frequencies. Therefore, they can disrupt your WiFi signal. Try moving your laptop closer to your router. Ensure there is no obstruction. Furthermore, consider changing your router's channel. Many routers offer this in their settings. Doing so could minimize interference from competing signals.
In Conclusion: Back Online and Ready to Roll!
Hopefully, one of these steps has fixed your WiFi problem. The feeling of being disconnected is frustrating. However, by following these simple solutions, you can usually get back online quickly. Keep this guide handy for future network troubles. You'll be browsing, streaming, and working in no time. Now, get back to enjoying the digital world! So, stay connected!
HP Pavilion dv6000 Wi-Fi Dead? This Trick Will SHOCK You!Laptop WiFi Dead? Emergency Reset Fix!
Hey everyone, ever been there? You're in the middle of something crucial – maybe a video call with your boss, or finally finishing that online course, or even just desperately needing to binge-watch your favorite show – and bam! Your laptop’s WiFi decides to take a vacation. The dreaded "no internet connection" message stares you in the face, and your palms start to sweat. Trust me, we've all been there. It's like the digital equivalent of a leaky faucet – endlessly frustrating. But fear not! We're going to dive deep into how to troubleshoot and, more importantly, fix that dead WiFi situation. Think of me as your tech-savvy friend, here to guide you through the digital wilderness.
1. The Dreaded "No Internet": First Steps to Sanity
Before you start picturing yourself chucking your laptop out the window (we've all been there), let's take a deep breath. The first thing to do is a sanity check. Is everything offline? Is it just your laptop, or is your phone, tablet, and smart fridge also having trouble connecting? This tells you immediately if the problem is your laptop or your actual internet connection. If nothing is working, chances are it's your router or internet service provider. Simple solutions here include:
- Restarting Your Router: Unplug it, wait 30 seconds, plug it back in. This is the digital equivalent of "turning it off and on again," and it works more often than you’d think!
- Checking Your Internet Service Provider (ISP): Call them, check their website, or look for service outage alerts. They might be having issues.
But, if only your laptop is the problem, then we're in the right place!
2. Laptop WiFi Dead? The Obvious Suspects: Let's Investigate!
Let's assume your other devices are humming along happily. Now, we need to Sherlock Holmes our way through your laptop's settings. The most common culprits are often easily fixed.
- Airplane Mode: This sneaky little feature can be the bane of our existence. Double-check that it’s off. You can usually find it in your system tray (bottom right corner of your screen) or by pressing the dedicated airplane mode key on your keyboard (usually a plane symbol).
- WiFi Switch/Button: Some laptops have a physical switch or button to enable/disable WiFi. Make sure it’s flipped the right way. Sounds silly, but we've all missed it!
- Network Adapter Issues: Your laptop has a "network adapter" that's the middleman between your computer and the WiFi signal. Sometimes, it just needs a little nudge.
3. Restarting Your Laptop - The Universal Cure?
Alright, let's get back to basics. Have you tried the oldest trick in the book? Restarting your laptop is often the digital equivalent of hitting the "reset" button on life. It clears out temporary files, refreshes connections, and often resolves minor glitches. Seriously, try it first. You’d be surprised how often this works! It's like giving your laptop a good night's sleep.
4. Diving into the Device Manager: The Network Adapter Detective
If a simple reboot didn't do the trick, we need to delve deeper. Think of the Device Manager as your laptop’s internal mechanic. Here’s how to get there:
- Windows: Type "Device Manager" in the search bar and select it.
- Mac: Go to "About This Mac" > "System Report" > "Network".
Once you're in, look for "Network adapters." Expand that section. You should see your WiFi adapter listed, usually with a name like "Wireless Network Adapter" or something similar.
5. Is Your WiFi Adapter Enabled? A Crucial Check
In the Device Manager, check the status of your WiFi adapter. If it has a little down arrow, it’s disabled. Right-click on it and select "Enable device." If it already says "enabled," move on to the next step.
6. "Update Driver" - Your WiFi Adapter's Software Tune-Up
Drivers are the software that lets your computer talk to its hardware. Sometimes, they get outdated or corrupted. Here's how to give your WiFi adapter a fresh coat of digital paint:
- In the Device Manager, right-click on your WiFi adapter.
- Select "Update driver."
- Choose "Search automatically for drivers." Windows will try to find and install the latest version.
7. Uninstall and Reinstall: A Fresh Start for Your Adapter
If updating the driver doesn't work, it might be time for a more drastic measure. Try uninstalling and reinstalling it.
- Right-click your WiFi adapter in the Device Manager.
- Select "Uninstall device."
- Restart your laptop. Windows will usually reinstall the driver automatically.
8. Network Troubleshooter: Your Laptop's Built-in Expert
Okay, let's tap into the power of your operating system. Windows and macOS both have built-in network troubleshooters designed to diagnose and fix common connectivity problems. They're like having a tech support person living inside your laptop.
- Windows: Go to Settings > Network & Internet > Status and run the troubleshooter.
- Mac: Go to System Preferences > Network and try the "Assist Me" option.
9. Forget and Reconnect: The Wireless Memory Eraser
Sometimes, your laptop has a bad memory of a WiFi network. It's like a relationship gone sour. You need to move on!
- Go to your WiFi settings (usually in your system tray or settings panel).
- Find your WiFi network.
- Select "Forget" or "Remove" the network.
- Reconnect to the network by entering your password again.
10. IP Address Conflicts: Digital Traffic Jams
Imagine two cars trying to use the same address. That’s an IP address conflict. It can stop your laptop from getting internet.
- Check Your IP Configuration: In your network adapter settings (Device Manager or Network Preferences), make sure your IP address is set to "Obtain an IP address automatically." This should allow your router to assign an IP address.
11. Clean Boot: Isolating the Culprit
A "clean boot" starts your laptop with a minimal set of drivers and startup programs. It helps identify if a third-party program is interfering with your WiFi. It's like removing clutter from your house to find a lost object.
- Windows: Search for "System Configuration" and go to the "Services" tab. Check "Hide all Microsoft services" and then "Disable all." Then, go to the "Startup" tab and disable all startup items. Restart your computer.
- Mac: This process is more complex. Search for instructions on how to start up in safe mode, which achieves a similar effect.
12. Check Your Router's Settings Again: The Router's Role
Sometimes, the issue isn't with your laptop. Your router might have filters or settings that are blocking your laptop.
- Access Your Router's Settings: You'll need to do this via a web browser (e.g., Chrome, Firefox, Safari) by typing in the router's IP address in the address bar (usually 192.168.1.1 or 192.168.0.1, but check your router's manual).
- Look for Filters: Make sure there are no MAC address filters or other settings blocking your laptop's connection.
13. Resetting Network Settings: A Digital Spring Cleaning
If you feel up to it, consider resetting all your network settings.
- Windows: Go to Settings > Network & Internet > Advanced network settings > Network reset.
- Mac: Go to System Preferences > Network and remove all WiFi and network connection options. Reboot.
14. Hardware Failure: When All Else Fails
If you've tried everything, and your WiFi is still dead, the unfortunate truth is that the problem might be hardware-related. It's possible your WiFi adapter has failed. This is often the case if other computers can connect to the same network. Unfortunately, this means a repair or replacement of the adapter or, in some cases, the entire motherboard.
15. External WiFi Adapter: An External Solution
Here’s a silver lining! You can purchase an external WiFi adapter that plugs into a USB port. It's like getting a second chance for your laptop's internet connection, a lifeline to overcome the dead WiFi scenario. They're relatively inexpensive and often work like a charm.
Wrapping Up: The WiFi Warrior's Guide
Okay, we covered a lot! We've gone from basic troubleshooting to digging into the depths of your network settings. Remember, fixing a dead WiFi connection is often a process of elimination. Start with the simple solutions, work your way through the more complex ones, and try not to get discouraged. It’s like solving a puzzle – the feeling of getting that connection back is absolutely worth it! And hey, if all else fails, that
HP Laptop WiFi: The Easiest Setup Guide EVER!How To Fix Wireless Adapter Missing In Windows 10 Get WiFi Adapter Back
By Sandeep Singh How To Fix Wireless Adapter Missing In Windows 10 Get WiFi Adapter Back by Sandeep Singh
Cara Memperbaiki Adaptor Nirkabel yang Hilang di Windows 10 ASK
By Tricknology Cara Memperbaiki Adaptor Nirkabel yang Hilang di Windows 10 ASK by Tricknology
Cara Memperbaiki Adaptor Jaringan yang Hilang di Windows Aktifkan Adaptor Jaringan WiFi dari Pengaturan BIOS
By WebbyFan Cara Memperbaiki Adaptor Jaringan yang Hilang di Windows Aktifkan Adaptor Jaringan WiFi dari Pengaturan BIOS by WebbyFan

Title: Cara mengatasi Wifi adapter hilang windows 7,8,10
Channel: Ani Saja
Cara mengatasi Wifi adapter hilang windows 7,8,10 by Ani Saja
My Laptop Work
Laptop Wi-Fi Dead? Emergency Reset Fix!
Have you ever stared, utterly defeated, at your laptop screen, the glaring absence of Wi-Fi signals mocking your every attempt to connect? The frustration of a suddenly unresponsive wireless card is a universally recognized tech woe. You're mid-project, expecting a critical email, or just want to unwind with a movie – and the internet, your lifeline, has vanished. Fear not, for we’ve all been there. And, more importantly, there are solutions. This guide provides a comprehensive, step-by-step emergency reset fix, designed to get you back online in the shortest possible time, transforming that dead Wi-Fi into a vibrant connection.
Understanding the Wireless Card and its Silent Struggles
Before diving into the fixes, it’s beneficial to grasp a fundamental concept: the wireless card, the tiny electronic component tucked inside your laptop, is essentially the receiver and transmitter of your Wi-Fi signal. The card's function is to receive and send signals in the form of electromagnetic waves. It's a delicate but robust piece of technology, and its functionality can be disrupted by various factors. It can be software glitches, driver conflicts, or even a simple oversight in settings.
Preliminary Checks: The Obvious but Often Overlooked
Before we begin to explore more advanced repair methods, it's crucial to address the simplest, most easily rectified possibilities. These preliminary checks are your first line of defense.
The Physical Switch: Many laptops have a physical switch, often located on the side or front, to enable or disable the Wi-Fi card. Make sure this switch is in the "On" position. It seems simple, we know, but you'd be amazed how easily it’s overlooked.
Function Keys: Your laptop keyboard almost certainly has a function key (Fn) in combination with another key (usually one with a Wi-Fi icon on it). Press this combination to toggle the Wi-Fi on or off. Common examples are Fn+F2, Fn+F12, or Fn+PrntScrn, though it can differ based on the laptop model.
Airplane Mode: Ensure that Airplane Mode isn't enabled. This feature, designed to disable all wireless communication, is easily activated by accident. The setting is usually found in the notification area, often signified by an airplane icon. Click on the notification and ensure that Airplane mode is off.
Reboot the Router: In the event that all other devices that you have in your home have an active connection, then your router might be the trouble. Rebooting your router allows it to refresh. Unplug the router from the power outlet. Wait a full 60 seconds. Plug it back in, and allow it to completely power up before attempting to connect to the internet.
The Emergency Reset: Troubleshooting Your Wi-Fi Connection
Now, let's move on to the core strategies. These steps, when followed methodically, will significantly increase your chances of reviving your dead Wi-Fi.
Step 1: Restarting the Laptop – Your Digital Reboot
The first, and often most effective, solution is a simple restart of your laptop. This action closes and restarts all running processes, offering a fresh start for the operating system and the wireless card.
- Close All Applications: Before restarting, make sure that you have closed all open applications. This prevents data loss and ensures a clean restart.
- Proper Shutdown, Not Just Sleep: Don't just put your laptop to sleep. Fully shut it down. Wait for the system to completely power off.
- Restart: Press the power button to turn your laptop back on. Login and test your internet connection.
Step 2: Hardware Troubleshooting - A Glimpse Behind the Veil
In the event that the previous step didn’t work, there are other options for you.
Device Manager Access: Right-click on the Windows Start button (or press Windows key + X) and select "Device Manager" from the menu. This panel provides a comprehensive overview of all hardware devices connected to your laptop.
Locate Network Adapters: In the Device Manager window, expand the "Network adapters" section. This will list all network-related hardware, including your wireless network adapter.
Check for Errors: Look at the wireless adapter entry. Is there a yellow exclamation mark or a red cross icon? These indicate driver or hardware problems. A yellow exclamation mark usually means that the driver is not working correctly, and a red cross indicates a disabled or faulty device.
Driver Updates: Right-click on your wireless adapter and select "Update driver." Choose the option to "Search automatically for drivers." Windows will attempt to find and install the latest available driver.
Driver Rollback: If you have recently updated your driver and the Wi-Fi stopped working, right-click on the wireless adapter again, select "Properties," then go to the "Driver" tab. Click "Roll Back Driver" if the option is available. This reverts to a previous driver version, which can resolve compatibility issues.
Uninstall and Reinstall: If updating or rolling back the driver doesn't work, try uninstalling the driver. Right-click on the wireless adapter, select "Uninstall device," and confirm. Then, restart your laptop. Windows should automatically reinstall the driver upon restart.
Power Management Options: Right-click on your wireless adapter, select "Properties," then go to the "Power Management" tab. Uncheck the box that says, "Allow the computer to turn off this device to save power." This will prevent the system from disabling the wireless adapter unnecessarily.
Step 3: Network Troubleshooter: Windows' Built-In Expert
Windows has a built-in Network Troubleshooter designed to identify and fix common network-related issues.
- Access the Troubleshooter: Search for "Network troubleshooter" in the Windows search bar and select it.
- Run the Troubleshooter: Follow the on-screen prompts. The tool will automatically detect and attempt to fix problems with your network connection. It might ask you to select your network adapter or to restart your router.
Step 4: Resetting Network Settings
Sometimes your system's network settings can become corrupted or misconfigured, which can lead to the loss of functionality of your Wi-Fi. Resetting these settings cleans the slate.
- Network Reset (For Windows 10 and 11): Go to Settings > Network & Internet > Advanced network settings (or "Network reset"). Click on "Network reset," and then "Reset now." Your computer will restart. This action will remove and reinstall your network adapters, and set other networking components back to their default settings.
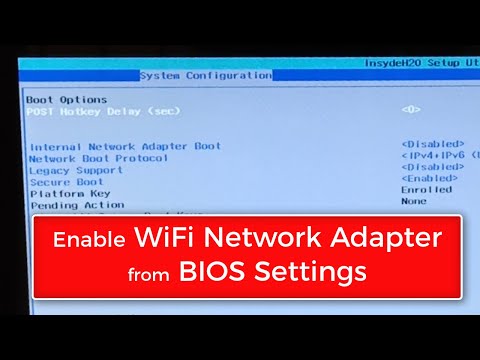
Step 5: Checking the Wi-Fi Adapter in BIOS
Some laptops allow you to enable or disable the wireless adapter through the BIOS (Basic Input/Output System). This is a more advanced setting, but it's worth checking if nothing else is working.
- Access the BIOS: During startup, press the key specified by your laptop manufacturer (usually Del, F2, F12, or Esc) to enter the BIOS setup. Consult your laptop's manual or search online for the correct key for your model.
- Navigate to Wireless Settings: Within the BIOS, look for a section related to "Wireless," "Wi-Fi," or “Integrated Peripherals.”
- Enable the Adapter: Ensure that the wireless adapter is enabled. Save the changes and exit the BIOS, allowing your laptop to restart. If the adapter was disabled, this might be the fix.
Step 6: Further Diagnostic Steps – Delving Deeper
If you’ve tried all of the above without success, you may need to take additional steps to diagnose your problems. Consider the following actions.
- Check Router Configuration: Make sure that your router is broadcasting the correct signal. Use another device to access it. Your router’s manual will provide guidelines on how to do so. Search for wireless settings, such as channel, mode, and SSID broadcasting.
- Consider Interference: Some electronic devices emit frequencies that might interfere with the functionality of your Wi-Fi. Try moving your laptop to a room further away from these devices.
Step 7: The Ultimate Resort: Professional Help
If, after trying all these steps, your Wi-Fi still remains dead, it's time to seek professional help. Contacting your laptop manufacturer's support or a qualified computer repair technician is the next logical step. Hardware failures or more complex software issues may require professional intervention.
Proactive Measures: Preventing Future Wi-Fi Woes
Prevention is always better than cure. Implementing consistent practices will help to reduce the likelihood of your Wi-Fi connection failing.
Keep Drivers Updated: Regularly update the drivers for your wireless adapter. Most operating systems provide automatic driver updates, but it's wise to check for updates periodically in Device Manager.
Secure Your Network: Protect your Wi-Fi with a strong password and the latest security protocols to prevent unauthorized access.
Invest in a Quality Router: A robust and reliable router is fundamental to stable Wi-Fi performance. Consider investing in a high-quality router that supports the latest Wi-Fi standards (e.g., Wi-Fi 6 or Wi-Fi 6E) for improved speed, range, and security.
Regular System Maintenance: Perform regular system maintenance tasks, such as disk cleanup and defragmentation, to keep your laptop running efficiently.
Conclusion: Reclaiming Your Connectivity
Losing your Wi-Fi connection can be an
