how to setup wifi on laptop windows 8.1

Title: How to Connect to WiFi on Windows 8
Channel: HOWTECH
How to Connect to WiFi on Windows 8 by HOWTECH
how to connect wifi on laptop windows 8, how to connect wifi in laptop windows 8.1, how to connect wifi to laptop windows 8.1 pro, how to connect wifi in hp laptop windows 8.1, how to connect wifi in toshiba laptop windows 8, how to connect wifi to hp laptop windows 8, how do i connect my windows 8.1 laptop to wifi
Unlock Your Wi-Fi: Windows 8.1 Laptop Setup Solved!
Conquering the Wireless Frontier: Your Windows 8.1 Wi-Fi Revelation!
We've all been there, haven’t we? That exasperating moment staring at a laptop screen, desperately seeking a Wi-Fi connection. Windows 8.1, while offering a plethora of features, could occasionally present such a hurdle. But fear not! Today, we'll explore the secrets to effortlessly connect to Wi-Fi on your Windows 8.1 laptop. We'll transform your setup experience into a seamless journey. This journey involves unlocking the wireless portal and ensuring digital freedom.
Decoding the Wireless Enigma: Initial Checks
Before plunging into the depths of settings, let's perform some crucial preliminary checks. First, confirm your laptop's Wi-Fi capabilities. Most modern laptops are inherently equipped with a wireless adapter. So, chances are, yours is too. However, it's still worthwhile to verify. Check the physical Wi-Fi switch. Some laptops include a dedicated button, often located on the side or the front edge. Ensure this switch is in the "on" position. Next, inspect the function keys. Sometimes, the Wi-Fi can be toggled on or off using a function key combination, like Fn + the Wi-Fi symbol key.
Navigating the Settings Labyrinth: The Wireless Network Configuration
Now, let's venture into the Windows 8.1 settings. You'll find that navigating the network settings is relatively straightforward. First, access the "Settings" charm. You can do this by swiping from the right edge of the screen. Alternatively, hover your mouse in the lower right corner and move upwards. Select "Settings" and then "Change PC settings." This will open the PC settings panel.
Embracing the Network: Connecting to Your Wi-Fi
Within the PC settings, click on "Network". You'll notice several options. Choose "Wi-Fi". Enable the Wi-Fi if it is not already. Windows 8.1 automatically scans for available networks. It searches for nearby wireless signals. Now, a list of available networks will appear, displayed in a user-friendly manner. Identify your Wi-Fi network from the list. It is often named according to your router's label. Typically, this is the name your internet service provider uses. Click on your network's name.
The Password Paradox: Securing Your Wireless Gateway
After selecting your network, Windows 8.1 will prompt for your network security key. This is a crucial step. This is the password that protects your wireless network from unauthorized access. You can usually find the password on your router itself. Check for a sticker on the underside or the back. If you can’t find it there, consult the documentation provided by your internet service provider, or contact them. Once you have the password, carefully enter it. Double-check for any typos. Errors here can be a common stumbling block. Then, click "Next" or "Connect".
Troubleshooting Turbulence: Resolving Connection Challenges
What if you face issues? If you can't connect, there are several troubleshooting steps you can perform. First, restart your router and laptop. Sometimes, a simple reboot can resolve temporary glitches. Ensure your router is functioning correctly. Check other devices connected to the same network. If they are also experiencing problems, the issue likely lies with the router or internet connection. Then, move closer to the router. Distance can greatly affect the Wi-Fi signal strength. Consider checking your network adapter drivers. Outdated or corrupted drivers can cause connectivity issues.
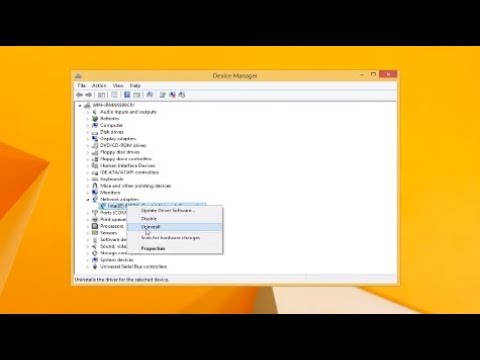
Driver Dilemmas and Solutions: Addressing Adapter Issues
To update your network adapter drivers, right-click the Start button. Choose "Device Manager". Expand "Network adapters". Locate your wireless network adapter. Right-click on it, and select "Update driver software". Choose "Search automatically for updated driver software". Windows will then search for updated drivers online. Install them if available and restart your computer.
Advanced Configuration: Delving Deeper Into Connectivity
For advanced users, Windows 8.1 offers further configuration options. You can manually configure your IP address. This is useful in specific network environments. Additionally, you can troubleshoot network connectivity using the Windows Network Troubleshooter. Access this by right-clicking the network icon in the system tray. Select "Troubleshoot problems". Windows will then automatically diagnose and attempt to fix any detected issues.
The Rewards of Connectivity: Embracing the Wireless Lifestyle
Successfully connecting to Wi-Fi unlocks a world of possibilities. From browsing the web to streaming movies, the digital world is at your fingertips. You can read emails. You can connect with friends and family. Also, it allows you to collaborate on projects. You can now access a vast digital library.
Final Thoughts: Mastering the Wireless Domain
In conclusion, setting up Wi-Fi on your Windows 8.1 laptop doesn't need to be a frustrating experience. By following these steps, you can swiftly connect to your network. Moreover, you will be well on your way to enjoying seamless wireless connectivity. Troubleshooting is key. Always remember those initial checks. If problems persist, do not hesitate to seek extra help. Ultimately, with a little persistence, you can conquer the wireless frontier. Now, go forth and enjoy the benefits of wireless connectivity! You’ve earned it!
HP Stream WiFi Nightmare Solved! (Easy Fix Inside!)Unlock Your Wi-Fi: Windows 8.1 Laptop Setup Solved!
Alright, fellow digital wanderers! Ever felt like your Wi-Fi connection is a mischievous gremlin, constantly hiding just out of reach? You're not alone. We've all been there, staring blankly at our laptops, praying to the internet gods for a stable connection. And if you're rocking a Windows 8.1 laptop, well, sometimes it feels like those gods are playing hard to get. But fear not, comrades! We're about to crack the code and banish those Wi-Fi woes, once and for all. Consider this your personal roadmap to Wi-Fi enlightenment. So, grab your coffee, settle in, and let's dive into the glorious, sometimes frustrating, world of Windows 8.1 Wi-Fi setup!
1. The Frustrating Reality: Windows 8.1 and Wi-Fi Hiccups
Let's be honest, Windows 8.1, while an improvement over its predecessor, can still throw some curveballs when it comes to connectivity. We've all experienced it: the dreaded "no internet access" message, the painfully slow loading speeds, or the complete inability to see available networks. It’s like being trapped in a digital echo chamber shouting into the void. The reasons? They're as varied as the socks in my laundry basket. But don't worry, we'll systematically unravel these mysteries.
2. Checking the Basics: Is Your Wi-Fi Even On?
Before we start pulling our hair out, let's perform a quick sanity check. This might sound obvious, but trust me, it’s a frequent culprit. Is your Wi-Fi adapter actually on? Look for a physical switch on your laptop, often located on the side or front. It might have a tiny Wi-Fi symbol. Make sure that switch is flipped to the ‘on’ position. It's like forgetting to plug in your toaster; pretty pointless without it!
3. Diving into the Settings: Unveiling Network Mysteries
Now, let's venture into the digital depths of your Windows 8.1 settings. Here’s how:
- Method 1: From the Desktop or Start Screen: Swipe in from the right edge of the screen (or point your mouse to the upper-right corner, then move the mouse pointer down) to open the Charms bar. Click on "Settings." Then, click on the Wi-Fi icon.
- Method 2: The Control Panel Route: Right-click on the Start button (the Windows logo, usually at the bottom left of the screen). Select "Control Panel." Then, click on "Network and Internet," followed by "Network and Sharing Center."
Inside the Network and Sharing Center, you'll see the status of your network connections. This is our command center, our home base.
4. Finding Your Network: The Search for Connections
Once you're in the correct settings, look for the available Wi-Fi networks. It should display a list of networks within range. If the list is empty, something is blocking the connection, we'll get to that. If you see your network's name (SSID), click on it, and enter your Wi-Fi password when prompted. Think of it like knocking on the door to your digital home. Ensure caps lock is off; these passwords are case-sensitive.
5. Hidden Networks: The Sneaky Wi-Fi
Sometimes, networks are “hidden,” meaning they don’t broadcast their names. If you know your network's name, you can manually add it. Click on "Connect to a hidden network" (typically found in the Wi-Fi settings). Then, you'll need to enter the network name (SSID), security type (usually WPA2-Personal or WPA/WPA2-Personal), and the security key (your Wi-Fi password).
6. The Wireless Adapter Troubleshooter: Your Digital Doctor
Windows 8.1 has a built-in troubleshooter designed to diagnose and fix common Wi-Fi issues. Access it the same way as the settings. Simply right-click on the Network icon in the system tray (usually in the bottom right corner) and select "Troubleshoot problems." It's like having a digital doctor for your Wi-Fi connection. It runs through a series of tests, which can resolve the problem.
7. Driver Dilemmas: Ensuring Smooth Communication
Outdated or corrupted network adapter drivers often create havoc. Think of drivers as translators, helping the hardware and software speak the same language. To update them:
- Right-click the Start button and select "Device Manager."
- Expand "Network adapters."
- Right-click your Wi-Fi adapter (it'll have a name like "Intel Wireless-AC 7260" or similar) and select "Update driver software."
- Choose "Search automatically for updated driver software." Windows will look for and install the latest drivers.
8. Restart, Restart, Restart! The Simplicity of a Reboot
I know it sounds cliché, but a simple restart can work wonders. It's like hitting the reset button on your brain when you're feeling overwhelmed. Restart your laptop and your router – yes, your router too! – and see if that clears up the issue. A fresh start can often work miracles.
9. Router Reset: A Deeper Cleanse
If a simple restart doesn't cut it, try resetting your router. There's usually a recessed reset button on the back of the router; you’ll need a paperclip or a similar tool to press it. Press and hold for about 10-15 seconds. This gets your router back to factory settings. Warning: This will reset your router’s settings, so you may need to re-enter your Wi-Fi password and any other custom configurations.
10. Firewalls and Antivirus: Gatekeepers of Your Connection
Sometimes, your firewall or antivirus software can block your Wi-Fi connection. Check your settings to ensure your Wi-Fi network is trusted. You might need to temporarily disable your antivirus software (but be careful when doing so—use caution!).
11. Location, Location, Location: Signal Strength Matters
Wi-Fi signals have a range, and obstacles like walls, microwaves, and other electronics can weaken them. Try moving your laptop closer to the router to improve signal strength. It's like giving your Wi-Fi the space to breathe.
12. Network Interference: The Signal Struggle
Other devices using the same frequency as your Wi-Fi can cause interference. Try changing your router's Wi-Fi channel. You can usually do this through your router's configuration page (accessed via your web browser by typing in your router’s IP address).
13. Advanced Troubleshooting: When Things Get Tricky
If none of the above steps work, you might need to delve into more advanced troubleshooting methods, such as checking your IP address configuration. This is probably beyond the scope of most readers, so seek expert help.
14. Security Type: Ensuring Compatibility
Double-check that your laptop's Wi-Fi settings support the security type used by your router (e.g., WPA2-Personal). If these aren't compatible, your laptop won't connect. It's like trying to fit a square peg in a round hole.
15. Keeping Your System updated: The Path To Future Proofing
Make sure your Windows 8.1 is up to date. Go to "Settings," and it should have an "Update and Recovery" option. Installing the latest updates can often resolve compatibility issues and security vulnerabilities, including those related to Wi-Fi.
Closing Thoughts: Conquer Your Wi-Fi
So, there you have it—a comprehensive guide to unlocking the secrets of your Windows 8.1 Wi-Fi. We've covered everything from the basics to some more advanced troubleshooting steps. Remember, don't get discouraged; fixing Wi-Fi issues is often a process of elimination. Try these steps one by one, and you will conquer the gremlins! Now, go forth and enjoy your uninterrupted internet access! We hope this helps!
FAQs: Your burning questions, answered!
1. My Wi-Fi shows "Limited Access." What does that mean?
"Limited Access" usually means your laptop can connect to the Wi-Fi network, but it can't access the internet. It could be an issue with your router (check your internet connection), an incorrect password, or a problem with your IP address configuration.
2. My Wi-Fi keeps disconnecting randomly. What's causing that?
Random disconnections can be caused by several factors, including outdated drivers, interference, signal strength issues, or problems with your router. Try updating your drivers, moving closer to the router, and/or restarting both your laptop and router.
3. My laptop can see my Wi-Fi but can't connect. Why?
This often boils down to an incorrect Wi-Fi password, an outdated driver, or a problem with the network's security settings. Double-check your password and try updating your network adapter drivers.
4. Should I upgrade to a newer version of Windows?
Windows 8.1 is a relatively old operating system. Although it's still supported, newer versions, like Windows 10 and 11, offer better security and compatibility with newer hardware. Consider upgrading for an improved user experience and security.
**
Dell Laptop WiFi Switch DEAD? 😱 FIX IT NOW!Connecting Manually to a Wireless Network in Windows 8 HP Computers HP Support

By HP Support Connecting Manually to a Wireless Network in Windows 8 HP Computers HP Support by HP Support
Windows 8.1 - No Internet Connection Available
By MDTechVideos Windows 8.1 - No Internet Connection Available by MDTechVideos
Cara Download & Install Driver WIFI & ETHERNET Manual untuk Windows 781011

By inprez id Cara Download & Install Driver WIFI & ETHERNET Manual untuk Windows 781011 by inprez id

Title: Windows 8 - How to turn on WiFi
Channel: HowTo
Windows 8 - How to turn on WiFi by HowTo
Wifi On Laptop Phone
Unlock Your Wi-Fi: Windows 8.1 Laptop Setup Solved!
Navigating the digital landscape necessitates a reliable internet connection. For Windows 8.1 laptop users, establishing a secure and consistent Wi-Fi setup is paramount. We understand the frustration when connectivity falters. This comprehensive guide equips you with the knowledge to swiftly configure, troubleshoot, and optimize your Wi-Fi on your Windows 8.1 laptop, ensuring a seamless online experience. Let's empower you to master your wireless connection.
Initial Setup: Connecting to Your Wi-Fi Network
The initial connection process is typically straightforward, yet understanding the underlying steps enhances troubleshooting capabilities. Upon starting your Windows 8.1 laptop, locate the Wi-Fi icon in the system tray, typically found in the bottom-right corner of the screen. Click this icon to display a list of available Wi-Fi networks within range. The icon's look will depend on what display configuration is adopted, and the user is using. It is usually represented by a small set of bars, or a series of curved lines.
Selecting and Entering Network Credentials
From the Wi-Fi network list, identify your home Wi-Fi network's name (SSID). Click the network name to initiate the connection process. If prompted, enter your Wi-Fi password, typically a combination of letters, numbers, and symbols chosen during the router setup. Ensure the password is entered correctly, paying close attention to capitalization and special characters. Incorrect credentials will prevent connection.
Connection Confirmation and Troubleshooting
After providing the correct Wi-Fi password, Windows 8.1 will attempt to connect. A successful connection is indicated by a change in the Wi-Fi icon's appearance, often displaying a filled signal strength indicator. You should be able to immediately begin browsing the web, as well as access other online resources. However, if the connection fails, several troubleshooting steps can resolve the issue. The first step is to revisit the Wi-Fi password. Misspellings are common.
Verifying Network Availability and Router Functionality
Confirm that your router is powered on and broadcasting a Wi-Fi signal. Check the router's power and internet status lights, typically located on the front or top panel. If these indicators are not lit as expected, the router might need to be reset. Examine the physical Ethernet cable to ensure the connection is securely connected, and that no damage exists.
Using the Windows 8.1 Network Troubleshooter
Windows 8.1 incorporates a built-in network troubleshooter designed to diagnose network connectivity issues. Access this tool by right-clicking the Wi-Fi icon in the system tray and selecting "Troubleshoot problems." The troubleshooter will automatically scan for common problems and attempt to resolve them. Follow the on-screen instructions. This is a practical first line of inquiry into resolving Wi-Fi functionality, as it can often readily isolate the cause of the problems.
Advanced Configuration: Fine-Tuning Your Wi-Fi Settings
Going beyond the basic connection, optimizing your Wi-Fi settings enhances performance, security, and overall user experience. Windows 8.1 provides several options for advanced Wi-Fi configuration. One of these settings involves a specific tab, which provides the functionality to set up a specific IP address, if required.
Accessing Advanced Network Settings
To access advanced Wi-Fi settings, navigate to the "Network and Sharing Center." You can access this by right-clicking the Wi-Fi icon and selecting "Open Network and Sharing Center." Alternatively, access this through the Control Panel. In the Network and Sharing Center, you can view the status of your network connections and configure associated settings.
Managing Network Adapters and Drivers
Within the Network and Sharing Center, you can access the "Change adapter settings" option. This section displays a list of all network adapters installed on your laptop, including your Wi-Fi adapter. Right-clicking the Wi-Fi adapter allows you to view its properties. Within the adapter properties, you can access the "Configure" button, which opens the adapter's driver settings.
Updating Wi-Fi Adapter Drivers for Optimal Performance
Outdated or corrupted Wi-Fi adapter drivers can cause connection problems. To ensure optimal performance, regularly update your Wi-Fi adapter drivers. Within the "Configure" settings, access the "Driver" tab. Here, you can update the driver by clicking the "Update Driver" button. Windows 8.1 will search for and install the latest driver updates. This ensures compatibility with your router.
Configuring IP Address Settings
Within the Wi-Fi adapter properties, select "Internet Protocol Version 4 (TCP/IPv4)" and click "Properties." This allows you to configure your IP address, subnet mask, default gateway, and DNS server settings. By default, Windows 8.1 is set to obtain IP addresses automatically. However, if you need to use a static IP address, you can manually enter the required information. This is a more advanced configuration, and may be necessary in some specific networking environments.
Prioritizing Network Connections and Bandwidth Allocation
Windows 8.1 offers tools to prioritize network connections and manage bandwidth allocation. These features are relevant when multiple network connections are active. This becomes increasingly relevant in a working environment, when more than one network is present for use with the laptop. Such configurations allow for more efficient allocation of bandwidth.
Troubleshooting Common Wi-Fi Problems
Even with proper configuration, Wi-Fi problems can occur. Several troubleshooting steps can resolve common issues. Windows 8.1 offers diagnostic tools.
Identifying and Resolving Limited Connectivity Issues
The "Limited connectivity" error indicates that your laptop is connected to the Wi-Fi network but cannot access the internet. This issue is often caused by a problem with the IP address configuration. The Windows 8.1 troubleshooter can help diagnose and resolve this issue. Other causes include ISP outages and even a rogue router.
Addressing Slow Wi-Fi Speeds
Slow Wi-Fi speeds can be frustrating. Several factors can contribute to slow speeds, including distance from the router, interference from other devices, and router congestion. Ensure your laptop is within optimal range of the router and minimize interference.
Resolving Wi-Fi Disconnections and Instability
Frequent Wi-Fi disconnections and instability can be caused by various factors. Update the Wi-Fi adapter drivers and relocate the laptop closer to the router. Ensure your router's firmware is up-to-date. Reconfigure your router to choose the optimal Wi-Fi channel. If problems persist, consider replacing the router.
Securing Your Wi-Fi Connection
A secure Wi-Fi connection protects your personal data from unauthorized access. This is of paramount importance in today's environment. We need to recognize that an unsecured connection can lead to data breaches.
Implementing WPA2/WPA3 Security Protocols
Ensure your Wi-Fi router is configured to use either WPA2 or WPA3 security protocols. These protocols provide robust encryption to protect your Wi-Fi traffic. Older protocols can be vulnerable.
Changing Your Router's Default Password
Change your router's default password to a strong, unique password to prevent unauthorized access to the router's settings. Default passwords are easily obtainable.
Enabling MAC Address Filtering
Enable MAC address filtering on your router to allow only specific devices to connect to your Wi-Fi network. MAC is a hardware address. This enhances security.
Advanced Troubleshooting: Deep Dive into Network Diagnostics
For persistent Wi-Fi problems, deeper troubleshooting steps are required. These steps require a robust understanding of the underlying functionality. The steps presented here reflect this.
Utilizing the Command Prompt for Network Diagnostics
The Windows 8.1 Command Prompt provides powerful tools for diagnosing network issues. Common tools include "ping" and "ipconfig." These tools reveal useful network information, as well as the source of the problems.
Using the "ping" Command for Network Connectivity Tests
The "ping" command tests network connectivity by sending ICMP (Internet Control Message Protocol) echo requests to a target host. To use the "ping" command, open the Command Prompt and type "ping [target IP address or domain name]." A series of replies are returned. A successful "ping" indicates that your laptop can communicate with the target host. The information can be useful.
Interpreting the Output of the "ipconfig" Command
The "ipconfig" command displays your laptop's IP address, subnet mask, default gateway, and DNS server settings. Type "ipconfig /all" in the Command Prompt to view more detailed information, including the MAC address of your Wi-Fi adapter. The information is extremely valuable.
Analyzing Wireless Network Reports for Troubleshooting
Windows 8.1 includes a built-in tool for generating wireless network reports. These reports provide valuable insights into Wi-Fi performance and connectivity issues. The report can provide the basis for the correct course of action to be adopted.
Generating a Wireless Network Report
To generate a wireless network report, open the Command Prompt as an administrator and type "netsh wlan show wlanreport." This command creates a detailed report in HTML format, providing information about recent Wi-Fi events, signal strength, and connection issues. The output provides a view of what is happening.
Interpreting the Wireless Network Report for Problem Identification
Analyze the wireless network report to identify the root cause of your Wi-Fi problems. The report provides information about Wi-Fi signal strength, connection attempts, and any associated errors. Identify the patterns. This helps identify the issue.
Optimizing Wi-Fi Performance: Advanced Tips and Techniques
Beyond basic troubleshooting, several optimization techniques can enhance your Wi-Fi performance. The steps
