can a laptop use a wifi extender as router

Title: Turn Windows 11 Laptop into a STRONG WiFi Range Extender
Channel: Sandeep Singh
Turn Windows 11 Laptop into a STRONG WiFi Range Extender by Sandeep Singh
Laptop WiFi Extender Trick: Router-Less Internet!
Unleash the Wireless Wizard Within: Your Laptop as a WiFi Extender – No Router Required!
Ever found yourself staring at a pitifully weak WiFi signal, miles away from your router, and dreaming of internet nirvana? We've all been there. That frustrating digital desert, however, might be easier to escape than you think. Forget expensive extenders or complex configurations. Believe it or not, your trusty laptop could be the key to unlocking a stronger, more reliable internet connection.
The Secret Weapon: Turning Your Laptop into a WiFi Powerhouse
The days of internet limitations could be over. Consider your laptop a secret weapon for boosting your WiFi range. Many modern laptops possess the built-in capability to act as a WiFi extender. Consequently, you can significantly expand your wireless reach without needing additional hardware. Are you excited already?
Decoding the Magic: How It Actually Works
The core principle is surprisingly straightforward. Your laptop essentially intercepts the existing WiFi signal. It then rebroadcasts it, extending the coverage area. It's like a digital relay race, smoothly passing the internet torch to your devices. This maneuver effectively creates a new WiFi network, utilizing your laptop as the central hub.
Setting the Stage: Preliminary Preparations for Success
Before diving in, a couple of preliminary steps might be beneficial. First, because this uses your laptop’s resources, ensuring your battery is charged or plugged in is crucial. Next, consider your location. Place your laptop strategically, midway between your primary router and the dead zone. After all, you want to capture the best signal quality possible.
Step-by-Step: The Windows Method to Unlock WiFi Freedom
Let’s get down to the practical stuff. The setup process, though, varies slightly depending on your operating system. We’ll first tackle the Windows approach.
- Access the Settings: Begin by navigating to your Windows settings. Click on either the Start menu and select "Settings," or press the Windows key + I.
- Network & Internet: Within Settings, find the "Network & Internet" option. Select it.
- Mobile Hotspot: Now, on the left-hand menu, click "Mobile hotspot." If you can't see this feature, ensure your Wi-Fi adapter is enabled.
- Share Your Internet Connection: A drop-down menu labeled "Share my internet connection from" should appear. Choose the source; usually, your existing WiFi adapter will be listed.
- Edit and Customize: Click "Edit" under "Share my internet connection from" to customize your hotspot’s name and password. Choose a strong password.
- Switch On and Connect: Finally, toggle the "Mobile hotspot" switch to "On." Other devices can now connect to your newly formed hotspot using the name and password you've set.
The macOS Adventure: Expanding Your Wireless Horizon
Mac users, fear not! The process is just as simple, although slightly different.
- Navigate to System Preferences: Start by clicking the Apple icon. Then, choose "System Preferences."
- Sharing Preferences: Then select the "Sharing" option.
- Internet Sharing: On the left side, you'll see various sharing options. Tick the box next to "Internet Sharing."
- Configure Your Sharing: Click the drop-down menu next to "Share your connection from." Choose your WiFi connection.
- Select Devices: In "To computers using," select "Wi-Fi."
- WiFi Options are Key: Click "Wi-Fi Options." This is where you customize your network name and password.
- Start It Up! Click "OK," and finally, check the box next to "Internet Sharing" to activate it. Other devices can connect now.
Troubleshooting Triumph: Conquering Common Connectivity Challenges
Even with the most straightforward processes, hiccups might occasionally arise. Fortunately, they are often easily resolved. For instance, if you can't find the Mobile Hotspot option in Windows, it could be due to outdated drivers. Update your network adapter. Similarly, ensure your laptop's WiFi adapter is enabled. If devices cannot connect, double-check the password. Therefore, a little patience goes a long way.
Beyond the Basics: Advanced Tips & Tricks
Consider these few bonus tips to further refine your WiFi extension efforts. Regularly update your laptop's network drivers for optimal performance. Furthermore, analyze your wireless environment. Identify and mitigate potential interference. Keep your laptop’s software up to date.
Embracing the Freedom: The Perks of Router-Less WiFi Expansion
The advantages are compelling. Firstly, you save money on buying dedicated extenders. Secondly, this method is incredibly convenient, especially when traveling or in temporary locations. Moreover, it's a flexible solution, adapting to different scenarios.
Security Savvy: Protecting Your Extended Network
While this method is convenient, security should always remain a priority. Use strong, unique passwords for your hotspot. Further, ensure your laptop's security software is up-to-date. Regularly monitor connected devices.
The Takeaway: Your Laptop, Your Wireless Champion
Your laptop is more versatile than you think. It’s more than just a productivity tool; it's a WiFi powerhouse, capable of bridging internet gaps. So, next time you're battling a weak signal, remember this trick. Unleash your laptop’s hidden potential. Enjoy a seamlessly connected digital life.
Acer Laptop Driver WiFi: The SHOCKING Fix You NEED!Laptop WiFi Extender Trick: Router-Less Internet!
Hey there, fellow internet adventurers! Ever been in a situation where your Wi-Fi signal is weaker than a kitten's meow? Or perhaps you’re traveling, and the only internet available is that sketchy public Wi-Fi that makes your data feel like it’s running through molasses. Well, buckle up, because we're about to dive into a nifty trick that'll let your laptop magically become a Wi-Fi extender, effectively giving you router-less internet! It's like turning your trusty workhorse into a digital sherpa, carrying your internet connection further than you ever thought possible. We'll explore how to make this happen, troubleshooting any hiccups along the way. Get ready to say goodbye to those frustrating dead zones!
1. Unleashing the Power: What is a Laptop Wi-Fi Extender?
Think of your Wi-Fi signal as a radio wave, broadcasting information. Now, imagine that radio wave doesn't quite reach where you need it to. A Wi-Fi extender, in its simplest form, is like a signal booster. It grabs the existing Wi-Fi signal, amplifies it, and rebroadcasts it, extending its reach. The cool part is, with the right know-how, your laptop can act as this very extender! It's like having a portable Wi-Fi superhero, always ready to save the day (or at least your internet connection).
2. The Setup Symphony: Prerequisites for This Clever Trick
Before we get started, let's make sure you have the right tools for the job. You'll need:
- A Laptop: (Duh!) Preferably one that runs on Windows (it's usually easier to configure this trick on Windows, but we’ll touch on the Mac option too) with a Wi-Fi adapter.
- A Wi-Fi Connection: You need to be connected to a working Wi-Fi network. Think of it as your launching pad.
- A Little Tech Savviness: Don't worry, we’ll keep it simple. We're not building the internet from scratch here.
3. Windows Wonders: Turning Your Laptop into an Extender
Here's where the magic happens, step-by-step, for Windows users:
- Step 1: Open the Command Prompt (Admin): Search "cmd" in your Windows search bar, right-click "Command Prompt," and select "Run as administrator." This is crucial.
- Step 2: The Magical Command: Type the following command and hit Enter:
netsh wlan set hostednetwork mode=allow ssid="YourNetworkName" key="YourPassword"(Replace "YourNetworkName" and "YourPassword" with the desired network name and password for your new extended Wi-Fi. Choose something unique and memorable!) - Step 3: Start the Hosted Network: Next, type and Enter:
netsh wlan start hostednetwork(This kicks off the virtual Wi-Fi network).
The Why Behind the Command: We're basically instructing your laptop to create a second, virtual Wi-Fi network, separate from the one it's already connected to.
4. Bridge the Gap: Sharing the Internet Connection
Our laptop is now broadcasting a signal, but it doesn't have internet access yet. We need to share the existing connection. Here's how:
- Step 1: Open Network Connections: Type "view network connections" in the Windows search bar and open the result.
- Step 2: Share the Connection: Right-click on your connected Wi-Fi adapter (the one you're using to get online), and select "Properties."
- Step 3: Internet Connection Sharing (ICS): Go to the "Sharing" tab. Check the box that says "Allow other network users to connect through this computer's Internet connection."
- Step 4: Choose Your Virtual Adapter: In the "Home networking connection" dropdown menu, select the virtual network adapter you just created (it will likely be a name like "Microsoft Hosted Network Adapter").
- Step 5. Apply the Settings: Click OK. And that's it!
5. Mac Mavericks: Adapting the Extender Trick
While the process is a bit different on macOS, the principle is the same. The main tools are:
- Internet Sharing: Mac has a built-in "Internet Sharing" feature, accessible through System Preferences.
- Wi-Fi Configuration: You configure which connection you want to share (the one receiving internet) and how.
Note: macOS has more stringent security protocols. There are ways to overcome some of these hurdles, but the specifics depend on your particular setup. A quick search for "macOS internet sharing" will give you a more tailored solution.
6. Troubleshooting Troubles: When Things Go South
Technology, as we know, can be as temperamental as a toddler. Here are some common issues and how to handle them:
- "The Hosted Network Failed to Start": Make sure you ran the Command Prompt as administrator. Double-check your command syntax for typos.
- Clients Can't Connect: Ensure your password is correct. Try restarting your laptop. Disable and re-enable the Wi-Fi adapter in your Network Connections settings.
- Slow Speeds: This is expected to some degree. The extender shares the existing bandwidth. The further away from the main connection, the slower it gets.
- "No Internet Access": Make sure you correctly enabled Internet Connection Sharing. Also, double-check that your original Wi-Fi connection has internet access.
7. The Power of Hotspot Software: An Alternative Route
There are several software programs (like Connectify and others) designed to make this process even easier. These tools provide a user-friendly interface for creating a Wi-Fi hotspot from your laptop. They often handle the complexities of network configuration behind the scenes.
8. Security Savvy: Protecting Your Digital Fortress
Remember, when you create a Wi-Fi hotspot, you're effectively opening up your internet connection to others. That's why security is vital:
- Strong Passwords: Use a strong, unique password for your extended Wi-Fi network.
- Encryption: Ensure your Wi-Fi network is using WPA2 or WPA3 encryption.
- Monitor Connected Devices: Keep an eye on who is using your network. If you spot any suspicious activity, disconnect the device.
9. The Mobility Marvel: Perfect for Travelers
This laptop extender trick is invaluable when traveling. Think about hotel rooms with terrible Wi-Fi, or those situations where you only have one Ethernet cable to share. Now you can extend that connection to all your devices!
10. Unleashing the Potential: Creative Uses Beyond the Obvious
The applications go beyond just boosting your Wi-Fi signal:
- Guest Network: Create a dedicated network for guests in your home, separating them from your main network for added security.
- File Sharing: Use the extended network to share files seamlessly between devices on your laptop.
- Testing Networks: Network admins find it an excellent tool for testing or troubleshooting a network configuration.
11. Limitations to Consider: What You Should Know
This trick has its limitations such as:
- Distance and Obstacles: Just like a regular router, the signal strength degrades over distance. Obstacles like walls can also reduce performance.
- Bandwidth Sharing: The extended Wi-Fi shares the bandwidth of your original connection. Expect slower speeds than if you were directly connected to the primary router.
- Laptop Battery Life: Operating as a Wi-Fi extender consumes more power, which can drain your laptop's battery quicker.
- Not a Replacement for a Router: This is not a long-term solution to your Wi-Fi woes, and it might not work in all situations. A good router should still be your primary source for internet access.
12. Enhancing the Experience: Tips and Tricks
Here are some quick tips to maximize your success:
- Positioning: Place your laptop in a central location for the best coverage.
- Antenna Awareness: If your laptop has an external antenna, try adjusting its position for optimal signal strength.
- Regular Reboots: Sometimes, a simple reboot can clear up network glitches and improve performance.
13. Mac vs. Windows: A Comparative Approach
Windows generally makes this setup procedure easier because it has a built-in functionality to set up the hotspot, whereas Mac has Internet Sharing that is built into its system. But each has its advantages and disadvantages. Overall, Windows is slightly easier to configure.
14. The Future of Router-Less Internet: Where We're Headed
The evolution of mobile technology will play a significant role in defining new technologies. Wi-Fi 7, 5G networks, and satellite internet will alter the way we connect to the internet. We are heading into a future of ubiquitous connectivity.
15. Final Thoughts: Embracing the Freedom
So, there you have it! Turning your laptop into a Wi-Fi extender is a fantastic hack that can solve various connectivity issues, allowing you to bypass the traditional router. It's easy to set up, very useful when traveling, and can even find a few creative uses. Now go forth and conquer those Wi-Fi dead zones!
Closing Section
We've
Unlock Your Hidden WiFi: Connect Your Laptop INSTANTLY!DON'T Buy A Wi-Fi Range Extender

By Techquickie DON'T Buy A Wi-Fi Range Extender by Techquickie
Boost Your Internet Speed by Using a Wi-Fi Extender with a Cable

By Gary Explains Boost Your Internet Speed by Using a Wi-Fi Extender with a Cable by Gary Explains
Set up TP-Link WA855RE as Ethernet Extender
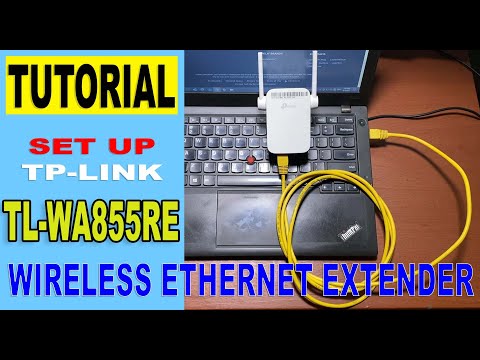
By Qurai Ryu Set up TP-Link WA855RE as Ethernet Extender by Qurai Ryu

Title: STOP making this WiFi Range Extender mistake and INSTANTLY get faster Internet
Channel: Liron Segev
STOP making this WiFi Range Extender mistake and INSTANTLY get faster Internet by Liron Segev
My Laptop Work
Laptop WiFi Extender Trick: Router-Less Internet!
Imagine a world where the shackles of a traditional router are broken, where internet access isn't tethered to a physical box and its often frustrating limitations. Picture a seamless, on-the-go connectivity solution; a digital life less constrained. This isn't futuristic fantasy; it's a readily achievable reality, accessible through a clever, often overlooked capability of your laptop. We’ll illuminate the path to harnessing your laptop's inherent potential to serve as a potent WiFi extender, creating internet access without the need for an external router. This article serves as your comprehensive guide.
Unveiling the Laptop's Hidden Power: Ad-Hoc Networking
At the heart of this capability lies the often-underutilized feature known as ad-hoc networking. This allows your laptop to function as a mini-access point, broadcasting a WiFi signal. Think of it as your personal, portable WiFi router, but built directly into your existing device. This eliminates the need for specialized hardware in certain situations, providing a cost-effective and efficient solution. Before diving into the granular steps, understand that ad-hoc networking leverages the existing WiFi adapter within your laptop. It's a software-defined function, not a physical modification, which means it's incredibly user-friendly and requires minimal technical expertise.
System Requirements and Preliminary Checks
Before we progress, it's essential to ensure system compatibility and adequate hardware support. The good news is that most modern laptops are fully equipped for this trick. The primary requirement is a WiFi adapter, which is standard in nearly all laptops produced in the last decade.
- Operating System: This method is generally supported on Windows 10, Windows 11, and to a slightly lesser extent, older Windows versions. macOS and Linux systems possess similar functionalities, but the specific implementation might differ.
- WiFi Adapter Drivers: Ensure your WiFi adapter drivers are up-to-date. Outdated drivers can lead to connectivity issues and prevent successful implementation. You can usually update drivers through your operating system's device manager.
- Physical Location: Consider the physical location of the device serving as the extender. Obstacles, like walls and distance, will affect the signal strength.
Step-by-Step Guide: Configuring Your Laptop as a WiFi Extender (Windows)
Let's walk through the process on a Windows operating system. The steps involve creating a virtual WiFi adapter and configuring its settings.
Open Command Prompt as Administrator: This is critical to execute the necessary commands. Search for "cmd" in the Windows search bar. Right-click on "Command Prompt" and select "Run as administrator."
Create a Virtual Hosted Network: In the Command Prompt window, type the following command and press Enter:
netsh wlan set hostednetwork mode=allow ssid="YourNetworkName" key="YourPassword". Replace "YourNetworkName" with the desired name of your extended WiFi network. Replace "YourPassword" with a strong password (at least eight characters long). This command sets up the virtual WiFi adapter, defining the network name (SSID) and security key.Start the Hosted Network: Once the network is created, you have to enable it. Enter this command at the Command Prompt and press Enter:
netsh wlan start hostednetwork. This command activates the WiFi network you've just configured.Share Your Internet Connection: This is where the magic happens. Open the "Network Connections" window. You can access this by searching for "View network connections" in the Windows search bar directly. Locate the network adapter connected to the internet (e.g., your Ethernet connection or your existing WiFi connection). Right-click on this adapter and select "Properties."
Enable Internet Connection Sharing: In the Properties window, go to the "Sharing" tab. Check the box that says "Allow other network users to connect through this computer's Internet connection." In the "Home networking connection" dropdown menu, select the virtual WiFi adapter you just created (it will usually have a name such as "Microsoft Hosted Network Virtual Adapter" or similar). Click "OK."
Connect Your Devices: On your other devices (phones, tablets, other laptops), search for available WiFi networks. You should see your new network name (the one you defined in Step 2). Connect to it using the password you previously set.
Troubleshooting Common Issues
Even with these clear steps, you might encounter minor issues. Here are some common fixes.
- "The hosted network couldn't be started. The group or resource is not in the correct state to perform the requested operation." This often means the virtual adapter isn't enabled. Try restarting your laptop. If that does not work, ensure your WiFi adapter drivers are current.
- No Internet Access on Connected Devices: Double-check your internet connection sharing settings (Step 5). Make sure you’ve selected the correct virtual adapter. Also, confirm that your laptop itself has internet access.
- Slow Speeds: The laptop is essentially relaying your internet connection. The speed will be dependent on the original internet connection speed and the quality of the WiFi signal. Physical obstructions and distance will impact the speed.
- Connectivity Drops: Interference is a common culprit. Other electronic devices can generate interference. Try moving the laptop to a different location to see if connectivity improves.
Extending the Range: Strategic Placement and Signal Enhancement
The effectiveness of your laptop as an extender hinges on its placement. Think of the laptop as a signal relay. For optimal performance:
- Central Location: Position your laptop in a central location within your home or office, where it can receive a strong signal from your primary internet source and distribute it effectively.
- Elevated Placement: Placing the laptop on a table, desk, or shelf improves signal propagation compared to placing it directly on the floor.
- Avoid Obstructions: Minimize the number of walls and other obstacles between the laptop and the devices connecting to it, and between the laptop and the original WiFi source.
- External Antennas (Optional): If your laptop offers external antenna ports, consider using external antennas for enhanced signal strength and range.
- Frequency Band Considerations: Most modern routers and laptops support both 2.4 GHz and 5 GHz WiFi bands. The 2.4 GHz band has a longer range but lower speed, while the 5 GHz band has a shorter range but higher speed. Experiment with the frequency band of your original internet source and the laptop extender to optimize performance.
Security Best Practices: Protecting Your Extended Network
While this trick is convenient, security is paramount.
- Strong Password: Always use a robust password for your extended WiFi network. Avoid easily guessable passwords.
- WPA2/WPA3 Encryption: Ensure the virtual network is configured for WPA2 or WPA3 encryption. These are the most secure encryption protocols.
- Regular Password Changes: Consider changing your password periodically to maintain security.
- Monitor Connected Devices: Keep an eye on the devices connected to your extended network through your router's settings. This will help you identify any suspicious activity.
- Enable Firewall: Ensure your laptop's built-in firewall is active and up to date.
Alternatives and Considerations: Router vs. Laptop Extender
While this laptop trick works exceptionally well, it has limitations. A dedicated WiFi extender or a mesh WiFi system often outperforms the laptop method, especially regarding speed, stability, and range.
- Dedicated Extenders: These devices are designed specifically for extending your WiFi network, offering better performance than a laptop.
- Mesh WiFi Systems: These systems use multiple units to create a comprehensive WiFi network throughout your home, offering superior coverage compared to both traditional routers and simple extenders.
- Power Consumption: Running your laptop as an extender constantly will consume power.
- Laptop Availability: You'll need to keep your laptop powered on and near your original WiFi source for this to function.
However, in numerous scenarios, the laptop extender is ideal.
- Travel and Temporary Situations: Ideal for use in hotels, temporary lodgings, or while traveling when a router isn't available.
- Cost-Effectiveness: It is a completely free solution, using existing hardware.
- Quick Setup: It is fast and simple to configure.
Conclusion: Maximizing Your Laptop's Potential
You've now unlocked the powerful hidden feature within your laptop, transforming it from a simple device to a versatile WiFi extender. This technique removes the reliance on a router. It is a powerful solution for individuals seeking to extend their WiFi coverage without investing in extra hardware. By embracing the techniques described within this guide, you can harness the full potential of your laptop. This makes sure you are able to enjoy seamless internet access, regardless of your location. Remember to prioritize security and adapt the setup to the specific requirements of your environment, and you'll be well on your way to a more connected and convenient digital life.
