how to make wifi hotspot from laptop windows 7

Title: How to Create a WiFi Hotspot with Windows 7
Channel: 1stepatatime
How to Create a WiFi Hotspot with Windows 7 by 1stepatatime
how to make laptop as wifi hotspot windows 7
**Unlock Your Laptop's Hidden Hotspot: Windows 7 WiFi Secret Revealed!**
Unveiling the Secret: Transform Your Windows 7 Laptop into a Wireless Hub!
Have you ever wished you could share your internet connection without a dedicated router? Perhaps you're traveling and a Wi-Fi source is scarce. Or, maybe you simply want to connect multiple devices at once. The solution, surprisingly, is already within your grasp. Ready to discover how? Well, let’s unlock the hidden potential of your Windows 7 laptop. This function allows you to create a fully functional wireless hotspot.
The Gateway to Wireless Freedom: Understanding Hosted Networks
Before we jump in, let's clarify a critical concept: hosted networks. Windows 7, in its inherent brilliance, allows you to transform your laptop into a virtual router. Basically, it's a software-defined hotspot. This means your laptop broadcasts a Wi-Fi signal. Consequently, other devices can connect. However, this feature often remains hidden, a well-kept secret. But don't worry: it's not complex. In fact, it's quite straightforward.
Decoding the Command Prompt: Your Key to Activation
The core of this method involves the Command Prompt. This is where the magic happens. It might seem intimidating, initially. However, the commands are remarkably simple. Thus, don't let the technical jargon scare you. We'll break it down step by step. First, locate the Command Prompt. Type "cmd" in the Start menu search bar. Right-click on "Command Prompt" and select "Run as administrator". This is a vital step. It grants the necessary permissions for the process.
Setting Up Your Virtual WiFi: The Command Line Blueprint
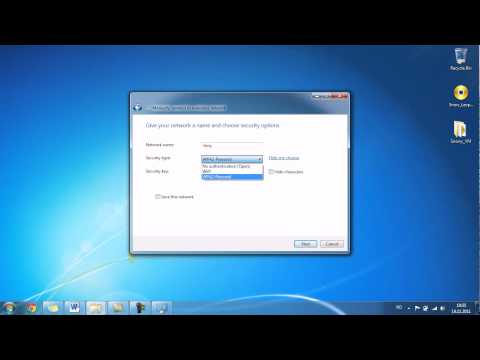
Now, for the exciting part: the commands. Once the Command Prompt window opens, type the following command, carefully: netsh wlan set hostednetwork mode=allow ssid="YourHotspotName" key="YourPassword". Replace "YourHotspotName" with your desired network name. Furthermore, replace "YourPassword" with a secure password. This command defines your hotspot settings. Therefore, pick a strong, memorable password. Press Enter after typing this out. Next, you'll enable the hosted network. Use this command: netsh wlan start hostednetwork. This command activates the virtual Wi-Fi adapter. You should see a confirmation message. That will indicate success.
Sharing Your Internet: Bridging the Connection
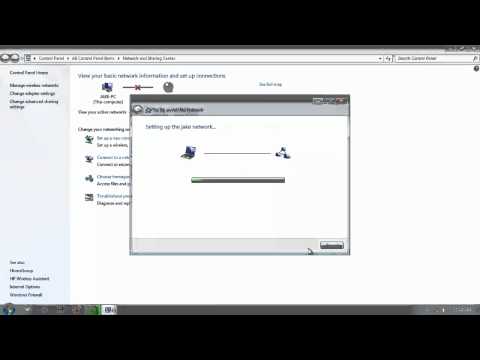
The hotspot is now broadcasting but isn't yet sharing your internet. Consequently, you need to configure internet sharing. Navigate to the "Network and Sharing Center" in your Control Panel. Then, select "Change adapter settings". You'll see a list of network connections. Identify the connection you're using to access the internet. This is usually your Wi-Fi adapter. Right-click on the connection. Select "Properties". Go to the "Sharing" tab. Check the box that says "Allow other network users to connect through this computer's internet connection." Select your hosted network connection from the dropdown menu. Click "OK" to save the settings.
Troubleshooting and Fine-Tuning: Ensuring a Smooth Experience
Sometimes, things don't go perfectly immediately. Therefore, troubleshooting is essential. First, ensure your Wi-Fi adapter is enabled. Secondly, double-check your commands for any typos. Also, verify your password meets the recommended complexity standards. If you face issues, restart your laptop. This can often resolve minor glitches. Furthermore, ensure your anti-virus software isn't blocking the connection.
Advanced Customization: Tailoring Your Hotspot Experience
Beyond the basics, you can further customize your hotspot. The netsh wlan show hostednetwork command displays detailed information. This includes the status of the hotspot. It will also display connected devices. You can also limit the number of devices. Sadly, this isn't doable directly. However, you can use third-party apps. They often offer more granular control.
Beyond the Basics: Real-World Applications
This hidden feature of Windows 7 proves incredibly useful. Picture this scenario: you're at a hotel with a single Ethernet port. You can share that connection with your other devices. Or, you can create a shared network for files. You can easily facilitate communication between devices. Ultimately, the possibilities extend beyond the confines of a single situation.
Security Best Practices: Keeping Your Connection Safe
Security is paramount. Therefore, always use a strong password. Moreover, regularly check connected devices. This way, you can identify any unwanted users. Additionally, consider enabling WPA2 encryption. This protects your connection from unauthorized access. Further, keep your Windows 7 system updated. Security patches are vital. They address vulnerabilities.
The Legacy of Windows 7: Celebrating a Powerful Feature
While Windows 7 is an older operating system, it remains capable. This hidden hotspot feature is a testament to its enduring value. Now, the knowledge you've gained should help in your day to day life. It offers considerable benefits to its users. Moreover, understanding such features enriches your overall computing experience.
Recap: Your Wireless Hub Simplified
In short, you can transform your Windows 7 laptop into a Wi-Fi hotspot. You can achieve this with simple Command Prompt commands. Remember the steps: enable the hosted network, configure sharing, and troubleshoot if needed. This is a powerful tool. So, embrace the wireless freedom it offers. Enjoy connecting on the go.
WiFi Laptop: The SHOCKING Truth You Need To Know!Unlock Your Laptop's Hidden Hotspot: Windows 7 WiFi Secret Revealed!
Hey there, tech enthusiasts! Ever found yourself in a Wi-Fi desert, desperately needing to connect your phone, tablet, or even another laptop? We've all been there, stranded and yearning for the sweet embrace of the internet. But guess what? Your trusty Windows 7 laptop might be a secret lifeline, hiding a powerful hotspot feature just waiting to be unleashed. That’s right, we’re talking about turning your laptop into a Wi-Fi router! And today, we're going to crack the code and unlock its hidden potential. Prepare to ditch the dependence on public Wi-Fi or a separate router – we're diving headfirst into the world of Windows 7's ad-hoc networking capabilities.
1. Why Windows 7's Hidden Gem Matters (And Why You Should Care!)
Think of your Windows 7 laptop as a Swiss Army knife of connectivity. Sure, it's great for checking emails and watching cat videos (no judgment!), but it's also a powerhouse that can share its internet connection. This is particularly useful in situations where:
- You're in a hotel with spotty Wi-Fi.
- You're visiting family who don't have a router.
- You're simply on the go and need to connect multiple devices.
It's like having a portable Wi-Fi router in your backpack, always ready to save the day! It’s a superpower, really.
2. Understanding the Ad-Hoc Magic: What's Really Happening?
Before we jump into the nitty-gritty, let's demystify the technical mumbo jumbo. Ad-hoc networking is essentially a direct connection between your laptop and other devices. It’s like a private party where your laptop is the DJ, broadcasting the internet connection. Unlike an infrastructure network (the kind you typically use at home), an ad-hoc network doesn't require a central access point like a Wi-Fi router. It's a direct line, just you and your connected devices.
3. Prerequisites: Getting Ready to Rumble
Before we begin, let's make sure we have everything in order. You'll need:
- A Windows 7 laptop (obviously!).
- A working internet connection on the laptop (Ethernet or Wi-Fi).
- The patience of a saint (it's not rocket science, but following instructions is key!).
- Your desired devices (phone, tablet, other laptop) you want to connect.
Alright, now that we’ve gathered our troops, let’s march forward!
4. The Command Prompt Command: Your Secret Weapon
This is where the magic truly begins. We're going to use the command prompt, a powerful tool, to orchestrate our Wi-Fi hotspot. Think of it as the conductor of our network orchestra. Here's the step-by-step guide:
- Open the Command Prompt: Click the Windows "Start" button, type "cmd" in the search box, and hit Enter. This launches the command prompt window.
- Run as Administrator: Right-click on the "cmd" icon and choose "Run as administrator." This gives us the necessary permissions to make changes.
- The Command: Type in the following command and then press Enter:
netsh wlan set hostednetwork mode=allow ssid="YourHotspotName" key="YourPassword"Replace "YourHotspotName" with the name you want to give your hotspot (e.g., "MyLaptopHotspot"). And replace "YourPassword" with a secure password you'll use for your hotspot connection. - Start the Hosted Network: Type the following command and press Enter.
netsh wlan start hostednetwork
That's it! You've just created your Wi-Fi hotspot. You may experience some errors at this point. Dont' worry, we will solve it in the next part.
5. Troubleshooting the Command Prompt: Common Hiccups and Solutions
Sometimes, things don't go perfectly the first time. Here are some common problems and how to fix them:
- "The hosted network couldn't be started." This is often due to an outdated or incompatible Wi-Fi driver. Go to your laptop manufacturer's website and download the latest driver for your network adapter.
- "The wireless feature is disabled." Make sure your Wi-Fi adapter is enabled. Go to Control Panel > Network and Sharing Center > Change adapter settings. Right-click on your Wi-Fi adapter and select "Enable."
- Password issues Be sure to create a stronger password. These tips are for all the times that we run into problems.
6. Sharing Your Internet Connection: The Final Touch
We've created the hotspot, but we still need to share our internet connection. Here’s how:
- Open Network and Sharing Center: Go to Control Panel > Network and Sharing Center.
- Change Adapter Settings: Click "Change adapter settings."
- Identify Your Internet Connection: Right-click on the connection you're using to access the internet (Ethernet or Wi-Fi).
- Sharing Tab: Select "Properties" and then go to the "Sharing" tab.
- Allow Other Network Users To Connect Through This Computer's Internet Connection: Check the box, "Allow other network users to connect through this computer's Internet connection."
- Select the Hosted Network: In the "Home networking connection" dropdown menu, select your hosted network (e.g., "MyLaptopHotspot").
- Click OK.
You are now prepared to share!
7. Connecting Your Devices: The Grand Finale
Now comes the moment of truth! On your phone, tablet, or other laptop:
- Scan for Wi-Fi Networks: Go to your device's Wi-Fi settings and scan for available networks.
- Select Your Hotspot: You should see the name of your new hotspot (e.g., "MyLaptopHotspot").
- Enter the Password: Enter the password you created and tap "Connect."
Voila! Your device should now be connected to the internet through your laptop.
8. Security First: Protecting Your Network
Remember, a strong password is your best friend! Also, keep an eye on connected devices to avoid unauthorized access. Consider enabling network discovery only when you need it for more security. It’s always crucial to prioritize online safety.
9. Stopping the Hotspot: Taking a Break
When you're done using the hotspot, you can easily stop it. In the command prompt (run as administrator):
netsh wlan stop hostednetwork
This will disable the hotspot until you choose to start it again.
10. The Power of Persistent Profiles: Making Life Easier
Want to avoid re-entering commands every time? You can create a persistent profile for your hotspot in Windows 7. This makes it easy to start and stop your network, improving convenience.
11. Beyond the Basics: Customization and Advanced Settings
While Windows 7's built-in features are great, there are some advanced options. For instance, you can change the channel your wireless adapter is using. This comes into play when your other devices will not connect.
12. Understanding the Limitations: Managing Expectations
Keep in mind that the speed and range of your hotspot depend on your laptop's Wi-Fi adapter and the strength of your internet connection. It might not be as fast as a dedicated router, but it works!
13. Visual Guide: Step-by-Step Screenshots (We'll Skip This)
Unfortunately, we can't add images directly. But the steps above should be clear enough… right?
14. The Benefits: Connectivity on Your Terms!
The benefits of using your laptop as a hotspot are numerous. It allows you to work and have fun on the go.
15. The Future of Connectivity: Looking Ahead
As technology evolves, we can expect even more seamless and versatile ways to share our internet connections. Until then, Windows 7 (and our shared knowledge!) remains a reliable companion.
Closing Thoughts
So there you have it! We’ve unlocked the secret of Windows 7's hidden hotspot. Now you have a powerful tool that can keep you connected wherever you go. It’s like having a pocket-sized Wi-Fi router, ready to spring into action whenever needed. It’s a fantastic solution for many situations, and it gives you more freedom and control over your internet access. Go forth, connect, and share the knowledge! And remember, technology is always evolving, so keep learning and exploring!
Frequently Asked Questions (FAQs)
- Is this safe to use? Yes, as long as you use a strong password for your hotspot.
- Can I use this with any internet connection? Yes, as long as your laptop has an active internet connection (Ethernet or Wi-Fi).
- How many devices can I connect to? The number of devices you can connect to will depend on your laptop's Wi-Fi adapter, but generally, it can handle several.
- **Will it drain my battery?
how to create a wifi hotspot on windows 7 Professional
By iTon how to create a wifi hotspot on windows 7 Professional by iTon
HOW TO CREATE A HOTSPOT IN WINDOWS 7 create hotspots with cmd

By Joko Gledeq HOW TO CREATE A HOTSPOT IN WINDOWS 7 create hotspots with cmd by Joko Gledeq
Create a laptop WiFi hotspot in under 30 seconds Windows 7
By jacobspeeds Create a laptop WiFi hotspot in under 30 seconds Windows 7 by jacobspeeds

Title: Cara Mengaktifkan Hotspot Wifi Laptop Windows 7
Channel: LAPTOP TUTORIAL
Cara Mengaktifkan Hotspot Wifi Laptop Windows 7 by LAPTOP TUTORIAL
Wifi Not Found
Unlock Your Laptop's Hidden Hotspot: Windows 7 WiFi Secret Revealed!
We've all been there: needing to share that precious internet connection when you're away from your home network. Perhaps your phone's data is dwindling, or maybe a guest needs to get online. While dedicated mobile hotspots are an option, your Windows 7 laptop already holds the key to a convenient, often overlooked, capability: creating a virtual WiFi hotspot. This guide unveils the straightforward process, enabling you to transform your laptop into a wireless access point, sharing your internet with other devices, all without the need to install additional software.
Understanding the Foundation: Hosted Network and Its Capabilities
Windows 7 possesses an inherent feature known as the Hosted Network. This functionality grants the ability to share your computer's internet connection over WiFi. It employs a software-based virtual adapter, essentially creating a second, independent network interface card (NIC) that broadcasts a WiFi signal. Crucially, your laptop's existing WiFi adapter serves as the primary connection, fetching internet access, which is then relayed through the virtual adapter. This means as long as your laptop itself has an active internet connection (Ethernet cable, existing WiFi) you can share it with other devices. The hosted network offers a secure means to share your connection. Users are required to enter a password, offering a layer of protection.
Step-by-Step: Initiating Your Windows 7 WiFi Hotspot
The process to establish your Windows 7 WiFi hotspot is generally straightforward, executed through the command prompt. Follow these steps meticulously to ensure successful creation of your virtual access point:
Launch the Command Prompt (Elevated): Begin by opening the Command Prompt as an administrator. To do this, search for "cmd" in the Windows Start menu. Right-click on "Command Prompt" and select "Run as administrator." This grants the necessary permissions to configure network settings.
Initiate the Hosted Network: Within the elevated Command Prompt, type the following command and press Enter:
netsh wlan set hostednetwork mode=allow ssid="YourHotspotName" key="YourPassword"Replace "YourHotspotName" with the desired name for your hotspot (e.g., "MyLaptopHotspot"). Avoid spaces in the name. Replace "YourPassword" with a secure password of at least eight characters. Ensure you choose a strong password to protect your network. This password will be required for any device to connect to your hotspot. Consider using upper and lower case letters, numbers, and symbols.
Start the Hosted Network: After successfully setting up the hosted network, you need to start it. Enter the following command and press Enter:
netsh wlan start hostednetworkThis activates your hotspot and starts broadcasting the wireless signal.
Share Your Internet Connection: The final step involves sharing your existing internet connection with the newly created hotspot.
- Open the "Network and Sharing Center" (search for it in the Start menu).
- Click on "Change adapter settings."
- Identify the network connection that provides your internet access (e.g., your Ethernet connection or your existing WiFi connection).
- Right-click on that connection and select "Properties."
- Navigate to the "Sharing" tab.
- Check the box that says "Allow other network users to connect through this computer's Internet connection."
- In the "Home networking connection" dropdown menu, select the "Microsoft Virtual WiFi Miniport Adapter" (this is the virtual adapter created by the Hosted Network).
- Click "OK."
These actions ensure your internet connection is routed to the virtual WiFi adapter, allowing other devices to access the internet through your hotspot. The sharing setting will be applied.
Troubleshooting Common Issues: Ensuring Smooth Operation
While the setup process is usually seamless, you may encounter challenges. Here’s how to resolve frequently observed problems.
"The hosted network couldn't be started." This error often arises due to driver issues or conflicts. Try the following:
- Update your WiFi adapter drivers: Go to the Device Manager (search for it in the Start menu), expand "Network adapters," right-click your WiFi adapter, and select "Update driver software." Choose "Search automatically for updated driver software."
- Restart your WiFi adapter: In Device Manager, right-click your WiFi adapter and select "Disable." Then, right-click again and select "Enable."
- Ensure the WLAN Autoconfig service is running: Type
services.mscin the Start menu search box and press Enter. Find the "WLAN Autoconfig" service. Ensure that it's running and set to "Automatic" startup. If it's not running, right-click it, and select "Start."
Devices Cannot Connect: If devices can see your network but cannot connect, check these points:
- Verify the Password: Double-check that you're entering the correct password when connecting. Passwords are case-sensitive.
- Network Name Visibility: Some devices might not detect hidden networks. Ensure your hotspot name isn't hidden.
- Firewall Interference: Your firewall might be blocking connections. Temporarily disable your firewall (especially third-party firewalls) to test. If this resolves the issue, you'll need to configure your firewall to allow connections on your WiFi adapter.
- Driver Conflicts: Ensure that you are using the correct drivers for your WiFi adapter.
Limited or No Internet Access: If devices connect but have no internet access, double-check the following:
- Internet Connection Sharing: Confirm that you've properly enabled internet connection sharing, as described in step 4 above.
- Check your main internet connection: Ensure your laptop is connected to the internet (Ethernet cable or existing WiFi).
- IP Address Conflicts: Although rare, an IP address conflict might occur. However, the process of internet sharing usually automatically handles the allocation.
Advanced Customization and Further Refinement
While the basic process outlined above is sufficient for most users, Windows 7 offers a degree of customization to further tailor your hotspot experience.
Changing the Hotspot Name and Password: You can modify the hotspot name and password through the command prompt. To do this, you must first stop the hosted network by typing
netsh wlan stop hostednetworkinto the command prompt. Then, run thenetsh wlan set hostednetwork mode=allow ssid="NewHotspotName" key="NewPassword"command, substituting your desired new name and password. Finally, restart the hotspot usingnetsh wlan start hostednetwork.Checking the Status of Your Hosted Network: To view the status of your hosted network (including its state, the SSID, the number of connected devices, etc.), use the command
netsh wlan show hostednetwork.Enabling the Hosted Network Upon Startup: To have your hotspot automatically start when your computer boots, you can create a scheduled task.
- Open Task Scheduler (search for it in the Start menu).
- Click "Create Basic Task."
- Give the task a name (e.g., "Start Hotspot").
- Choose a trigger (e.g., "When I log on"). This will trigger the task when you log in to your account.
- Choose an action: "Start a program."
- In the "Program/script" field, type
cmd.exe. - In the "Add arguments" field, type
/c netsh wlan start hostednetwork. - Click "Finish."
This task will automatically start the hosted network each time you log in.
Understanding the Role of Adapters: A key aspect to grasp is the relationship between your physical WiFi adapter, the virtual adapter created by the hosted network, and your Ethernet connection (if applicable). When your laptop connects to the internet through Ethernet, the laptop sends data to the WiFi virtual adapter. In cases where you connect to the internet through WiFi, it is sent to the virtual adapter. The sharing capability is the element that allows this process to occur.
Security Considerations: Protecting Your Connection
While the hosted network does offer password protection, it's imperative to implement strong security measures to safeguard your connection and data.
Use a Strong Password: Employ a strong password (a minimum of 12 characters is recommended), combining uppercase and lowercase letters, numbers, and symbols. Avoid using easily guessable information such as personal names or dates.
Keep Your Windows 7 Updated: Ensure that Windows 7 is fully updated, including security patches. While Windows 7 is out of official support, it still receives some security updates. Regularly update your system, even if you're not using it as your primary machine.
Monitor Connected Devices: Check the status information of the hosted network to monitor the devices connected to your hotspot. If you notice any suspicious devices, immediately change your password or disable the hotspot.
Consider Encryption (though unlikely on Windows 7): On more modern systems, WPA2 or WPA3 encryption would be considered superior to standard WPA, but these might not be available in Windows 7. Ensure your hotspot uses the strongest encryption your adapter supports.
Conclusion: Unleashing the Power of Your Windows 7 Laptop
Creating a WiFi hotspot on your Windows 7 laptop is a valuable skill. It allows you
