huong dan cai dat wifi tren laptop

Title: Cch Kt Ni WiFi Cho Laptop Hng Dn n Gin v Hiu Qu
Channel: An Nhin
Cch Kt Ni WiFi Cho Laptop Hng Dn n Gin v Hiu Qu by An Nhin
hướng dẫn cài đặt wifi trên laptop, hướng dẫn cài đặt wifi cho laptop, hướng dẫn cài đặt wifi cho laptop win 7, hướng dẫn cài đặt wifi trên máy tính, hướng dẫn cách cài đặt wifi trên laptop, hướng dẫn cài đặt internet cho máy tính, cach cai dat wifi tren laptop, hướng dẫn cài đặt mạng internet cho máy tính, cach cai dat wifi tren may tinh, hướng dẫn cài đặt usb wifi cho máy tính bàn
Laptop WiFi Setup: The SHOCKINGLY Easy Guide (No Tech Skills Needed!)
Conquering WiFi: Your Laptop's Wireless Revelation (Seriously Easy!)
So, ready to banish those frustrating internet woes? You’ve probably battled a flaky connection. Perhaps you've wrestled with overly complicated tech manuals. Breathe easy. Setting up WiFi on your laptop should be simple. Honestly, it can be a breeze. This guide breaks down the entire process. You’ll be browsing in no time. No tech wizardry is needed, I promise.
Decoding the Wireless World: A Quick Primer
First things first: let's keep things simple. Your laptop uses a wireless network adapter. This little marvel works with your router. The router, in turn, is the gateway to the internet. Think of it as a digital toll booth. It manages traffic. Wireless networks use radio waves. They transmit data between your laptop and the router. It’s pretty cool. Understanding this helps. Now, let's connect!
Step-by-Step: Your WiFi Setup Adventure
Okay, let’s dive in! The following are easy steps to get up and running.
Unleashing the Wireless Switch: Locate your laptop's WiFi switch. It might be a physical button. It could also be a key combination. Commonly, it is found on the keyboard. Look for an icon that resembles a radio tower. Press it to enable wireless functionality. Sometimes it's labeled "Fn" plus another key. Check your laptop’s manual if you're unsure. Alternatively, glance at your system tray. See a network icon? Good.
Hunting for Networks: Click the WiFi icon. It is usually found on the bottom right corner. It can also vary depending on your operating system. A list of available networks will appear. These are all the wireless signals in range. They are waiting to be joined.
Selecting Your Network: Identify your home network. It is usually the name of your router. If you do not know the name, check your router. It may be labeled on the device itself. Select your network's name. Then, click "Connect".
Entering Your Password: Prepare your network security key. This is also known as the password. It is a string of characters. It’s designed to keep your connection secure. You’ll likely find it on your router's sticker. Or perhaps you previously set it up. Type the security key carefully into the required field. Double-check it, just in case. Then, click "Next" or "Connect."
Success! (Hopefully) Your laptop will try to connect. If everything is correct, you'll connect in seconds. You will see the network icon change. It’ll probably indicate you have internet access. Congratulations. You're now wirelessly connected!
Troubleshooting: When Things Go Sideways
Sometimes, WiFi doesn't cooperate. Don’t panic! Here are a few common fixes:
- Restart Everything: Try restarting both your laptop and your router. It often works wonders. Many issues can be solved this way.
- Check the Password: Double-check that you entered the right password. Case sensitivity is important. It’s a very common mistake. Try again.
- Distance Matters: Are you too far from the router? Signal strength diminishes over distance. Move closer.
- Router Reboot: The router might need a reboot. Unplug it. Let it sit for a minute. Then, plug it back in.
- Driver Issues: Your network adapter might have a driver issue. This isn’t a common issue but it happens. Update your network adapter drivers. Search for your "laptop model update drivers". Then, seek for the network adapter driver online.
- Contact Support: If all else fails, contact your internet service provider. They are designed to assist you.
Beyond the Basics: WiFi Tips & Tricks
Now you’re connected, here are some useful tips:
- Network Security: Always use WPA2 or WPA3 encryption. This is the gold standard for security.
- Guest Network: Set up a guest network. It isolates your main network. This offers extra protection.
- Strong Passwords: Use strong, unique passwords. The longer, the better.
- Router Placement: Position your router in a central location. This maximizes coverage.
- Update Your Router Firmware: Keep your router's firmware updated. This improves performance and security.
Final Thoughts: Embrace the Wireless Life
Setting up WiFi on your laptop is not a daunting task. It is quite straightforward, actually. You've now learned the key steps. Moreover, you know basic troubleshooting. Take a deep breath. You can do this. Enjoy your new wireless freedom! You deserve it. After all, technology should serve you, not frustrate you. So go on. Browse, stream, connect. Enjoy the experience. You’ve earned it!
Laptop WiFi Connected, But No Internet? This SHOCKING Fix Works!Laptop WiFi Setup: The SHOCKINGLY Easy Guide (No Tech Skills Needed!)
Hey there, tech newcomers! Ever felt that knot of anxiety in your stomach when faced with anything remotely involving computers? Don't worry, we’ve all been there. Remember that time I spent a full afternoon trying to connect my printer? Let's just say, it involved more tears than triumphs. But guess what? Setting up your laptop’s WiFi? It's NOT like that. Seriously! It's so ridiculously simple, and we're going to prove it. Consider this your official permission slip to ditch the tech jargon and embrace the joy of seamless internet connectivity. Let's dive in; imagine it as a digital scavenger hunt where the treasure is… well, internet access!
1. Why WiFi Setup Seems Scary (But Isn't!)
Let’s be brutally honest: technology can feel intimidating. We’re bombarded with terms like "IP addresses," "routers," and "protocols," which often make us feel like we're staring into a foreign language. The good news? You don't need to understand any of that to connect your laptop to WiFi. It's a bit like driving a car. You don't need to know how the engine works to get from point A to point B. In this case, point A is your laptop, and point B is the glorious world of the internet! The fear often stems from the unknown. But once we break down the steps, you'll realize how incredibly straightforward it is.
2. Before We Begin: Gather Your Supplies (And Your Courage!)
Okay, so what do you actually need? Surprisingly little!
- Your Laptop: This might seem obvious, but you need the star of the show!
- Your WiFi Network Name (SSID): This is the name of your home WiFi network, the one your phone and other devices connect to. It's usually printed on your router, often on a sticker on the bottom or side. Think of it as the address for your WiFi.
- Your WiFi Password: This is your security key, protecting your network from unauthorized access. This is also typically found on your router, sometimes under the SSID. It's your secret handshake to the internet.
- A Tiny Bit of Patience: Just like baking a cake, sometimes things take a minute. Don't panic if it doesn't work immediately. We'll troubleshoot together!
3. The Magic Button: Finding Your WiFi Icon
This is the starting point of our journey! Look at the bottom right corner of your screen, near the clock. You'll see a little icon that looks like either:
- A set of curved lines, resembling a WiFi signal: This is the classic WiFi indicator.
- A small computer monitor with a cable plugged into it: This likely indicates a wired Ethernet connection, but don't worry; we're looking for the WiFi icon.
- An "X" over the Wi-Fi signal: This indicates that you are not connected to any network.
Once you've located it, it's time to click on it. This will open a list of available WiFi networks.
4. Spotting Your WiFi: The Network Detective
When you click the WiFi icon, prepare for a list of network names to appear – these are all the available WiFi networks in your area! Your goal is to find your network. It will be the one that matches the SSID you found on your router. Compare it to the list, and if you see it, then you're on the right track!
5. The Password Vault: Entering Your WiFi Password
Once you've found your network, click on its name. A window will pop up, prompting you to enter your password. This is where your "secret handshake" comes into play.
- Type Carefully: Double-check that you're entering the password correctly. It's case-sensitive, so capitalization matters!
- The "Show Password" Box: If you're unsure, check the "Show password" or "Reveal password" box (the phrasing varies depending on your operating system) to see what you're typing. It's like peeking at the answer key just to be sure.
- Hit "Connect" or "Join": Once you’ve entered your password, click the “Connect” or "Join" button.
6. The Moment of Truth: Did It Connect?
After you enter the password, your laptop will attempt to connect to the network. Watch your WiFi icon in the bottom-right corner.
- Look for a signal strength indicator: The curved lines, or the signal bars inside of the set of curved lines, will change as you get closer to your router, and as your internet connection strengthens.
- Check for confirmation: Check your screen where the network name, or SSID, is shown. This usually means you’re connected.
- If it doesn't connect: Don't panic! See the next steps, because we are troubleshooters!
7. Troubleshooting Titans: What If It Doesn't Work?
Sometimes, things don’t go perfectly the first time. Here are some common issues and quick fixes:
- Incorrect Password: This is the most common culprit. Double-check that you typed everything correctly, paying close attention to capitalization and special characters.
- Router Issues: Rebooting your router can often work wonders. Unplug it from the power outlet, wait about 30 seconds, and plug it back in. Give it a few minutes to fully restart. Think of it as the internet's version of a nap.
- Location Matters: Make sure you're not too far from your router or that your router is blocked. Walls and other obstructions can weaken the signal, so it will act like a barrier.
- Airplane Mode: Ensure Airplane Mode is OFF. This feature turns off all wireless communication, including WiFi.
- Contacting Your ISP: If all else fails, it might be an issue with your internet service.
8. WiFi on Windows: Step-by-Step Guidance
Let's get specific now! Here are the steps for connecting to WiFi on a Windows laptop (these steps are generally similar across different Windows versions):
- Click the WiFi Icon: Located in your system tray (bottom-right corner).
- Select Your Network: Click the name of your WiFi network from the list.
- Enter the Password: Type in your network password when prompted, and click "Connect."
9. Apple's Approach: WiFi on a MacBook
MacBooks make the process just as user-friendly:
- Click the WiFi Icon: In the top-right corner of your screen. It's a series of curved lines emanating from a central point.
- Choose Your Network: Select your network's name from the drop-down menu.
- Enter the Password (If Required): Type in your password, and click "Join."
10. Dealing With Hidden Networks: Playing Hide-and-Seek With WiFi
Sometimes, networks are hidden. This simply means the SSID (network name) isn't broadcasted. You'll need to manually add your network:
- Look for "Hidden Network" or "Other Network": In the list of available networks.
- Enter the SSID: Type in your network's name.
- Select Security Type: Choose your network's security protocol (usually WPA2 or WPA3; check your router settings if you're unsure).
- Enter Password: Type in your WiFi password.
- Click Connect:
11. Securing Your Connection: Keeping Your Data Safe
Connecting to WiFi is easy, but security is paramount, so it's not just all about connecting to your home network; here are some security tips:
- Strong Passwords: Use a complex password with a mix of upper and lower case letters, numbers, and symbols. Think of it as a fortress guarding your digital castle.
- Update Your Router's Firmware: Check your router manufacturer's website for updates. This improves security and fixes bugs.
- Avoid Public Networks: Be cautious when using public WiFi.
- Use a VPN: For added security, especially when using public WiFi, consider using a Virtual Private Network (VPN).
12. Mobile Hotspots: WiFi on the Go
Got a smartphone? You can often turn it into a mobile hotspot, allowing your laptop to connect to the internet, even when you're away from home.
- Enable Hotspot: This setting is usually found in your phone's settings, under "Personal Hotspot" or "Tethering."
- Find the Hotspot: Your laptop will see your phone's hotspot as a WiFi network, and it will show up as the name of your phone, followed by "Hotspot."
- Connect as Usual: Enter the hotspot's password.
13. Speed Test Time: Checking Your Internet Speed
Once you're connected, It can be great to test your internet speed!
- Search for "Speed test" on Google: Several speed test websites will appear.
- Run the Test: The test will measure your download and upload speeds. See if they match your internet plan.
14. What Would We Do Without a Strong
Echo Dot WiFi Setup: Laptop Trick That'll SHOCK You!2 cch M - Tt Wifi trn Laptop - Cho ngi mi s dng

By Khm ph cuc sng TV 2 cch M - Tt Wifi trn Laptop - Cho ngi mi s dng by Khm ph cuc sng TV
Ci t li internet cho my tnh - PosApp

By Phn mm qun l bn hng PosApp Ci t li internet cho my tnh - PosApp by Phn mm qun l bn hng PosApp
Cch M Wifi Trn LapTop Cc K D Dng
By Kin thc Tin hc Cch M Wifi Trn LapTop Cc K D Dng by Kin thc Tin hc
Title: Hng Dn Cch Hin Mt Khu Wifi Cho My Tnh Chy Window 10
Channel: TLD Digital
Hng Dn Cch Hin Mt Khu Wifi Cho My Tnh Chy Window 10 by TLD Digital
Laptop Wifi Connect
Laptop WiFi Setup: Your Stress-Free Guide to Instant Connectivity
We understand. The words "WiFi setup" may conjure images of tangled wires, cryptic error messages, and frustrating hours spent wrestling with technology. But what if we told you that connecting your laptop to WiFi – regardless of your tech expertise (or lack thereof!) – could be a remarkably straightforward experience? We're here to prove it. Prepare yourself for a refreshingly simple journey to seamless internet access.
Understanding the WiFi Landscape: A Quick Primer
Before we plunge into the practical steps, let’s briefly demystify some common WiFi terminology. Think of your WiFi router as a miniature broadcasting station, beaming out radio waves that your laptop can "catch." These waves carry the internet signal. Your laptop, equipped with a WiFi adapter (usually built-in), acts as the receiver, translating these waves into the webpages, emails, and streaming content you enjoy.
Essentially, you’ll need two things: your laptop’s WiFi capability and a functioning WiFi router. Most laptops manufactured in the last decade possess the necessary built-in WiFi adapter. The router is the box that’s probably already humming away in your home. It connects to your internet provider (like Comcast, Verizon, etc.) and distributes the signal wirelessly. Now, let's connect!
Step-by-Step: The WiFi Connection Revelation
The process is fundamentally the same, regardless of your operating system. We'll guide you through the typical steps for Windows and macOS, and we'll also provide some troubleshooting tips for more complex situations.
For Windows Users: The Effortless Route
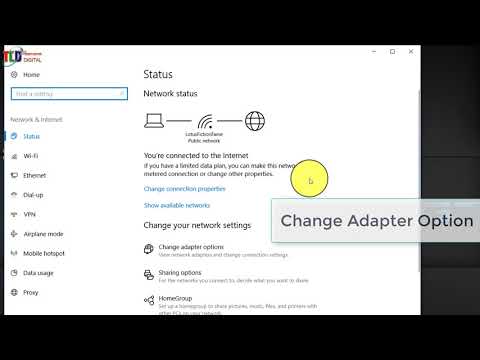
The Icon Hunt: Look at the bottom-right corner of your screen, near the clock. You're looking for a small icon that resembles a series of curved lines radiating outwards – that's the WiFi icon. It might also appear as a computer monitor with a radio wave signal. If you see a red "X" over the icon, that likely indicates a problem, but don't worry; we will resolve it.
The Network Whisper: Click on the WiFi icon. Windows will instantly scan for available WiFi networks within range. A panel will appear, displaying a list of networks. You may see the names of your neighbor's networks, especially if you're in an apartment or closely situated homes.
Selecting Your Network: Identify your home WiFi network's name (also known as the SSID, Service Set Identifier). This is usually the name you assigned to your network when you set up your router. Click on your network's name.
The Password Portal: A window will pop up, prompting you to enter your network's password (also referred to as the security key or passphrase). This password is designed to protect your network from unauthorized access. You should have received the password from your internet service provider (ISP) or set it during the router setup. Enter the password carefully, paying close attention to capitalization. There is usually an option to view the password as you type it.
The Connection Confirmation: Once you enter the correct password, click "Connect." Windows will attempt to connect to the selected WiFi network. A few moments later, assuming the password is correct, the WiFi icon will transform from a scanning signal to a filled-in signal, which indicates you are now connected to the internet.
Browsing Brilliance: Open your favorite web browser (Chrome, Firefox, Edge, etc.) and navigate to a website. If the page loads successfully, congratulations! You're online. If there is an issue, continue to the troubleshooting steps.
For macOS Users: A Simplified Approach
The Menu Bar Beacon: Look for the WiFi icon in the top-right corner of your screen, in the menu bar. It functions similarly to Windows' WiFi icon – a series of curved lines.
The Network Selection: Click on the WiFi icon. A drop-down menu will appear, displaying a list of available WiFi networks.
Choosing Your Connection: Select your home WiFi network's name from the list.
The Password Requirement: You'll be prompted to enter your network's password. Enter it meticulously, paying attention to case sensitivity.
The Connection Achieved: Click "Join." macOS will attempt to connect. If the password is valid, the WiFi icon will indicate a strong connection, and you will be able to browse the internet.
Web-Surfing Success: Open your web browser and test the connection.
Troubleshooting: Conquering Connectivity Challenges
Sometimes, things don’t go quite as planned. Here are some common issues and solutions.
"Cannot Connect to This Network": Verify that you're entering the correct password, including capitalization and special characters. Double-check the password on your router’s label if you are unsure. Restarting your router by unplugging it from the power source for 30 seconds can sometimes resolve temporary glitches.
"Limited or No Connectivity": This often suggests a problem with your internet connection rather than your laptop’s WiFi. Restart your router. If that doesn’t work, contact your ISP to check for outages.
WiFi Icon with an "X": This usually indicates that your laptop's WiFi adapter is disabled. On Windows, go to Settings > Network & Internet > WiFi. Ensure the WiFi switch is turned "On." On macOS, go to System Preferences > Network. Make sure WiFi is "On."
Slow Internet Speed: WiFi speeds can be affected by distance from the router, physical obstructions (walls, furniture), and interference from other devices. Move closer to the router. Consider upgrading your router if it's outdated, as newer models support faster WiFi standards.
The "Airplane Mode" Trap: Ensure that "Airplane Mode" is turned off. On Windows, you might find this in the Action Center (accessed by clicking the notification icon in the bottom right). On macOS, look in the menu bar for the airplane icon.
Driver Deficiencies: Very rarely, an outdated or corrupted WiFi driver may cause problems. On Windows, go to Device Manager (search for it in the Start menu). Expand "Network adapters" and right-click on your WiFi adapter (e.g., "Intel Wireless-AC"). Choose "Update driver." On macOS, driver updates are typically handled automatically through system updates.
Securing Your WiFi Network: A Shield Against Intrusion
Once you've successfully connected, it's vital to ensure your WiFi network’s security.
Strong Passwords are Essential: Use a strong and unique password for your WiFi. A strong password is at least 12 characters long and combines uppercase and lowercase letters, numbers, and symbols. Avoid using easily guessable information like your birthdate or pet's name.
Encryption Matters: Ensure your router uses WPA2 or WPA3 encryption. These are more secure than older encryption protocols like WEP. You can typically find your router’s encryption settings in its web-based configuration panel.
Router Admin Access: Change your router's default administrator password. This prevents unauthorized access to your router’s settings. The default admin password is often found on the router itself.
Beyond the Basics: Advanced WiFi Exploration
For those seeking deeper knowledge:
WiFi Standards: Learn about different WiFi standards (802.11a/b/g/n/ac/ax). These standards define the speed and range of your WiFi network. Modern routers support the latest standards (like Wi-Fi 6, or 802.11ax), which provide faster speeds and improved performance.
Channel Selection: Your router broadcasts on a specific "channel." In crowded environments (like apartment buildings), multiple routers using the same channel can cause interference. Consult your router’s manual or online resources to learn how to change your WiFi channel to mitigate interference.
Guest Networks: Consider setting up a guest network. This allows visitors to connect to the internet without giving them access to your primary network and the devices connected.
Celebrating Your Connectivity Triumph
Congratulations! You've navigated the process of connecting your laptop to WiFi. This guide should empower you to conquer any WiFi setup challenges that come your way. Start enjoying your newly-established connection. Feel free to revisit this resource should the need arise. With these steps, you are ready to work and play online, wherever your laptop takes you!
